

The Worker Page: Overview, Controls, and Live Surfaces
Every Virtual Worker has its own page. It is where a supervisor answers the three questions that matter once a worker is hired: is it healthy, what is it doing, and how do I stop or restart it safely. The page opens on the Overview, a live dashboard of the worker's container, its AI accounts, and its work, and its tabs reach every other view of the worker, from its configuration to the terminals and editors its slots run in. After this page you will be able to read a worker's health at a glance, use each lifecycle control for the job it was made for, and look over a running worker's shoulder without taking its keyboard away.
Open a worker from Virtual Workers in the app's sidebar and choose Configure on its card. The person who hired the worker can use its whole page, within what their role allows, and people it is shared with can read its Overview and Calendar and see its Configure steps read-only. Your organization's owners and administrators see every worker on the roster and can use its lifecycle controls and part of Configure, as The Configure Wizard sets out, but for a worker someone else hired, its Overview, Calendar, and account details load for them only if the worker is shared with them.
The Tabs
After this section you will know what each tab is for. The tab strip runs across the top of the page in this order:
- Overview. The live dashboard described below.
- Configure. The eight-step wizard that sets everything about the worker. See The Configure Wizard.
- Email. Shown only while the worker has an inbox; opens that inbox in Backbuild Mail. See A Worker's Inbox and Calendar.
- Calendar. The worker's week: work hours, holidays, and invitations.
- Terminal, VS Code, and Desktop. The live surfaces of the worker's container. They are available while the container is running and greyed out otherwise.
- Logs. A timeline of the container's lifecycle events, such as when work was dispatched and completed, and when an agent exited or the container ran short of memory.
The tab strip works from the keyboard: the Left and Right arrow keys, Home, and End move between tabs, and Enter or Space opens the one you are on. After a refresh the page returns to the tab you were using, except the live surfaces, which wait until you open them again.
Reading the Overview
After this section you will be able to tell from the Overview whether a worker is healthy and why it is or is not taking work.
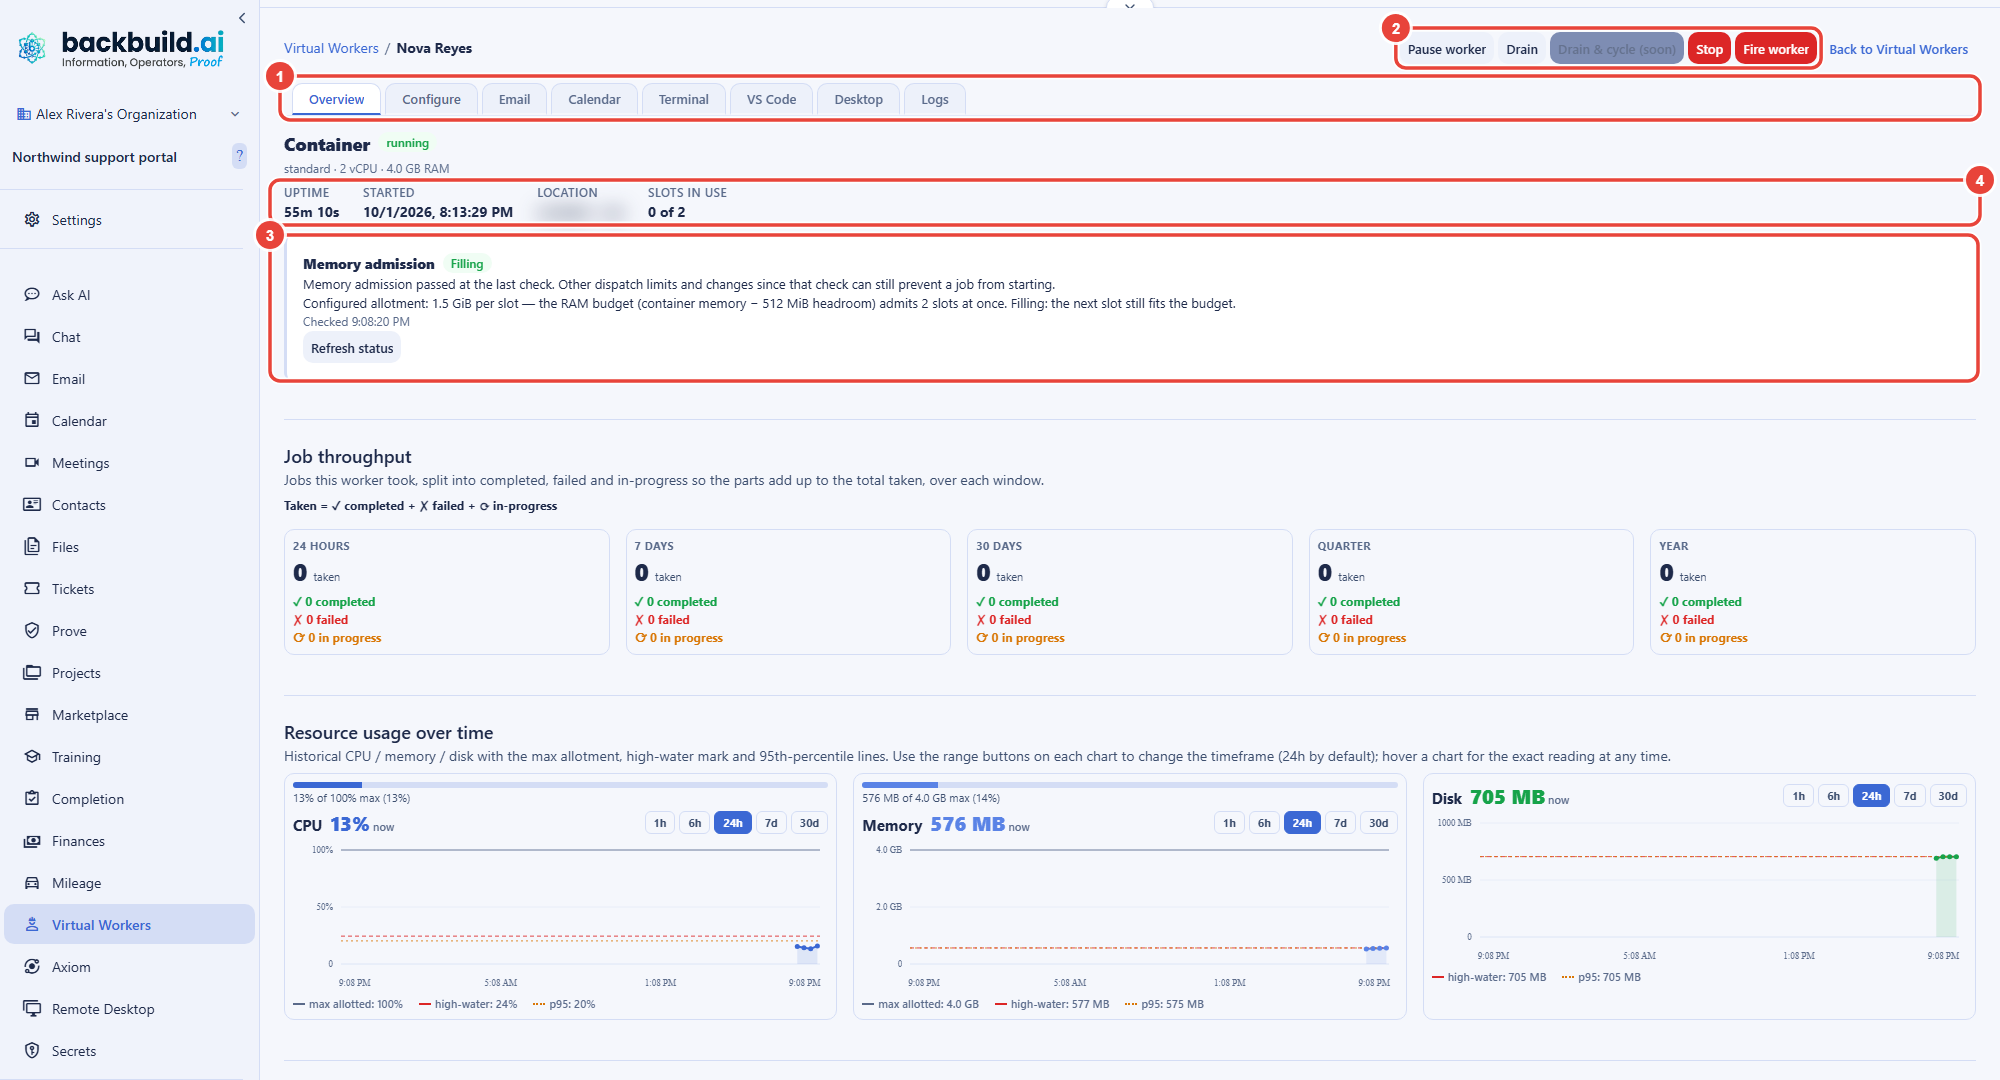
- Container. The container's state and size, how long it has been up, when it started, where it runs, and how many of its slots are busy. A worker never runs more than one container at a time.
- Memory admission. Whether the next job fits in the container's memory. Filling means another slot still fits the budget; RAM-capped means filling has paused until memory frees, and the panel shows the memory figures behind that decision; RAM gate off means the worker fills every configured slot without consulting memory. The panel shows when it last checked, and Refresh status checks again. The allotment and the fill rule are set in Configure step 2.
- This worker cannot start yet. A red banner appears when one of the worker's slots runs a coding tool that has no AI account linked and no Universal Usage Credits source. It names the tool and offers Open AI accounts, which jumps to the step that fixes it.
- Job throughput. The jobs the worker took over the last 24 hours, 7 days, 30 days, quarter, and year, each split into completed, failed, and in progress so the parts add up to the total.
- Resource usage over time. CPU, memory, and disk charts with the allotted maximum, the high-water mark, and the 95th percentile, over 1 hour to 30 days. Hover a chart for the exact reading.
- AI tools & accounts. Every account linked for each coding tool, with its availability, its slot cap, and its measured usage, described in the next section.
- Slot occupancy. Each slot of the container, busy or idle, with the ticket or task it is working on and the stage that assigned it, plus a history of how many slots were in use.
- Automatic workload. The help desk workflow stages the worker staffs automatically.
Account Usage and Sign-in Health
Coding-agent providers limit how much an account can do in a rolling 5-hour window and in a week. For every linked account the Overview, and the account pool in Configure step 5, show two meters, 5h and Week, with the percentage used and the time each window resets, plus a meter for any model that has a limit of its own. The meter that is actually holding the account back is highlighted, and a maxed meter turns red.
- Not measured yet. A window that has never been measured says so. It is never shown as zero, because "not checked" and "nothing used" are different facts.
- Measured. Each account shows how long ago its usage was last measured, so a percentage is never read without its age. How often usage is re-checked is set in Configure step 2.
- A maxed account sits out until its window resets and then returns to the pool on its own; the worker keeps working on its other accounts.
- Sign-in expired, re-link. When a provider revokes an account's sign-in, the account shows Sign-in expired · re-link in red instead of a usage limit or a stale percentage. A revoked sign-in does not recover by waiting: choose Re-link (or link it again in Configure step 5) to return it to the pool. A running worker picks up the re-linked account without restarting its container.
- Shared credential. If two pooled accounts turn out to be the same sign-in, each is flagged as sharing one credential, with the fix: re-link one of them so the pool really holds two accounts.
The Lifecycle Controls
After this section you will be able to stop, start, and restart a worker without losing work. The controls at the top right of the page change with the worker's state. Each has one job:
| Control | When it appears | What it does |
|---|---|---|
| Pause worker / Resume worker | Pause on an active worker, Resume on a paused one | Pausing hands the worker no new work while it keeps its configuration and its shift. Resume puts it back to work. |
| Start | No container is running | Starts the worker's container. Disabled while a slot's tool has no AI account or credits source. |
| Drain | The container is running | Fences off new work, lets the worker finish what it is already doing, then closes the container cleanly. In-flight work is not interrupted. Asks you to confirm first. |
| Drain & cycle (soon) | The container is running | Shown but greyed out: it is not available yet. To move a worker onto a fresh container today, use Drain and then Start. |
| Stop | The container is running | Tears the container down immediately. Use Drain when work is in flight. |
| Fire worker | Any worker that is not already fired | Deactivates the worker after you confirm. It stops accepting work and moves to the Deactivated tab, keeping its configuration, its connections, and its inbox. |
| Re-hire worker | A fired worker | Brings the worker back with everything it had. |
| Activate worker | A newly hired worker | Moves it from provisioning to active so it can be given work. |
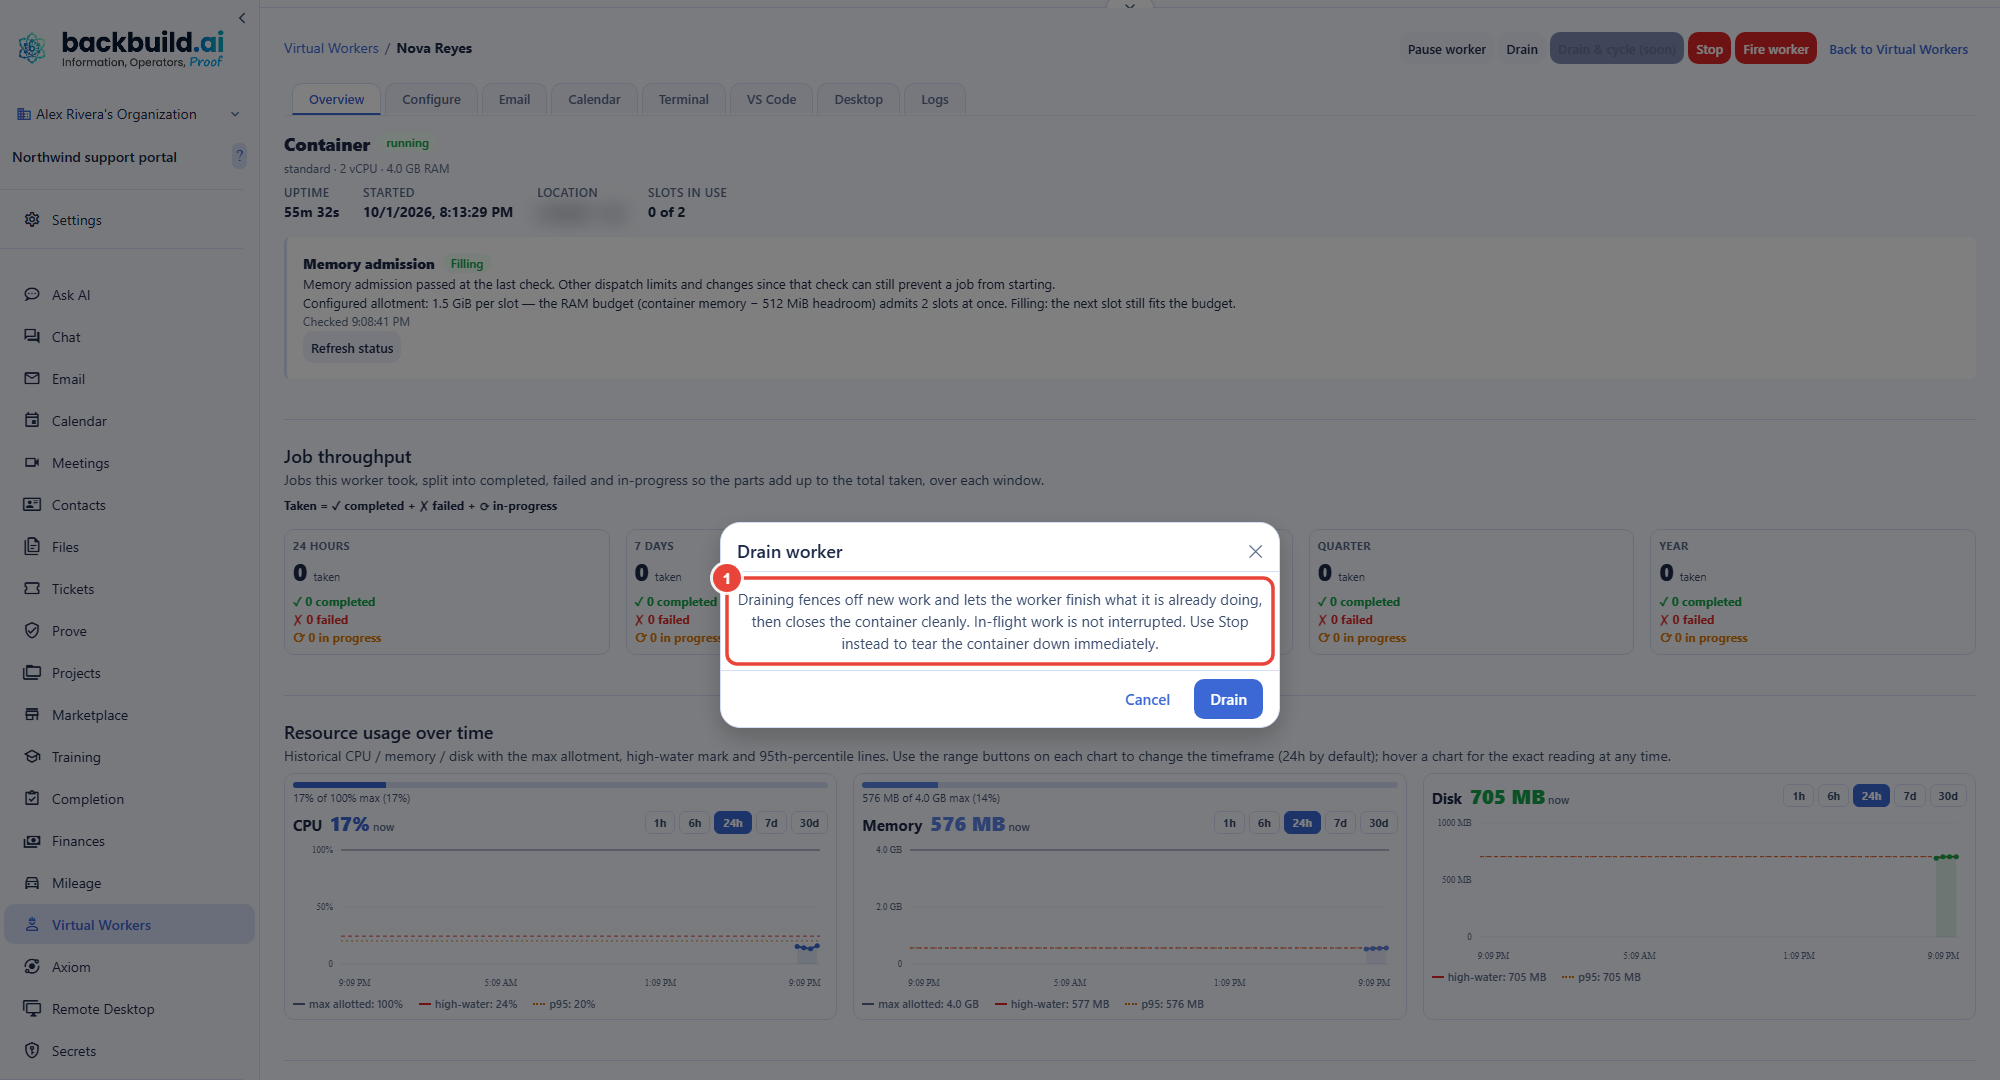
There is also a Drain switch in Configure step 1, for keeping a worker drained for as long as you need. Set it to Draining and the worker finishes what it is doing but claims nothing new, while its container stays up; the step shows how many tasks are still in flight, then Fully drained, safe to restart. Switch it back to Active to resume.
What is the difference between Pause, Drain, and Stop? Pause stops handing the worker new work; it is about the worker, not its container. Drain finishes the work in flight and then closes the container. Stop closes the container at once.
Why is Start greyed out? Every slot of the worker runs a coding tool, and each tool needs a linked AI account or a Universal Usage Credits source before the container can start. The red banner on the Overview names the tool; Open AI accounts takes you to the fix. A credits source lets the container start, but in this release a slot's coding tool runs only on a linked account: on credits alone the slot stays idle. For Claude Code, Codex, and Gemini CLI its terminal says it is waiting for an account to be linked.
Watching a Running Worker
After this section you will be able to look at what a worker is doing without getting in its way. While the container runs, three tabs show it live. They open for the person who hired the worker and for its human manager, and the Desktop tab also needs a role that allows connecting to desktops. An administrator of your organization's containers can also open its Terminal and VS Code tabs, and a person whose role lets them connect to container terminals can open its Terminal tab. Being able to see or edit the worker does not by itself open them.
- Terminal. One terminal tab per slot, each labelled with the slot and its tool, such as Slot 1 · Claude Code. You see the coding agent work in real time.
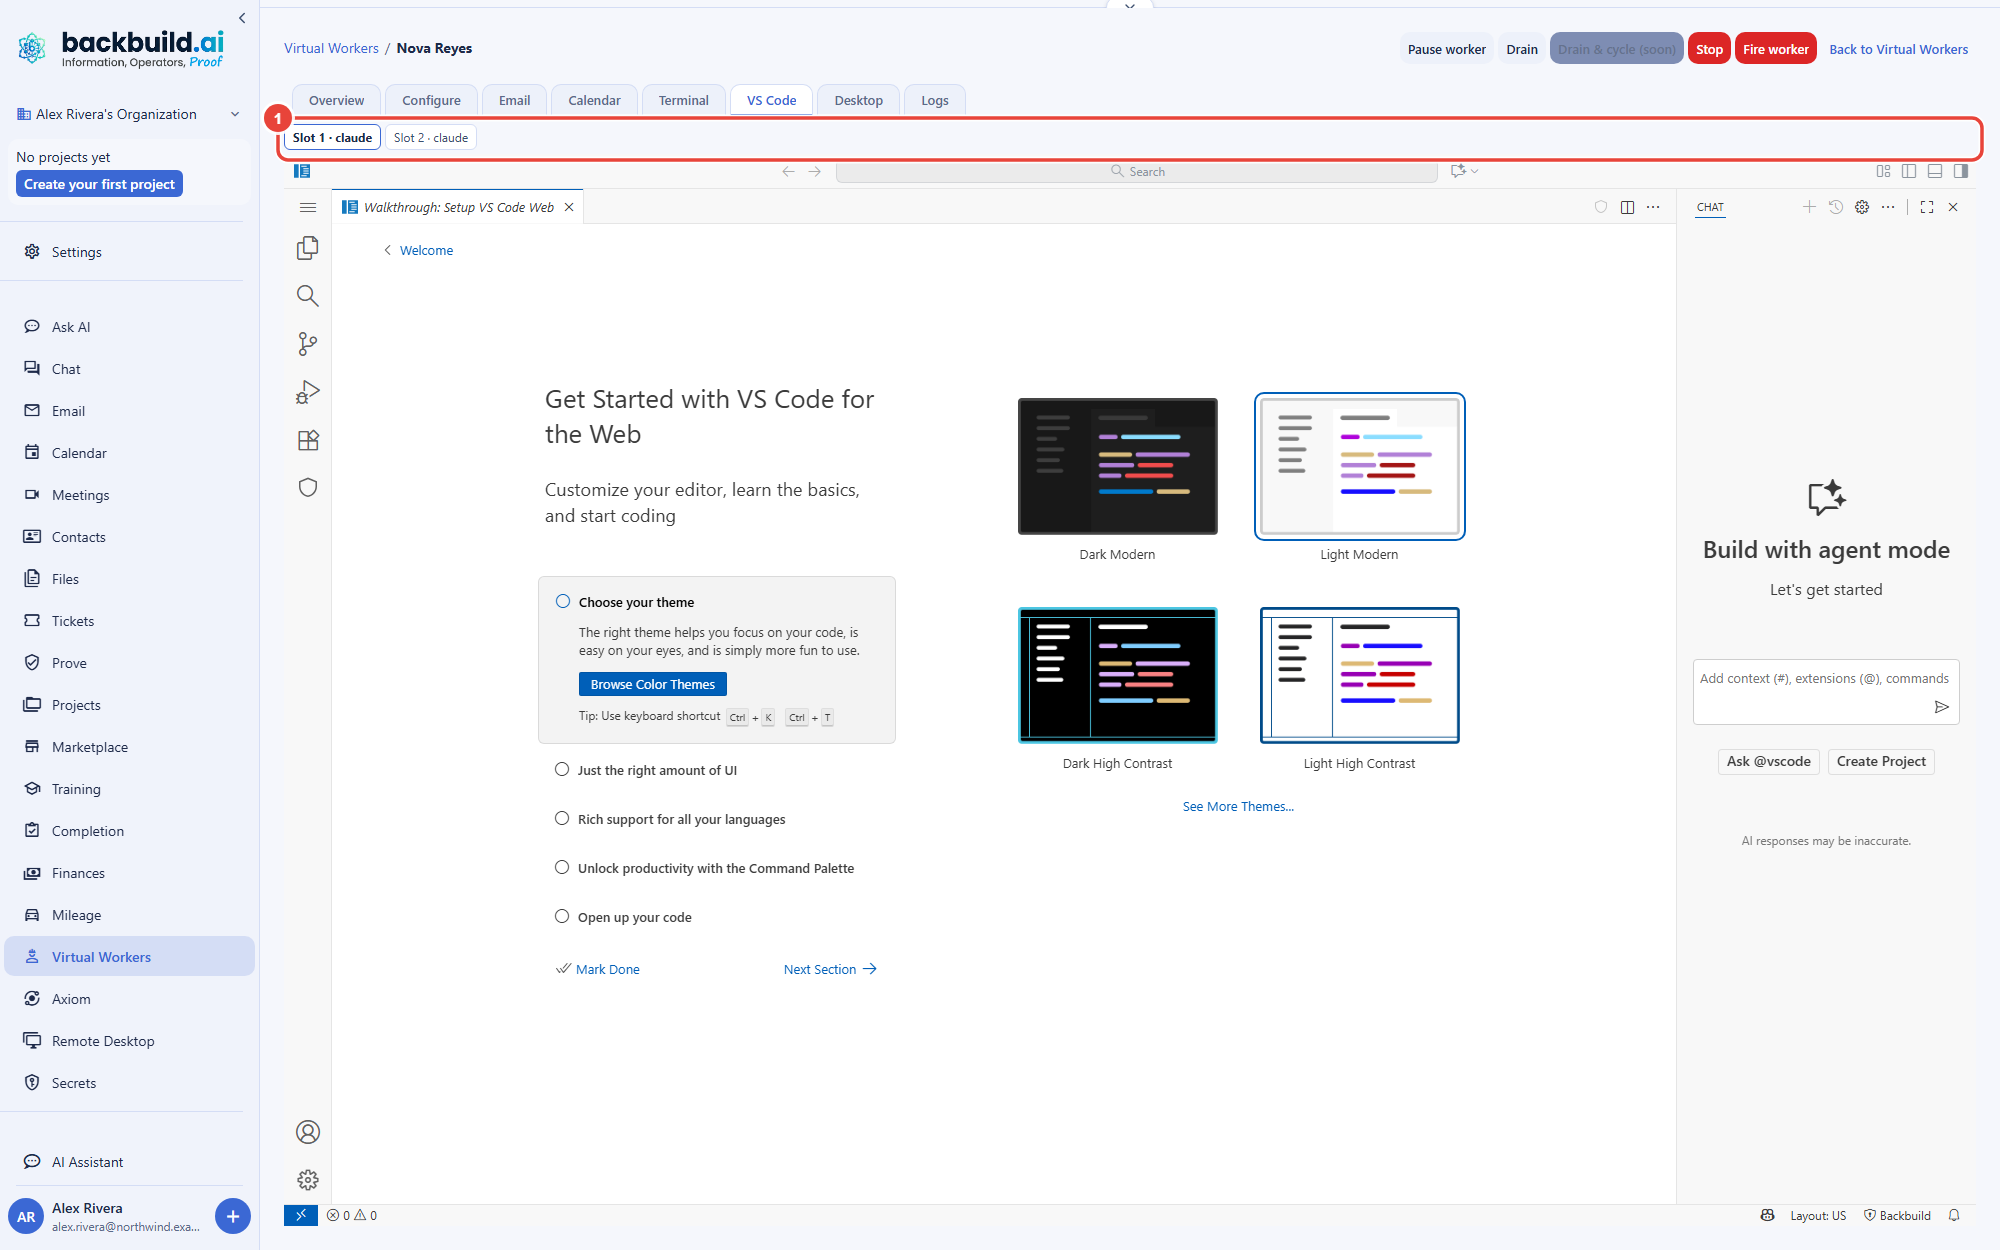
- VS Code. One VS Code editor per slot, chosen from a strip of slot tabs above the editor, so you open exactly the slot whose files you want to read. An editor you have opened keeps its state while you switch between slots. In the Backbuild desktop app, the tab asks you to open the worker in a browser to use VS Code.
- Desktop. The container's graphical desktop, for the browser and apps the worker drives. See Terminal, VS Code, and Desktop.
Read-Only Until You Take Control
Opening a worker's terminal should not mean typing into a session the worker is using. The worker's Connect in read-only mode by default setting, in Configure step 2, decides what happens when you switch to one of its terminals:
- Off (the default): you control a terminal you are allowed to drive the moment you switch to it.
- On: every terminal of the worker opens read-only, slot tabs included, and shows a Take control button. You watch until you choose to take over.
The setting changes how a terminal opens, never who may use it. Whether you can drive a worker's terminal at all is still decided by who may open it, as described above, and one person holds control of a terminal at a time; taking control is granted and recorded like any other control of the terminal. For your own containers, the same choice lives in your personal terminal settings.
Where to Next
- The Configure Wizard: slots, RAM per slot, fill by RAM, where the worker runs, and its AI accounts.
- A Worker's Inbox and Calendar: the Email and Calendar tabs.
- Autonomy and Approvals: what the worker may do on its own, and the two capabilities locked to Always supervised.
- Backbuild Containers: the container a worker runs in.