

Secrets from the CLI
This guide teaches you to run your applications with secrets injected at
launch instead of scattered across .env files. By the end you will have
authorized your machine against the zero-knowledge vault, verified the
authorization the right way, wired secrets run into your
daily workflow, and learned the grant lifecycle well enough to manage a
whole team's machines.
Why Replace .env Files
A .env file is a plaintext copy of your most sensitive values sitting in your working tree, one careless commit away from a repository and one backup away from places you never intended. Multiply that by every developer machine and every project checkout, and "where are our secrets" stops having an answer.
The Backbuild Secrets CLI inverts the model: secrets live encrypted in the vault, your machine is explicitly authorized to read them, and values are injected into your process's environment at the moment you launch it. Nothing is written to disk, there is one authoritative copy, and removing a machine's access is one action instead of a hunt.
How the Vault Protects You
Three properties define the security model you are working with:
- Zero-knowledge encryption. Vault contents are encrypted on your device with keys derived from your vault master password, using hybrid post-quantum cryptography. Backbuild stores only ciphertext and cannot read your secrets. Decryption happens locally, on the machine you authorized.
- Machine identity. Each machine gets its own identity keypair with a human-readable fingerprint. Access is granted to a specific machine, scoped to specific vaults, with an expiry. You always know which machines can read what.
- OS keystore required. The CLI stores machine keys in your operating system's secure keystore and refuses to operate without one. Keys are never dropped into a dotfile.
Step 1: Create Your Machine Identity
On the machine that needs vault access, generate its identity keypair:
backbuild secrets keygen
The command prints the machine's fingerprint, a short human-comparable
string that uniquely identifies this machine's key. You will compare this
fingerprint during authorization, so keep the terminal open or note it.
Running keygen again with --force replaces the
identity, which invalidates existing authorizations for the old one.
Check the current identity's fingerprint and key state at any time with:
backbuild secrets statusStep 2: Authorize the Machine
Authorization is a deliberate ceremony, not a silent token exchange. After this section you will know exactly what each step proves.
backbuild secrets login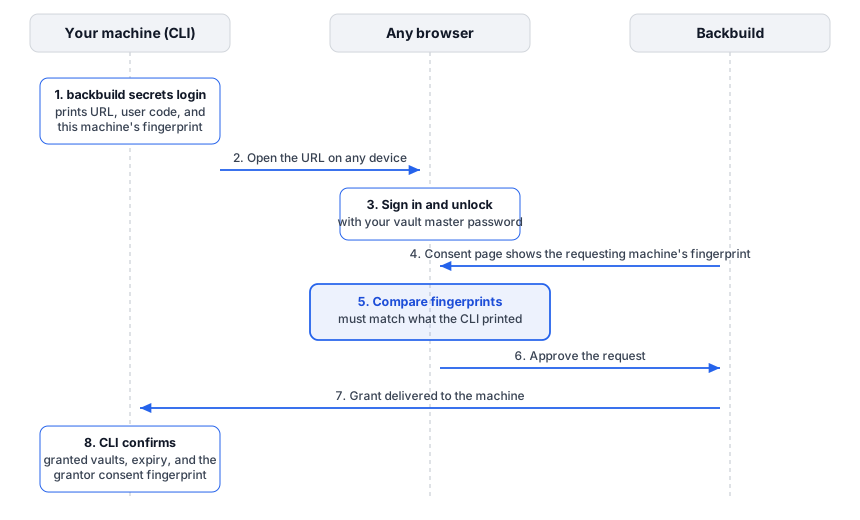
- The CLI prints a verification URL and a short user code. Open the URL in any browser on any device. This is why the flow works from SSH sessions and headless machines: the browser does not need to be on the same computer.
- You authorize in the browser. Sign in to your account and review the request. The consent page shows the requesting machine's fingerprint, asks for your vault master password to unlock, and then requires a fresh second-factor confirmation before anything is granted, even inside a signed-in session.
- Compare the fingerprints. The fingerprint on the consent page must match the one your CLI printed. A match proves you are authorizing your machine's key, not an attacker's machine that raced you to the code.
- Choose what to grant, approve, and the CLI confirms. You pick the vault access to grant, and the CLI prints the vaults you were granted, the grant's expiry, and a grantor consent fingerprint. Comparing that value out-of-band closes the loop in the other direction: the grant your machine received is the one you approved.
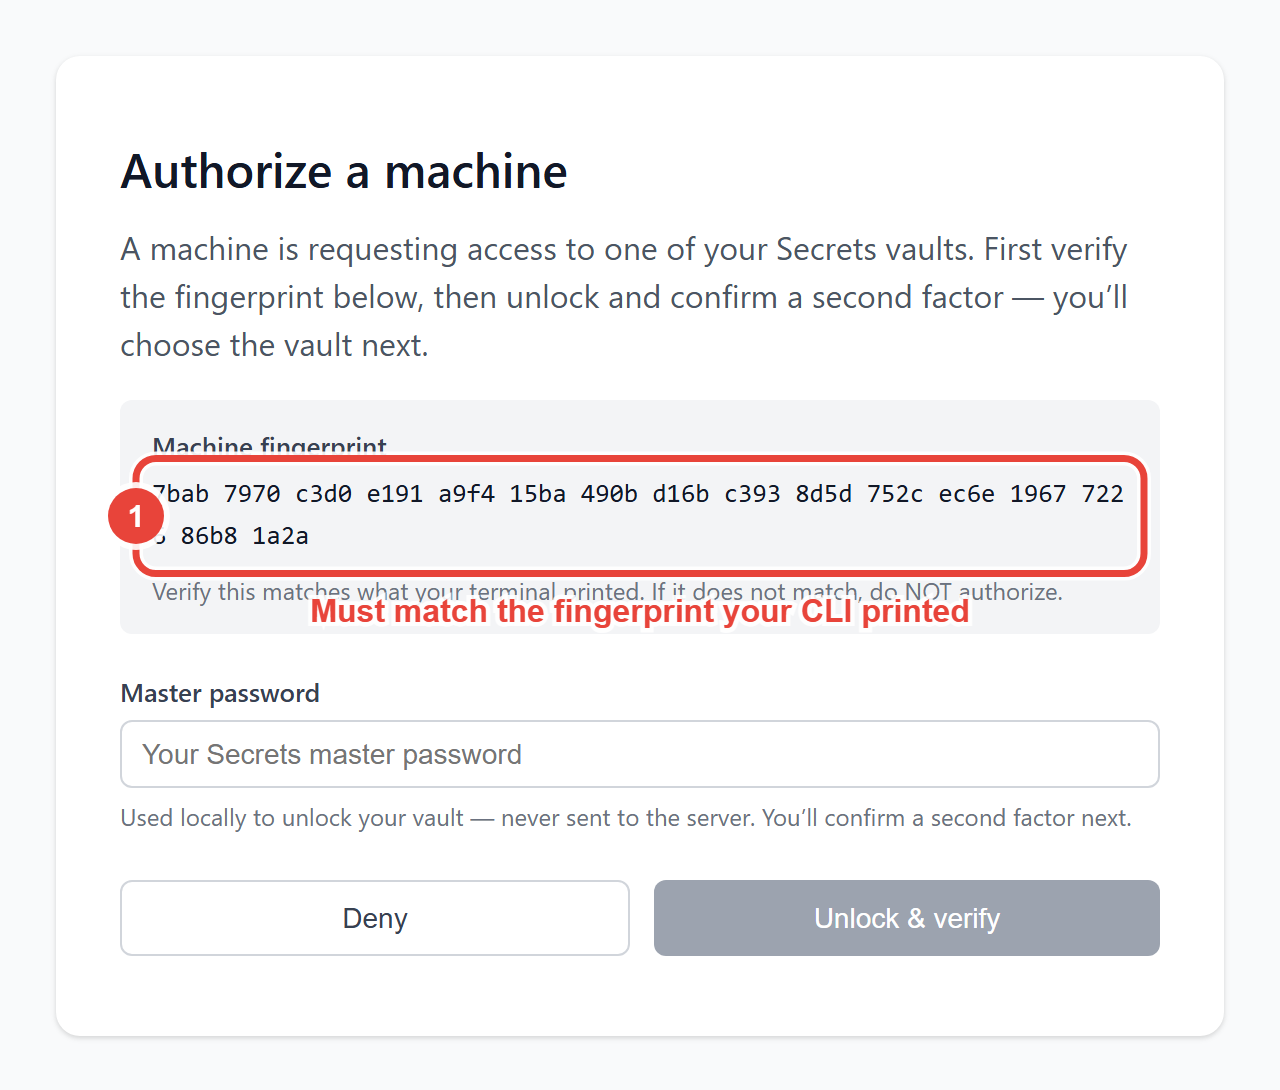
Only approve a code that you initiated moments ago on a machine you control. If a code or authorization request ever arrives unprompted, by chat, email, or a colleague "just needing a quick approve", decline it. Unsolicited approval requests are how device-authorization phishing works, and declining is always the correct answer.
Everyday Use
Run your app with secrets injected
This is the command that replaces the .env file. It launches any command with your vault secrets projected into that process's environment:
# Instead of copying and editing a .env file
backbuild secrets run npm run dev

# Any command works
backbuild secrets run python manage.py runserver
Secrets exist only in the launched process's environment, only for its lifetime. Nothing is written to disk, nothing lingers in your shell environment after the process exits, and there is no file to accidentally commit.
Read a secret
# List your items; every value is masked
backbuild secrets get

# Show the values in the listing, only when you explicitly ask
backbuild secrets get --reveal

# Print one field's value in plaintext, for scripts and pipes
backbuild secrets get --name DATABASE_URL

# Dump all items and values as JSON, for tooling
backbuild secrets get --json
The listing masks every value unless you pass --reveal, so a
screen share, a pasted terminal log, or a recorded demo does not become an
incident. Selecting a single field with --name (or
--field) prints that one value in plaintext, which is exactly
what scripts and pipes need; --json likewise emits values in
plaintext. Treat the output of both like the secret it is: it goes to your
terminal or wherever you redirect it, on purpose.
Store a secret
# The value is read from stdin, never from the command line
backbuild secrets set --name STRIPE_KEY
# (paste the value, press Enter)

# Or pipe it
cat key.txt | backbuild secrets set --name STRIPE_KEY
set deliberately refuses a value passed as an argument.
Command-line arguments land in shell history and are visible to other
processes on the machine; stdin is neither. If you try to pass the value
positionally, you get a usage error, not a stored secret.
Export when a file is unavoidable
backbuild secrets export --format dotenv
backbuild secrets export --format shell
backbuild secrets export --format json
Some tools insist on a file. export writes plaintext to
standard output in dotenv, shell, or
json form, and from that moment the output is your
responsibility: redirect it somewhere safe, never into a tracked file,
and remember that shell redirection lines can end up in history and
build logs. Prefer secrets run whenever the tool allows an
environment variable, and treat export as the exception.
Working with Multiple Vaults
If your grant covers more than one vault, commands that read or write
require an explicit --vault ID. The CLI never silently picks
a vault for you, because "the wrong production database URL, quietly" is
exactly the class of surprise a secrets tool must not produce. Your
granted vault IDs are printed when the authorization completes, so note
them then; omitting --vault on a multi-vault grant gets a
clear error that lists the IDs your grant covers.
The Grant Lifecycle
Understanding grants end to end is what makes this manageable across a team:
- Scope: a grant covers specific vaults for one machine identity. Different machines get different grants.
- Expiry: grants expire. When one does, commands fail with a clear message telling you to run
backbuild secrets loginagain; nothing goes stale silently. - Ending access from the machine:
backbuild secrets logoutremoves the machine's authorization (add--yesto skip the confirmation). - Ending access from the vault side: revoke the machine's access in the app's Secrets management. This is your offboarding lever: a departed laptop loses access without touching the machine itself, and without re-keying every secret it could once read.
- Identity health: if the machine identity is found broken or half-initialized, the CLI repairs it and warns you that the fingerprint changed. A changed fingerprint means previous grants no longer apply to this identity; authorize again and compare the new fingerprint.
CI and Shared Machines
A CI runner or build box is authorized the same way as a workstation, once, during setup:
- On the runner, run
backbuild secrets keygen, thenbackbuild secrets login. Because the approval happens in a browser on any device, you can complete it from your own machine using the printed URL and code. - Once authorized, jobs use
backbuild secrets runorsecrets get --jsonnon-interactively until the grant expires. - Grants expire by design, so schedule re-authorization into your runner maintenance rather than discovering expiry in a failed deploy. The expiry is printed when the grant is issued; record it in your runner maintenance schedule.
Two constraints to plan for: the runner needs an operating system secure
keystore available (the CLI refuses to store machine keys without one),
and each runner should have its own identity so revoking one machine
never disturbs the others. Secret values appear in output only when a job
explicitly requests them (--reveal, a --name
selector, --json, or export), which keeps CI
logs clean by default.
Troubleshooting
- "Grant expired" (or commands suddenly demand authorization): run
backbuild secrets loginagain and re-compare fingerprints. This is routine, not a fault. - The CLI refuses to run, citing no secure keystore: the machine has no OS keystore available. This is a protection, not a bug; enable your platform's keystore rather than looking for a way around it.
- Warning that the machine identity was repaired and the fingerprint changed: the old identity was unusable. Re-run
secrets loginand verify the new fingerprint on the consent page. - "Multiple vaults" error: pass
--vault IDexplicitly. The CLI will not choose for you. - A command printed masked output when you needed the value: add
--revealto show every value in the listing, or select the one field you need with--name, which prints it in plaintext. Masking is the default for the listing.
Frequently Asked Questions
Can Backbuild read my secrets?
No. Vault contents are encrypted on your device before upload and
decrypted only on machines you have authorized. The platform stores
ciphertext. This is also why nobody can email you a reset for your vault
master password.
What does the fingerprint comparison actually prove?
That the key being authorized is the one on your machine. The consent
page shows the requester's fingerprint; your CLI printed yours. If they
match, you authorized your machine. The grantor consent fingerprint the
CLI prints afterwards proves the reverse direction: the grant your
machine holds came from the approval you performed.
My laptop was lost or stolen. What is the blast radius?
Revoke that machine's access in the app and its grant is dead. The vault
itself remains encrypted, and the thief does not have your vault master
password. Rotate any secrets the machine had recently read if your
policy calls for it, then get back to work.
Is secrets run really safer than a .env file?
Yes, categorically. A .env file is at-rest plaintext that every backup,
sync tool, and git add . can pick up. secrets run
puts values in one process's environment for one lifetime, with a single
revocable grant behind it and one authoritative copy in the vault.
Does export defeat the purpose?
Used casually, it can. It exists for tools that cannot read environment
variables. Keep its output out of tracked files and logs, and reach for
it only when run cannot do the job.
Where is the vault's master password in all this?
You enter it in the browser during the authorization ceremony, never
into the CLI. See
the master
password explainer for what it is and why it is unrecoverable.
See Also
- CLI Reference: the full command surface, configuration, and exit codes
- Getting Started: account creation and the vault master password
- Security & RBAC: organization-level access control