

Making a Training Video: the Word Timeline, Cues, and Actions
A Backbuild Studio training video is a narrated walkthrough that drives your real product on screen. You write the narration, anchor each on-screen action to the word it belongs to, and Studio produces a finished video where the voice and the actions never drift apart. This guide teaches the whole flow: the word timeline you write in, the pause and delivery chips that shape the voice, the cues that pin things to words, the actions that drive the product, recording a screen that sits behind a login, framing a widescreen and a vertical cut from one project, and generating with the cost shown first. After it you will be able to turn a script and a list of steps into a polished demo, and keep that demo current when the product changes without re-recording it by hand.
The Word Timeline
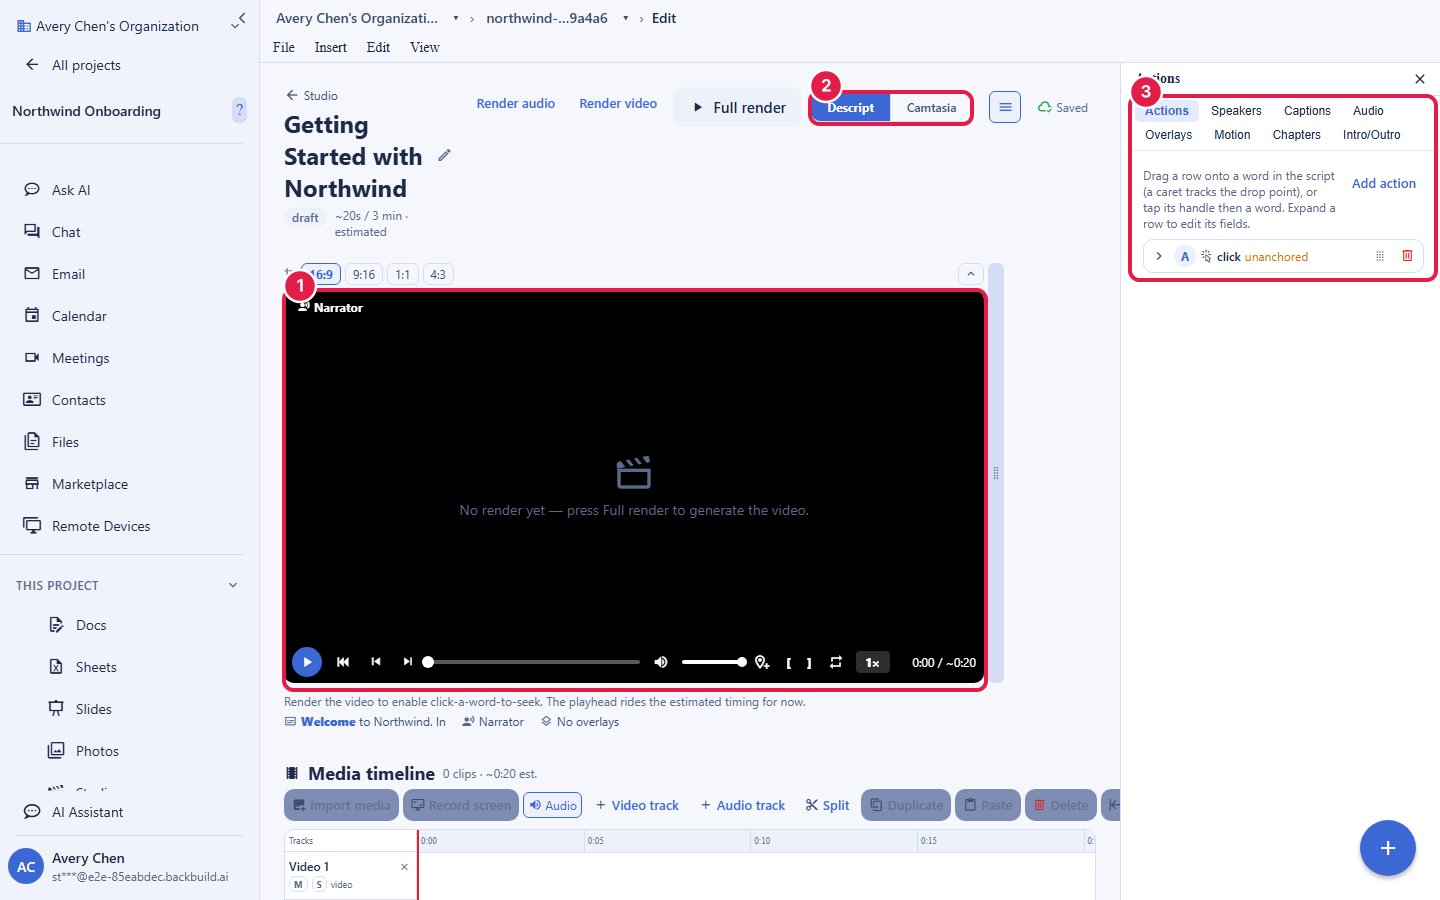
After this section you will know why the editor looks the way it does. A training video is written in a single surface called the word timeline. Your narration is laid out word by word, with space around each word, because every word is an anchor point. Audio, sound effects, actions, and overlays sit on lanes directly under the word they attach to, the way a caption sits under the syllable it belongs to. There is no separate write mode and arrange mode to switch between; you write the words and attach things to them in the same place.
Above the script is a video preview that shows what the finished frame looks like. You can expand or collapse it and drag it to the size you want, and it remembers your choice, so you can give the preview the whole top of the window while you check framing or shrink it to a strip while you write.
Write the Narration, and Let Auto-Markup Pace It
After this section you will have a narration that reads naturally without hand-tuning every pause. Type your script straight into the timeline. You do not have to mark anything up to get a good result: run auto-markup and Studio annotates the unmarked script for you, adding a pause after sentences and paragraphs and a delivery tag per paragraph, so the voice breathes and phrases the way a person would. Auto-markup fills the gaps; it does not overwrite pauses or tags you placed by hand, so you can let it do the bulk and then refine the moments that matter.
Shape the Voice with Pause and Delivery Chips
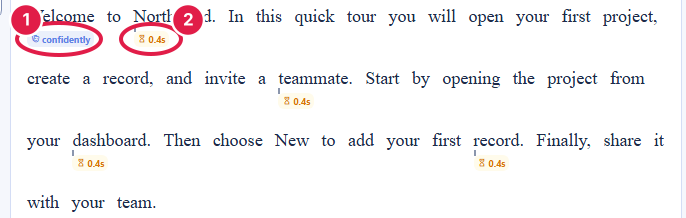
After this section you will control timing and tone precisely. Two kinds of chip live in the script, rendered as small anchored controls rather than raw text you have to remember the syntax for.
- Pause chips insert a silence of a set length at that point in the narration. A stepper sets the duration, from a tenth of a second up to five seconds, so you can hold a beat before a key point or space out a list.
- Delivery chips tag a single word with an emotion or delivery style, chosen from a picker, so a word or a phrase is read calm, warm, emphatic, or however the moment calls for. This is how you keep a long narration from sounding flat.
Because the chips are anchored controls, not literal characters in your text, they move with the words as you edit and never end up spoken aloud by mistake.
Cues: Pin Anything to a Spoken Word
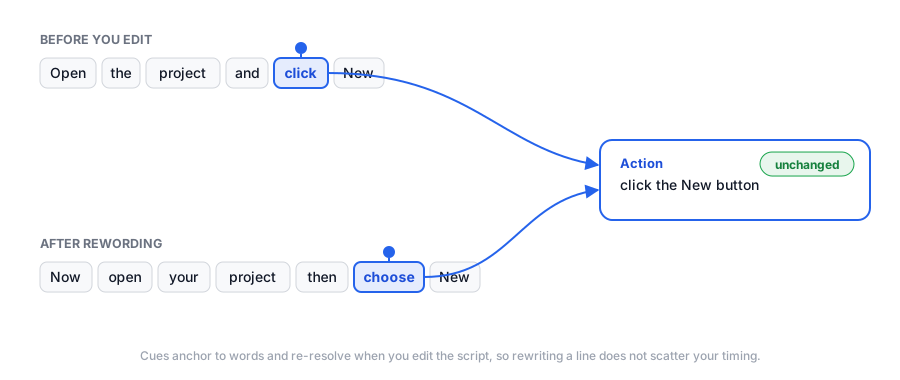
After this section you will attach on-screen events to the exact moment they should happen. A cue is a named marker on a word. You add one by clicking the word you want, and from then on anything you attach to that cue, an action, a sound effect, a music change, an overlay, happens at the instant that word is spoken. The important property is that cues survive edits: when you rewrite a sentence, Studio re-resolves the cue to its word rather than scattering your timing, so you can keep polishing the script without rebuilding the sequence of events every time.
Actions: Drive Your Real Product
After this section you will know exactly what Studio can do on screen, and why the result is trustworthy. This is what sets a Studio training video apart from a screen recording or an avatar reading a script. When the video renders, a real browser is driven through the actions you listed, against your live Backbuild product or another web address you approve. The pixels the viewer sees are the real product, not a mock and not a static backdrop. The actions you can script include:
- Navigate to a screen, and wait for an element or a state before continuing.
- Click a control, type into a field, drag one element onto another, and select, hover, scroll, focus, or press a key.
- Highlight the control in use with a rounded spotlight so the viewer can follow the pointer, and assert that something is true on screen.
- Play a clip or an overlay at a chosen moment.
Because the render actually performs each step and can assert the expected result, a training video doubles as a check that the workflow still works: if a step the video depends on has broken, the render surfaces it rather than quietly recording a broken product. That is the answer to the recurring developer-relations question, can an AI video tool really open my product and click through it: yes, it drives the real interface, and the run is verifiable.
Does it just narrate over a screen recording, or does it actually use my product? It drives your real product. During the render a real browser navigates, clicks, types, and drags through the steps you scripted, against your live app or an address you approve, and records the genuine result. It is not an avatar over a static backdrop.
The recurring pain: how do I keep a demo current when the UI changes, without re-recording the whole thing? Because the video is generated by driving the live product, a change in the interface is simply re-captured the next time you render. You do not re-shoot by hand. And a timing or wording edit re-renders cheaply, because Studio only re-does the parts that changed. See Narration, Voices, and Cost for the caching that makes this true.
The Tools Panel: Music, Effects, Overlays, and Shapes
After this section you will know where the production controls live. A dockable panel on the right holds the tools you reach for while building: add music, add a sound effect, add an action, add an overlay, and import a shape, plus Speakers, intro and outro management, the Secrets panel for linking a credential, and Metadata. Overlays cover titles, lower thirds, text, a caption band, images, shapes and shape groups, and a credits roll, positioned per output format and anchored to an absolute time, a spoken word, or an audio event, with transitions on the way in and out. You can import a scalable vector shape drawn in the document editor; it is cleaned and prepared for the video and can be saved to a shape library shared across the project or the organization.
Frame a Widescreen and a Vertical Cut Together
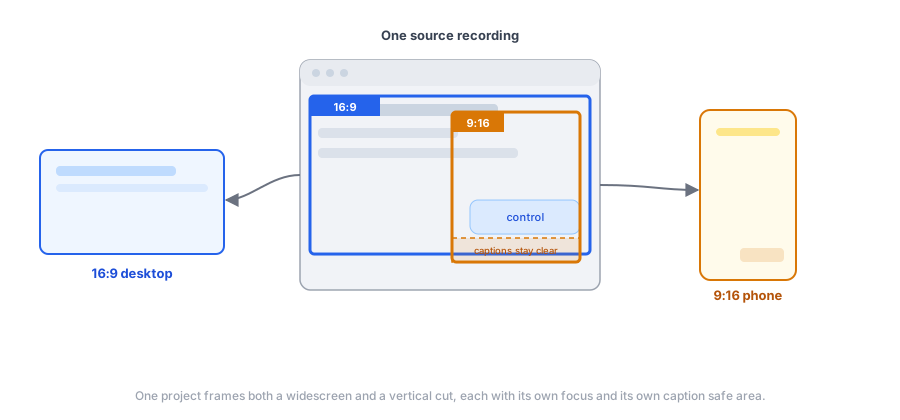
After this section you will produce a desktop and a phone version from one project. Studio frames the recording through a virtual camera. It outputs a widescreen 16:9 video for a desktop or a projector and, optionally, a vertical 9:16 video at 1080 by 1920 that follows the active part of the screen for a phone. Each format has its own focus keyframes, so the vertical cut zooms to the control in use rather than showing a shrunken whole screen, and a safe area keeps captions from colliding with the edges. You do not lay the video out twice: one project, two framings.
Captions
After this section you will ship an accessible video. Because the narration is aligned word by word, Studio can produce captions that match the voice, configured for the production and available embedded in the video and as a sidecar file in the standard SubRip (.srt) and WebVTT (.vtt) formats that video hosts and players read. Captions are driven by the same alignment that keeps the actions in sync, so they are timed to the words rather than guessed.
Video Segments
After this section you will build a longer video out of parts. A production can include video segments: insert a new video project segment, a segment from your library, or a video-content segment, give it placeholder fields you fill in, and navigate into it to edit. Transitions smooth the seams where one segment meets the next, so a multi-part video reads as one piece.
Recording a Screen Behind a Login
After this section you will record a product that requires signing in, without exposing a credential. Many real walkthroughs need a signed-in screen. You link a credential from your Secrets vault to the production and mark the field it fills, for example a login email, a password, or a one-time code. During the render the value is entered into that field with the typing hidden and the field masked, so the credential never appears in the recording, and it is only ever used on the exact web address you approved. The value itself is never shown in the editor, never placed in a link, and is resolved only at the moment the render needs it. This capability is rolling out; until it is enabled for your workspace, record walkthroughs of screens that do not require a sign-in during the recording.
Can it record an app that is behind a login? Yes. You link a credential from your Secrets vault and mark the field it fills. The value is typed in masked, never appears in the recording or in the editor, and is only ever used on the address you approved. It is resolved only at render time.
Generate, with the Cost Shown First
After this section you will render without a surprise bill. When you press Generate, Studio first shows what changed since the last render and a credit estimate for the work it will do, before it spends anything. You approve, and it runs, showing live progress through each stage and the difference at each step. The finished video is produced in every output format you chose. The composed cloud render is available on the paid plans and draws universal usage credits; if you bring your own text-to-speech key, that part of the work is billed by your provider rather than by Backbuild. Narration, Voices, and Cost explains the estimate and the caching in full.

If I change one word or one step, do I have to re-render the whole video? No. Studio caches the voice, the alignment, and the recording, and only re-does what changed. A cue or timing edit re-renders without paying to re-synthesize the voice, and a wording change re-synthesizes only the affected narration. An unchanged re-render costs nothing.
What caption formats do I get, and are they auto-generated? Captions are generated from the word alignment, so they match the voice exactly. They are available embedded in the video and as a separate sidecar file you can edit and export, in the standard SubRip (.srt) and WebVTT (.vtt) formats.
How much does a render cost, and can I see it before I spend? Yes. Generate shows a credit estimate before it runs, and an unchanged re-render is free. In-browser export elsewhere in Studio is free on every plan; the composed cloud render for a training video is on the paid plans and draws credits.
Can I package this as a SCORM or xAPI course for my learning-management system? Not today. Studio exports finished video files and caption tracks, which you host or embed wherever your learners watch; a SCORM or xAPI package for a learning-management system is not a current feature. If your program depends on completion tracking inside an existing system, plan to host the exported video there.
Can a non-video person build one of these? Yes. Write your narration, run auto-markup to pace it, click a couple of words to add actions, and generate. You never have to touch a traditional timeline to get a finished, narrated walkthrough.
Where to Go Next
- Narration, Voices, Caching, and Cost: choose a voice, bring your own key, and understand exactly what a render costs.
- Audiobooks and Visual Storybooks: the other narrated modules built on the same engine.
- AI Agents, the API, and Governance: render a training video from an AI agent or the REST API, and see how access and audit are enforced.