

Getting Started
This guide takes you from nothing installed to a first verified proof. Pick the CLI or an editor extension, authenticate, add one annotation, and watch the kernel confirm it. Plan on a few minutes for your first result.
After this page you will be able to install Prove, sign in, write a minimal proof annotation on a real function, run verification, and read the result. You will also know how to let an AI agent draft the proof for you and what happens to your source when you verify.
Backbuild Prove is launching soon. This guide describes the product at launch. Join the waitlist to get access the moment it is live.
Choose Your Path
Prove works through two interfaces that share the same verification service. Use whichever fits your workflow, or both:
- Editor extension: best for interactive development. You get inline diagnostics and automatic re-verification every time you save.
- CLI: best for batch verification, CI pipelines, scripting, and command-line workflows.
Path 1: The CLI
Install
The Backbuild CLI is distributed through pip:
pip install backbuild-cliConfirm the install:
backbuild --helpAuthenticate
Sign in with your Backbuild account. This opens a browser window for the sign-in flow, and your session is stored locally for later commands.
backbuild auth loginIf you do not have an account yet, create one here.
Verify
From your project directory, run:
backbuild prove run
The CLI scans your project for prove:pf2 annotations across
every supported file type, verifies each one, and reports the results. Full
command reference, including watch mode and CI, is on the CLI and CI page.
Path 2: An Editor Extension
Install
Search for Backbuild AI (publisher GableDigitalSolutions) in your editor's extensions panel, or install from the VS Code Marketplace. The same build is published on Open VSX for Cursor, Windsurf, and other compatible editors. Prove also ships extensions for several other editors; see Editor Extensions for the full list.
Sign in
Open the Command Palette (Ctrl+Shift+P /
Cmd+Shift+P) and run Backbuild: Sign In. Your
session is kept in the editor's encrypted secret storage, so you stay
signed in across restarts until you sign out.
Verify on save
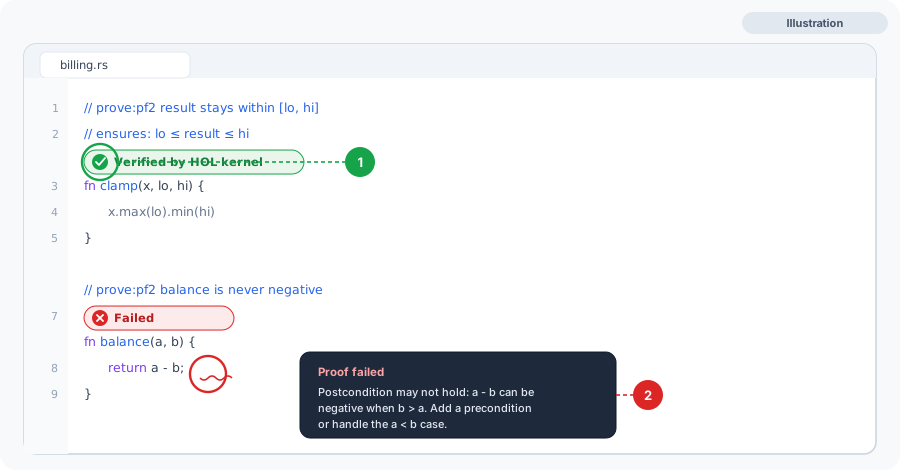
Once signed in, verification runs automatically every time you save a file. Failed proofs appear as red squiggles inline, exactly like type errors. Hover an annotation to see its rendered proof. There is no separate step to run.
Your First Annotation
Add a prove:pf2 annotation in a documentation comment above a
function. Here is a minimal example in Rust:
/* prove:pf2("add_commutative")
\[
\begin{pre} \forall\, a\, b : \mathbb{N} \end{pre}
\begin{proof}
\step{1}{ a + b = b + a }
  \pf\ By ADD\_SYM.
\qedstep
\begin{proof} \pf\ By \stepref{1}. \end{proof}
\end{proof}
\]
*/
fn add(a: u64, b: u64) -> u64 {
    a + b
}
The annotation declares a theorem named add_commutative, a
precondition stating the inputs are natural numbers, one proof step citing
the standard library theorem ADD_SYM, and a QED step that
closes the proof. The full format, including every block type and
per-language comment syntax, is on Writing pf2 Annotations.
What Happens When You Verify
When you run backbuild prove run or save the file in your
editor, the system:
- Scans the file for
prove:pf2markers. - Parses the LaTeX annotation into a structured proof.
- Reads a formal translation of the code the annotation sits above.
-
Checks each proof step against the foundation and the code translation:
does step 1 follow from
ADD_SYM? Does the QED step close the proof? Is the proof consistent with what the code actually does? - Returns a result for each annotation.
Understanding Results
Each annotation receives one of four statuses:
- Verified: the proof is mathematically valid. Every step follows from the foundation, the standard library, and the code.
- Failed: at least one step did not check out. The error names the failing step and explains what the kernel expected. Fix the annotation or the code and verify again.
- Cached: the annotation is unchanged since it last verified, so the result is returned instantly without re-checking. This is why re-verifying a large project after a small edit is fast.
- Skipped: the annotation was excluded by project
settings, for example an
exclude_patternsrule that matched the file path.
Let an AI Agent Draft the Proof
You do not have to write every proof by hand. An AI coding agent working in your editor or through the Backbuild tools can draft the annotation alongside the function, then read the kernel's diagnostics and correct itself until the proof verifies. The agent learns the format from examples and error messages during normal use, with no special training.
This is the safe way to trust AI-generated code: the agent proposes, but the kernel decides. An agent cannot make a false proof pass, so a "Verified" result means the property actually holds regardless of who or what wrote the proof. If the agent gets it wrong, you see a red squiggle rather than a silent mistake.
Does my source code leave my machine?
Verification runs against the Backbuild service, so annotations are sent
for checking, but your signing keys stay local (see Certifications) and no proof is
accepted without being fully re-derived. For air-gapped and on-premise
requirements, see the deployment note on the Certifications page and
contact us through the contact page.
How much annotation overhead is this per function?
You do not annotate everything. Prove your critical paths (auth, money,
concurrency, parsing, anything safety-relevant) and let the rest ride on
tests. Caching keeps re-verification cheap, because unchanged annotations
never re-run.
Will it nag me about correct code?
You control that with severity modes: run failures as warnings while you
are learning and as errors in CI, and suppress an accepted case with a
recorded reason. See Project Settings.
Next Steps
- Writing pf2 Annotations: the full syntax guide with examples in many languages
- Supported Languages: comment syntax, tiers, and add-ons
- Editor Extensions: the interactive feature set and supported editors
- CLI and CI: every command, exit codes, and pipeline integration
- Project Settings: severity modes, exclusions, and timeouts