

Sending Domains and DNS Verification
Linking a domain is the step people dread with self-run email, so Backbuild Mail turns it into a guided wizard that shows you exactly what to do, checks each record for you, and confirms with a checkmark when receiving and sending are both verified. This guide teaches you to link a domain, prove you own it, provision the records that make mail deliverable, and understand why proper authentication is what reaches the inbox. After this page you will have a verified domain ready to send and receive at your own brand.
Link Your Domain
After this section you will have added your domain and chosen how mail arrives. You start by entering a domain you own. Backbuild Mail then guides you through the rest.
- Choose how inbound mail arrives. By default, Backbuild receives inbound mail for your domain directly. If your domain is already on Cloudflare DNS, there is a faster shortcut that routes inbound mail through Cloudflare.
- Domains are globally unique. A domain can be claimed by exactly one organization, so mail can never route to the wrong tenant. If a domain is already claimed elsewhere, linking is refused.
Prove You Own the Domain
After this section you will have proven control of your domain. Before Backbuild Mail will send or receive for a domain, you prove you own it.
- Publish a verification record. The wizard gives you a secret TXT record to add at your DNS host. When you click Verify, Backbuild looks it up and decides whether it matches. You never assert the verdict yourself; the server confirms it.
- Skip the manual step on a connected Cloudflare account. If your Cloudflare account is connected to Backbuild, ownership can be proven automatically from the connected account, so the manual TXT step is skipped entirely.
Provision DNS and Routing
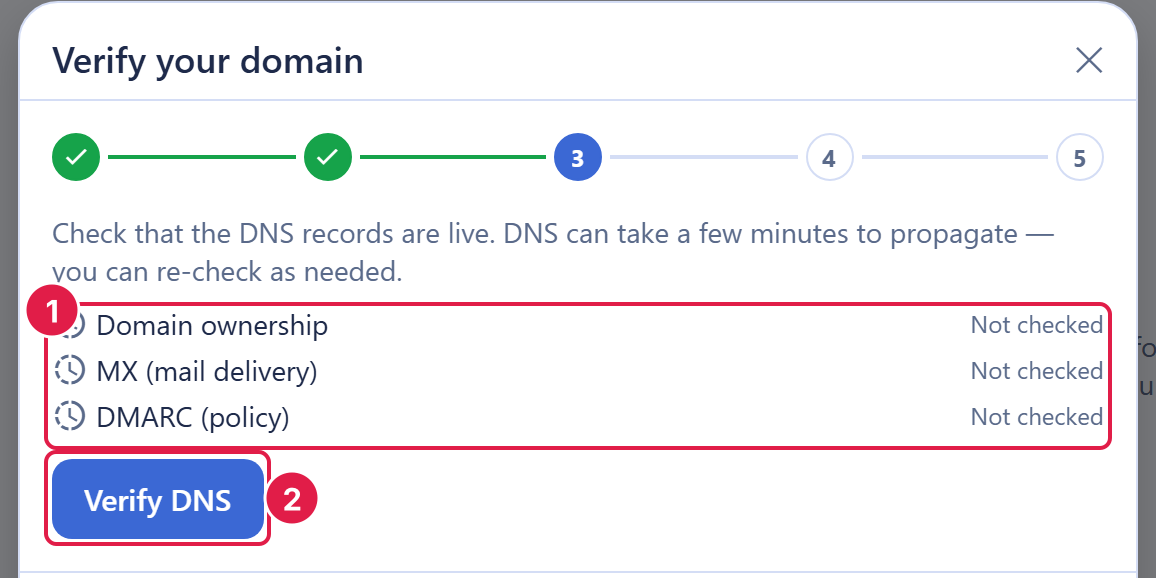
After this section you will have the records that make mail deliverable, published and verified. Once ownership is proven, the wizard provisions and verifies the records that route inbound mail and let your outbound mail pass authentication, reporting a checkmark or a cross for each step so you always know where you stand.
- Inbound routing: the records that route mail addressed to your domain into your mailboxes.
- Outbound authentication: the records that let receiving servers confirm your mail is really from you. On a Cloudflare-managed domain these are provisioned for you automatically; on another DNS host the wizard shows you exactly what to add and verifies it.
- Read-back, not assumption: the wizard reads back the records that are actually published rather than assuming them, so the checkmark means the record is really in place.
You do not need to understand each record to get a working mailbox at your domain. When every step shows a checkmark, the domain is ready.
How do I get me@my-domain email, and do I need to be technical? Link the domain, prove ownership (automatic on a connected Cloudflare account, otherwise one TXT record), and let the wizard provision the rest. On a Cloudflare-managed domain there is nothing to edit by hand. Then create a mailbox as described in Mailboxes, Inbox, and Reading.
Why Authentication Reaches the Inbox
After this section you will understand why some mail lands in the inbox and some lands in spam. Getting to the inbox is mostly about two things: proving your mail is really from you, and building a sending reputation.
- Authentication proves it is you. Fully authenticated mail from a domain you control reaches the inbox at far higher rates than unauthenticated mail. The wizard provisions correctly aligned records so authentication is not your failure point, and you do not have to hand-manage the includes yourself.
- Reputation has to warm up. A brand-new domain has no sending history, and receivers are cautious until you have sent steadily over time. Sudden volume spikes look suspicious. Authentication is necessary but not sufficient: expect reputation to build as you send consistently.
Why do my emails go to spam even though I set it up? Authentication (the records the wizard provisions) is required but not the whole story. A new domain has no reputation yet and must earn it by sending steadily; large sudden spikes look like abuse. With the guided setup, authentication is handled correctly, so the usual remaining factor is reputation building over time.
Is email at my own domain here as reliable as a big provider? Deliverability comes from correct authentication plus reputation, both of which apply the same way everywhere. Backbuild Mail provisions correctly aligned records for you, and if you already trust a specific provider you can route your outbound mail through it while keeping everything in the workspace. See Outbound Routing and Allowances.
Manage and Remove Domains
After this section you will be able to review and unlink domains. You can list your linked domains and open any one to see its verification status. When you unenroll a domain, Backbuild Mail tears down its mailboxes, routes, the domain claim, and stored objects together, so the domain is fully released and can be claimed again later if you need to.
Migrate Without Losing Mail
After this section you will know how to switch to Backbuild Mail without a gap in delivery. The safe way to move a domain to a new mail provider is to overlap rather than hard-cut.
- Stand up the mailbox first. Link the domain and create the mailboxes you need in Backbuild Mail while your current provider is still receiving.
- Lower your MX time-to-live early. A few days before you switch, reduce the time-to-live on your current mail routing records so the change propagates quickly when you make it.
- Verify inbound before you flip. Confirm Backbuild Mail receives a test message on the new path before you point your live mail routing at it, so no message is lost in the handover.
- Switch and watch. Point your mail routing to Backbuild Mail. Because you overlapped, delivery continues throughout rather than stopping during a cutover.
Plan a parallel run rather than an instant switch, and keep the old mailbox reachable until you are confident everything is arriving at the new one.
Related Guides
- Mailboxes, Inbox, and Reading: create mailboxes once your domain is verified.
- Outbound Routing and Allowances: send through Backbuild or your own provider, by category.
- API and AI Agents: link and verify domains programmatically.