

Launching a Container
Launching a container is a short, deliberate flow: open the launch screen from a project, pick a size that matches your work, decide whether you need the graphical desktop, and spin it up. This guide walks every choice on that screen and shows what each status badge means as the container comes up, so you know exactly what you are getting and what to expect while it provisions. After this page you will be able to launch a container of the right size, in the right place, and connect to it with confidence.
Open the Launch Screen
After this section you will know where the launch flow lives. Containers launch from a project, because a container is a workspace for the work in that project. Open the project and choose Launch a container. A short explainer at the top tells you plainly what you are about to get: a cloud environment with a terminal, VS Code, and your files saved to your own private storage, billed only while it runs. Read it once; it is the honest summary of the product.
If the launch action is not offered, containers may not be enabled for your organization on this plan or by policy. An administrator controls which sizes and backends your team may use; see Container Policies and Administration.
Read a Size Card
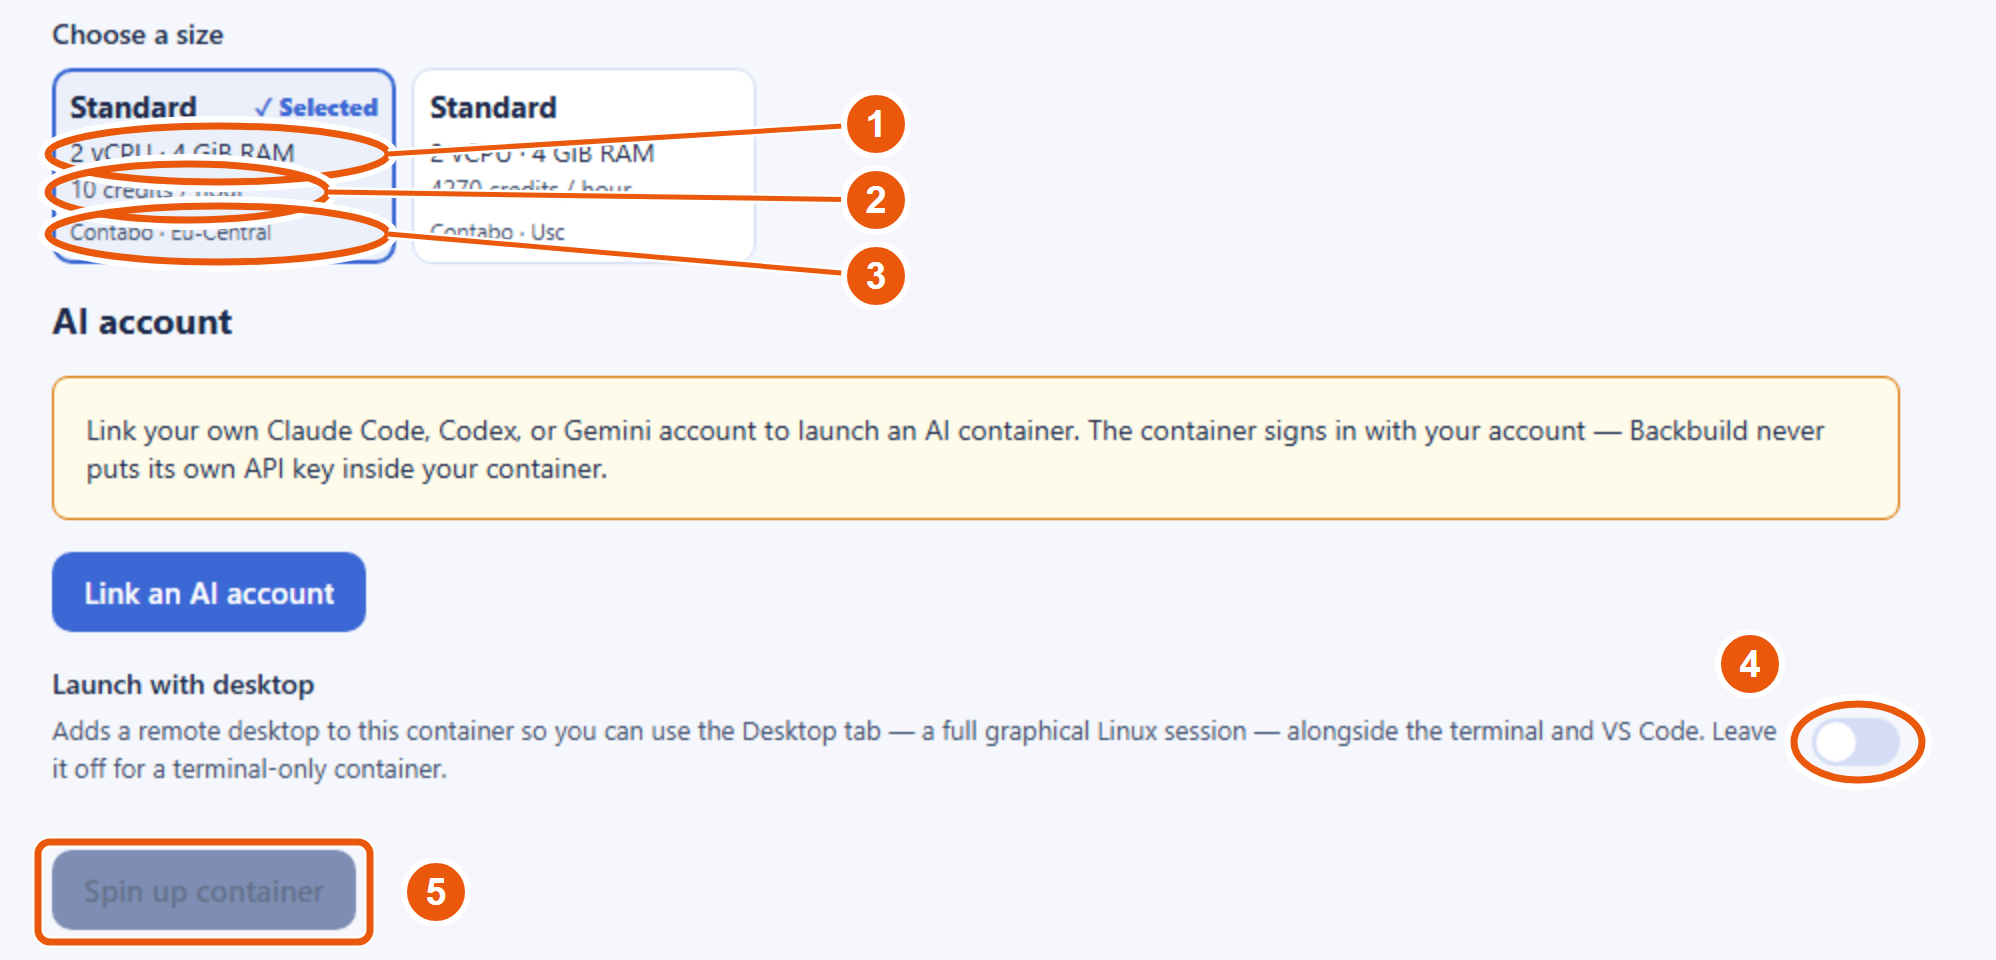
After this section you will be able to pick the right size for a task. Sizes are presented as cards, one per tier. Every card carries the same four facts, and choosing well is a matter of reading them:
| On the card | What it tells you |
|---|---|
| Tier name | The named size, such as Standard. Larger tiers have more compute and draw more credits. |
| vCPU and memory | The processing power and RAM the container gets. Match this to your workload: a shell and an editor need little; a build or a browser-driving agent wants more. |
| Credits per hour | The exact rate this size draws from your usage credits while it runs. This is the number that governs cost. |
| Backend and region | Which cloud the container runs in and where, geographically. This matters for latency and for data residency. |
A size is identified by the full combination of its backend, its tier, and its region, so the same tier offered in two regions is two distinct choices. Pick the smallest tier that comfortably runs your work; you are never locked in, and you can launch a larger one for the next task. The rates and exact tiers shown on the cards are the authoritative figures; this guide does not restate specific numbers because your available sizes depend on your plan and your organization's policy.
Which size should I start with? The smallest one that runs your work. A terminal session and light editing need very little. Move up a tier only when a build, a test suite, or an agent workload actually needs more. Since you pay per hour of running time, an oversized container just costs more for the same result.
Launch With or Without the Desktop
After this section you will know what the desktop toggle does and when to turn it on. The Launch with desktop toggle is off by default. Left off, you get a terminal-and-editor container: a shell, VS Code, and your files. That covers most development work and is the lighter option.
Turn it on when you need to see and control a real graphical Linux desktop in the browser: to run a desktop application, to drive a full browser including its chrome, or to interact with something that is not a page or a terminal. The desktop is a decision made at launch. A container started without it does not grow one later; if you decide you need the desktop, launch a new container with the toggle on. The desktop surface itself is covered in Terminal, VS Code, and Desktop.
Run the In-Container AI on Your Own Account
After this section you will know how the AI assistant inside a container is powered. A container can run an AI coding assistant on the command line. Before you launch, you can choose the account that assistant runs under: the platform's default, a coding-assistant account of your own that you have linked, or your usage credits. This lets you keep in-container AI work on your own subscription instead of drawing platform credits, if you prefer.
The credential for a linked account is handled through your organization's encrypted vault. It is released to the container at the moment it is needed and is not part of the workspace that persists: the AI account state is kept out of the saved home folder and is destroyed when the container tears down, so a credential never lingers in stored files. Bringing your own AI keys is covered across the platform in AI Assistant.
Spin It Up and Watch It Come Alive
After this section you will be able to read every status the launch goes through. Click Spin up container. The terminal attaches immediately and waits, and a status badge reports where the container is in its lifecycle. You are meant to watch it come up, not guess.
| Status | What is happening |
|---|---|
| Queued | Your request is accepted and waiting for a slot. |
| Scheduling | A machine is being chosen for your container on the backend you picked. |
| Starting | The container is booting and connecting its terminal. |
| Running | The container is live. The terminal is interactive and the editor and desktop tabs are available. |
| Idle | The container is up but has been left without activity; see the reason it reports, such as inactivity or exhausted credits. |
| Tearing down | The container is closing in an orderly way and finalizing its saved session. |
| Terminated / Failed | The session has ended, cleanly or because something went wrong; a failure reports why. |
Most launches move from queued to running in well under a minute. If provisioning takes longer than usual, the screen shows a gentle note that it is taking longer than expected and keeps waiting; the terminal stays attached, so you do not lose your place. When the badge reaches running, you are ready to work.
What is the cold-start time? A container is normally usable in well under a minute from clicking spin up. You watch it progress through queued, scheduling, and starting, and the terminal is attached the whole time.
It has been stuck a while. Did it fail? Not necessarily. A slow provision shows a "taking longer than expected" note and continues. A real failure moves the badge to Failed and states the reason, so you can tell the difference at a glance.
Where to Next
- Terminal, VS Code, and Desktop: connect to and work in your running container.
- Managing Sessions, Persistence, and Credits: switch between containers, terminate cleanly, and understand what persists and what it costs.
- Container Policies and Administration: for admins, what sizes and backends are offered and why.