
Getting Started
This guide takes you from nothing to a working Backbuild workspace: a verified, protected account, your first project, and a team if you want one. By the end you will understand every step of signup, including the two steps that surprise most people, the second factor and the vault master password, and you will know exactly what to do in your first fifteen minutes.
Before You Begin
You need one thing: an email address you can read. A phone with an authenticator app, or a computer with a fingerprint reader, face unlock, or a device PIN, makes the second step of signup faster, but an emailed code works too.
- No credit card is required. Signup never asks for payment details. Every new account starts on the Free plan, which is a complete workspace, not a trial.
- No plan selection. You are not asked to choose a tier during signup. You can upgrade later, in-app, whenever you are ready. See pricing for what each plan adds.
- No organization setup. Backbuild creates a personal organization for you automatically. A short setup guide then offers to create your first project and virtual worker, and you can leave it at any point.
If you were invited to Backbuild by a teammate, your path is shorter: skip ahead to Joining from an invitation.
1. Create Your Account
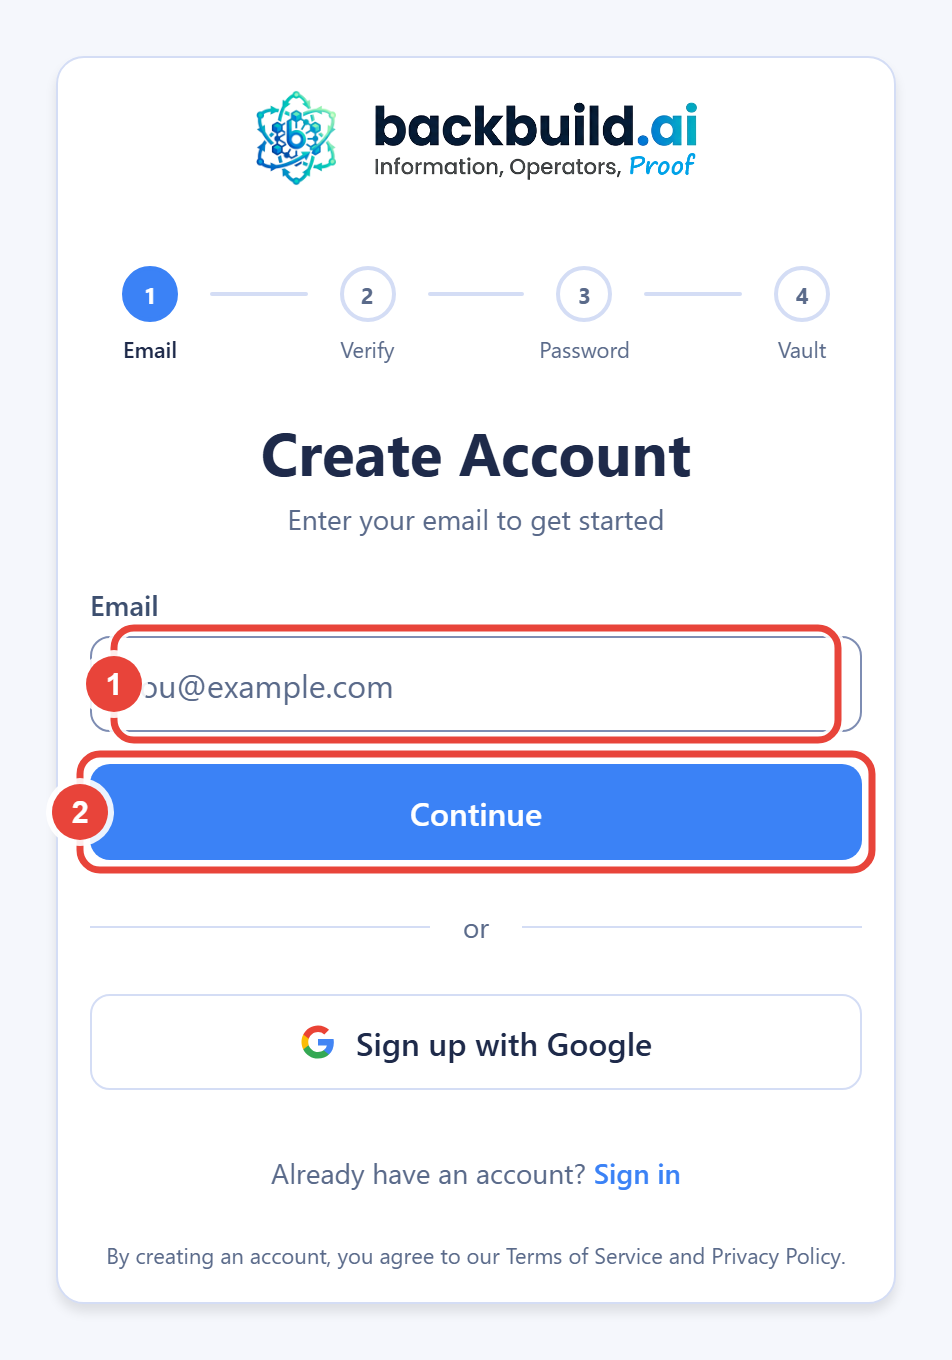
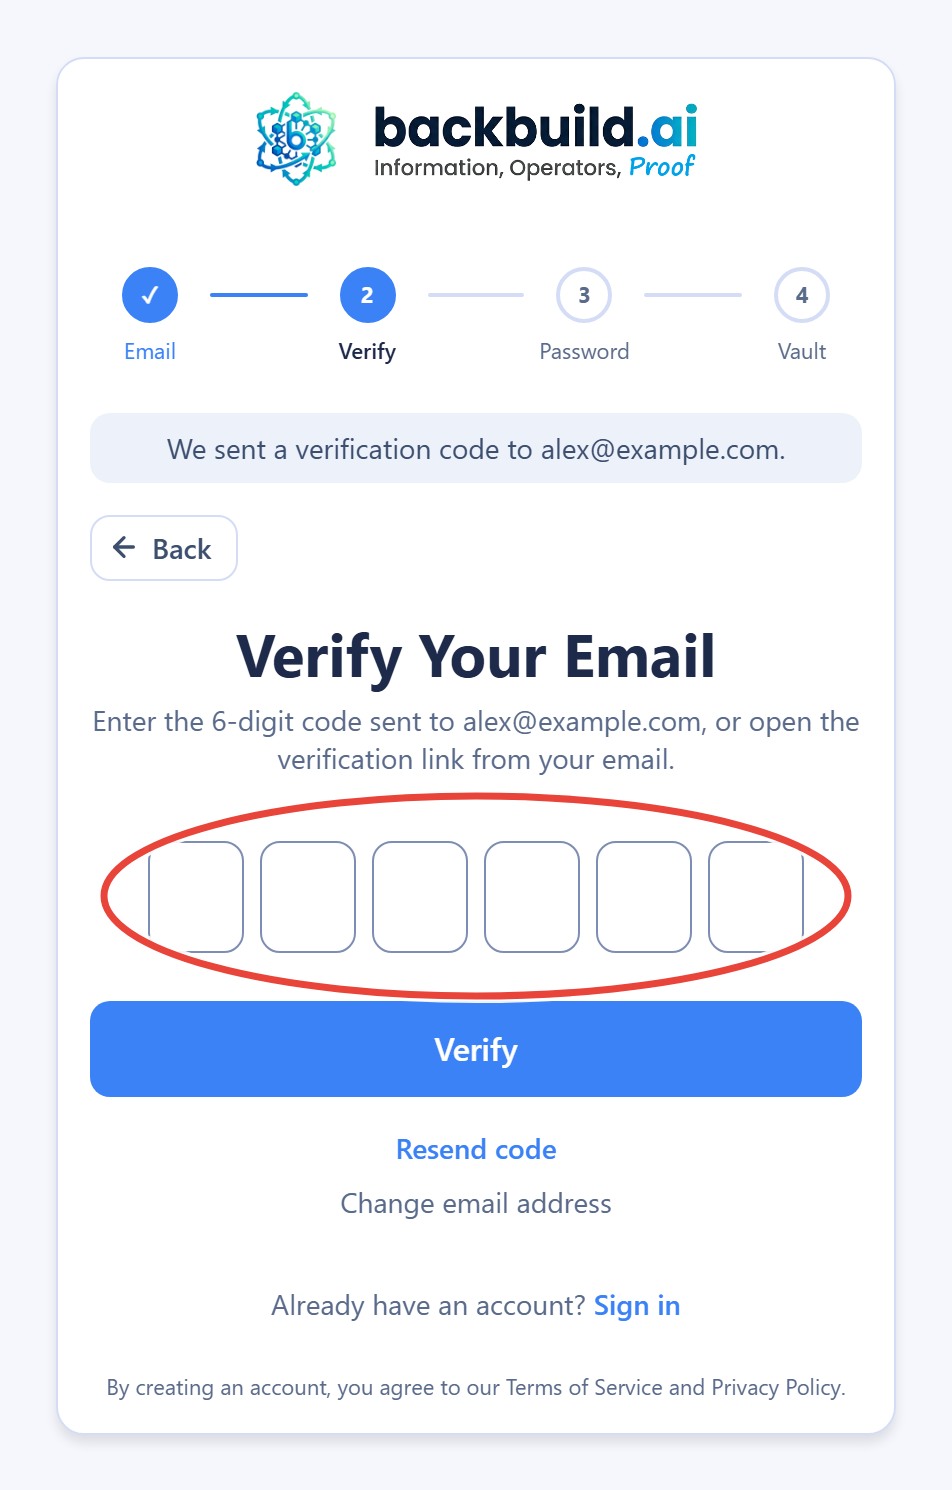
Go to app.backbuild.ai/auth/sign-up. Signup is a sequence of five short screens, in this order, and a progress bar across the top of the card shows all five from the start:
- Enter your email address. Backbuild sends a 6-digit verification code to it.
- Enter the verification code. Check your inbox and type the code into the boxes. The button in the same email opens this step, in this browser or another, with your address already filled in; you still type the code. You verify your email before you ever set a password, so there is no half-registered state to come back and clean up.
- Set your account password. This is the password you sign in with.
- Set up two-factor authentication. Choose a second factor and save your recovery codes. Every account has one; the section below explains the choices.
- Create your vault master password. This is a second, different password that protects your Secrets vault, and it comes with a recovery kit you save. It matters enough to get its own section below.
When the last step completes you are signed in, with a workspace already provisioned, and the setup guide described in step 3 below opens.
Account password requirements
Your account password must be at least 13 characters (up to 128) and include an uppercase letter, a lowercase letter, a digit, and a symbol. A strength meter guides you as you type. Backbuild also rejects passwords that are common or that appear in known data breaches, and tells you which of those checks failed so you can fix it. A passphrase of several words with a digit and a symbol clears all of these checks easily and is easier to remember than a shorter scramble.
Set up two-factor authentication
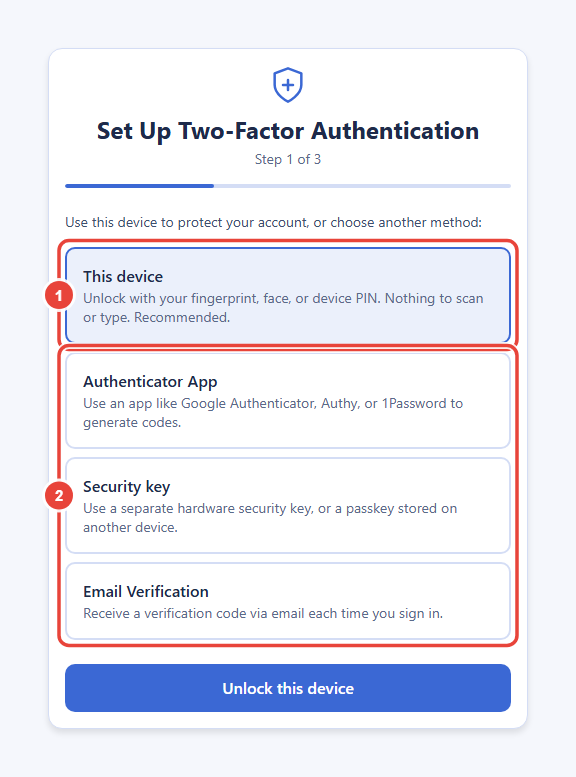
Every Backbuild account has a second factor, so a stolen password alone can never open it. This step cannot be skipped: if you close the tab before finishing it, Backbuild asks you to complete it the next time you sign in, before anything else opens. Choose one of four factors:
- This device (recommended): unlock with the fingerprint, face, or PIN of the computer or phone you are signing up on. Nothing to scan or type.
- Authenticator App: scan a QR code, or type the setup key, into an app such as Google Authenticator, Authy, or 1Password, then confirm with the 6-digit code it shows.
- Security key: a hardware security key, or a passkey stored on another device.
- Email Verification: a code sent to your email address each time you sign in.
After the factor is confirmed, Backbuild shows a set of recovery codes. Each one works once, in place of your factor, if you ever lose it. Copy or write them down and keep them somewhere safe and offline, then tick the box confirming you saved them to continue. You can add more factors later, from your security settings, and a second factor on a second device is the difference between an inconvenience and a lockout if you lose your phone. See Signing In and Account Security for managing factors after signup.
Prefer Google sign-in?
You can sign up with your Google account instead. Choose the Google button on the signup screen and approve the request. Google sign-in means one less password to manage and inherits your Google account's protections, while an email-and-password account gets the breached-password screening described above. Either way you then set up your Backbuild second factor and your vault master password, exactly as above. See Signing In and Account Security for the full picture.
If the verification code does not arrive
Codes normally arrive within a minute or two. If yours has not:
- Check your spam or quarantine folder. Corporate mail filters are the most common culprit.
- Request a new code from the signup screen. Only the newest code is valid.
- Codes expire after a short time, and entering the wrong code too many times invalidates the attempt. In both cases the fix is the same: request a fresh code and enter it promptly.
- If a strict corporate filter keeps eating the email, sign up with a different address or reach us through the contact page.
The signup screen shows the same "check your email" message whether or not an address already has an account. This is deliberate: it prevents anyone from using the signup form to discover which email addresses are registered. If you already have an account, the email you receive will route you the right way.
2. The Vault Master Password, Explained
After reading this section you will know what the vault master password is, why it is separate from your account password, what the recovery kit is for, and what to do if you forget the password.
Backbuild includes Secrets, a zero-knowledge vault for passwords, API keys, and other credentials. Zero-knowledge means your vault contents are encrypted on your device before they ever reach Backbuild. The vault master password is the key to that encryption. Backbuild never receives it, never stores it, and therefore can never read your vault.
- It is not your account password, and it cannot be the same. Your account password signs you in. Your master password unlocks your vault. Signup refuses a master password identical to the account password you just set, and resetting one never touches the other.
- Save the recovery kit. As soon as you create the master password, Backbuild shows your recovery kit, once. It is the only way to recover your vault if you forget the master password. Reveal or copy it, store it somewhere safe (another password manager, or a printed copy in a secure place), then choose "I've saved it" to continue.
- Nobody else can recover it. Neither Backbuild support nor your organization's administrators can open, reset, or replace your vault. This is the price of a vault the platform itself cannot read, and it is a feature.
- Forgetting it does not lock you out of Backbuild. Your account, projects, docs, mail, and everything else keep working. Only the encrypted vault contents are unreadable until you unlock them.
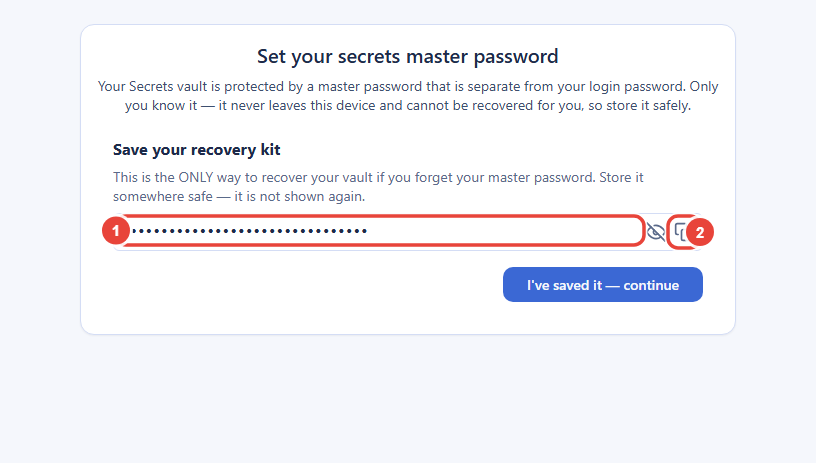
If you forget the master password, choose Forgot your master password? on the vault unlock screen, enter your recovery kit, and choose a new master password. Your vaults stay intact and readable; only the password that unlocks them changes. If you lose both the master password and the recovery kit, your personal vaults cannot be recovered by anyone. Vaults you share with others stay available to their other members, who can share them with you again once you set up a new vault.
The vault step cannot be skipped either. If you close the signup flow before completing it, your account still exists, and Backbuild asks you to create the master password the next time you sign in.
3. The Setup Guide
The first time you arrive in a new organization, a short setup guide takes over the page. It walks you through the pieces most people want on day one and records your progress so you can come back to it. A few steps ask for a choice before Next moves on; Skip Tour leaves the guide at any point.
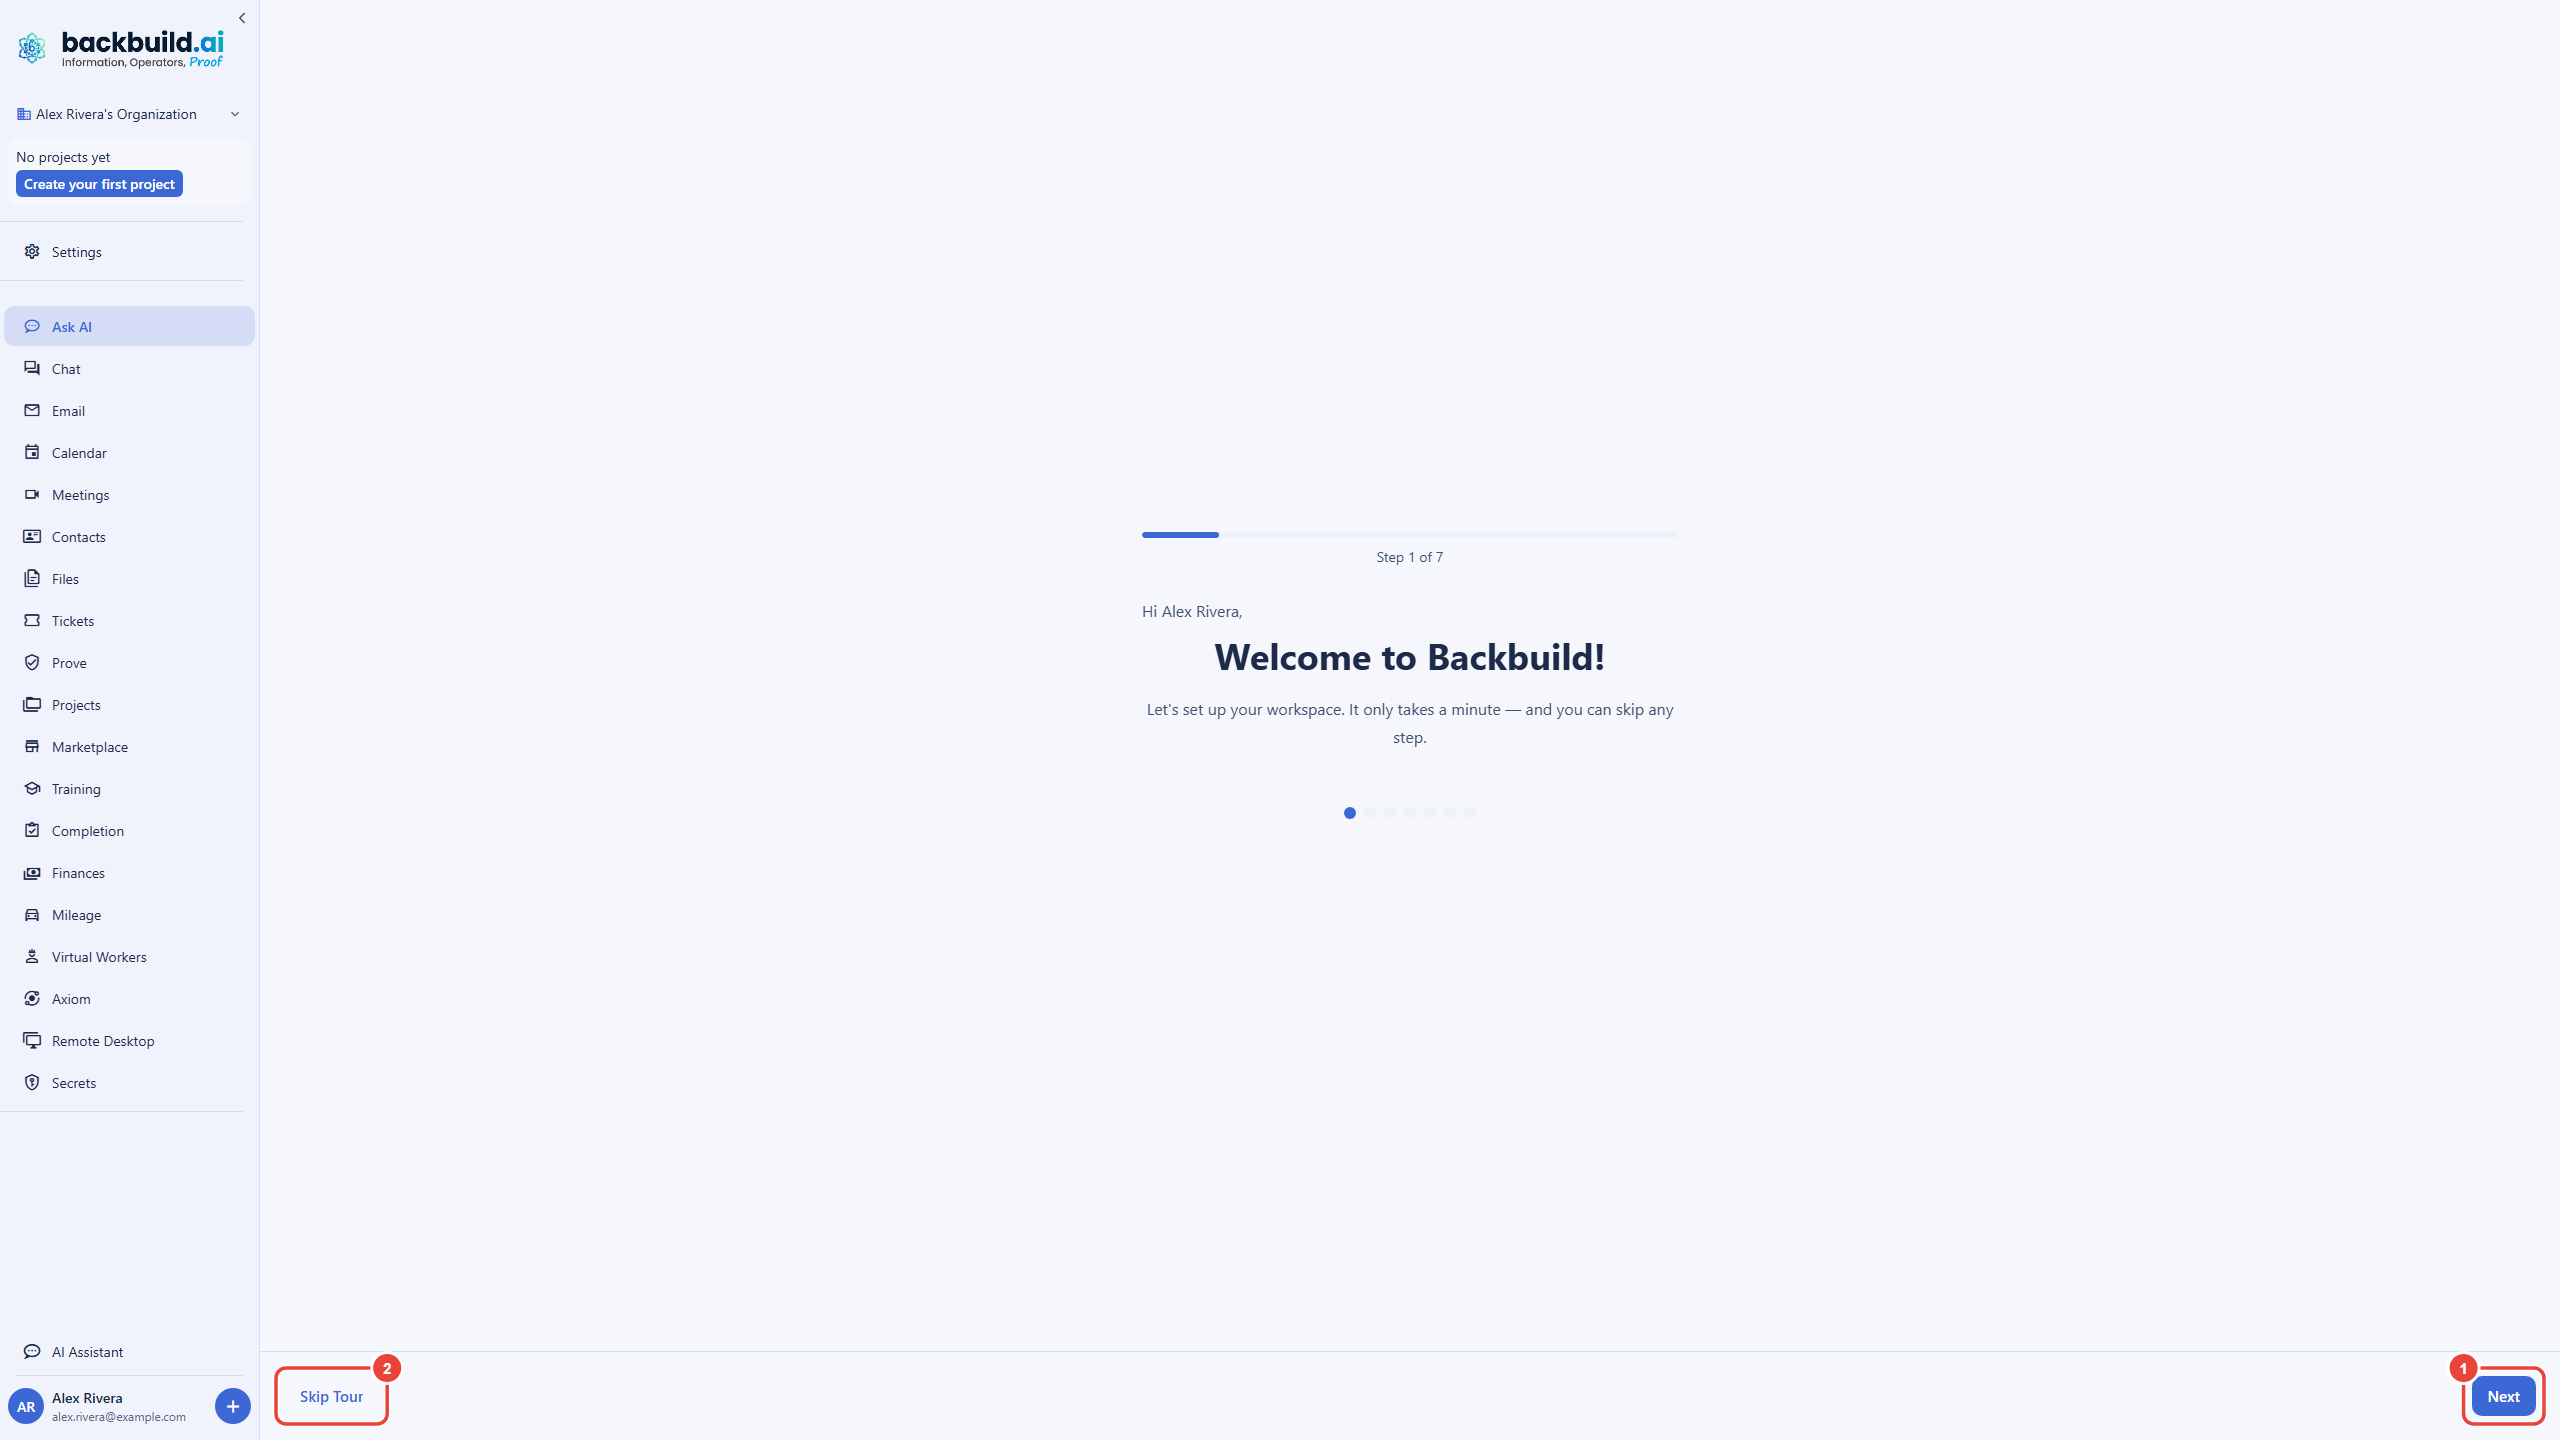
The steps, in order:
- Create your first project. Give it a name. Projects organize your documents, entities, tasks, and AI work.
- Create your virtual worker. Your virtual worker is your personal AI assistant. The guide pre-fills a name and description you can edit, or lets you pick a worker that already exists.
- Choose a credit source. How your virtual worker is powered: Universal Usage Credits from your organization's balance, a link to your own AI tool subscription (such as Claude Code, Codex, or Gemini), or your own provider API key.
- Choose where your virtual worker runs. On your own computer through the Backbuild desktop client, or on a Backbuild environment in the cloud at a size you pick. Running in your own cloud account is marked coming soon. Choosing your own computer adds a few steps that pair the desktop client.
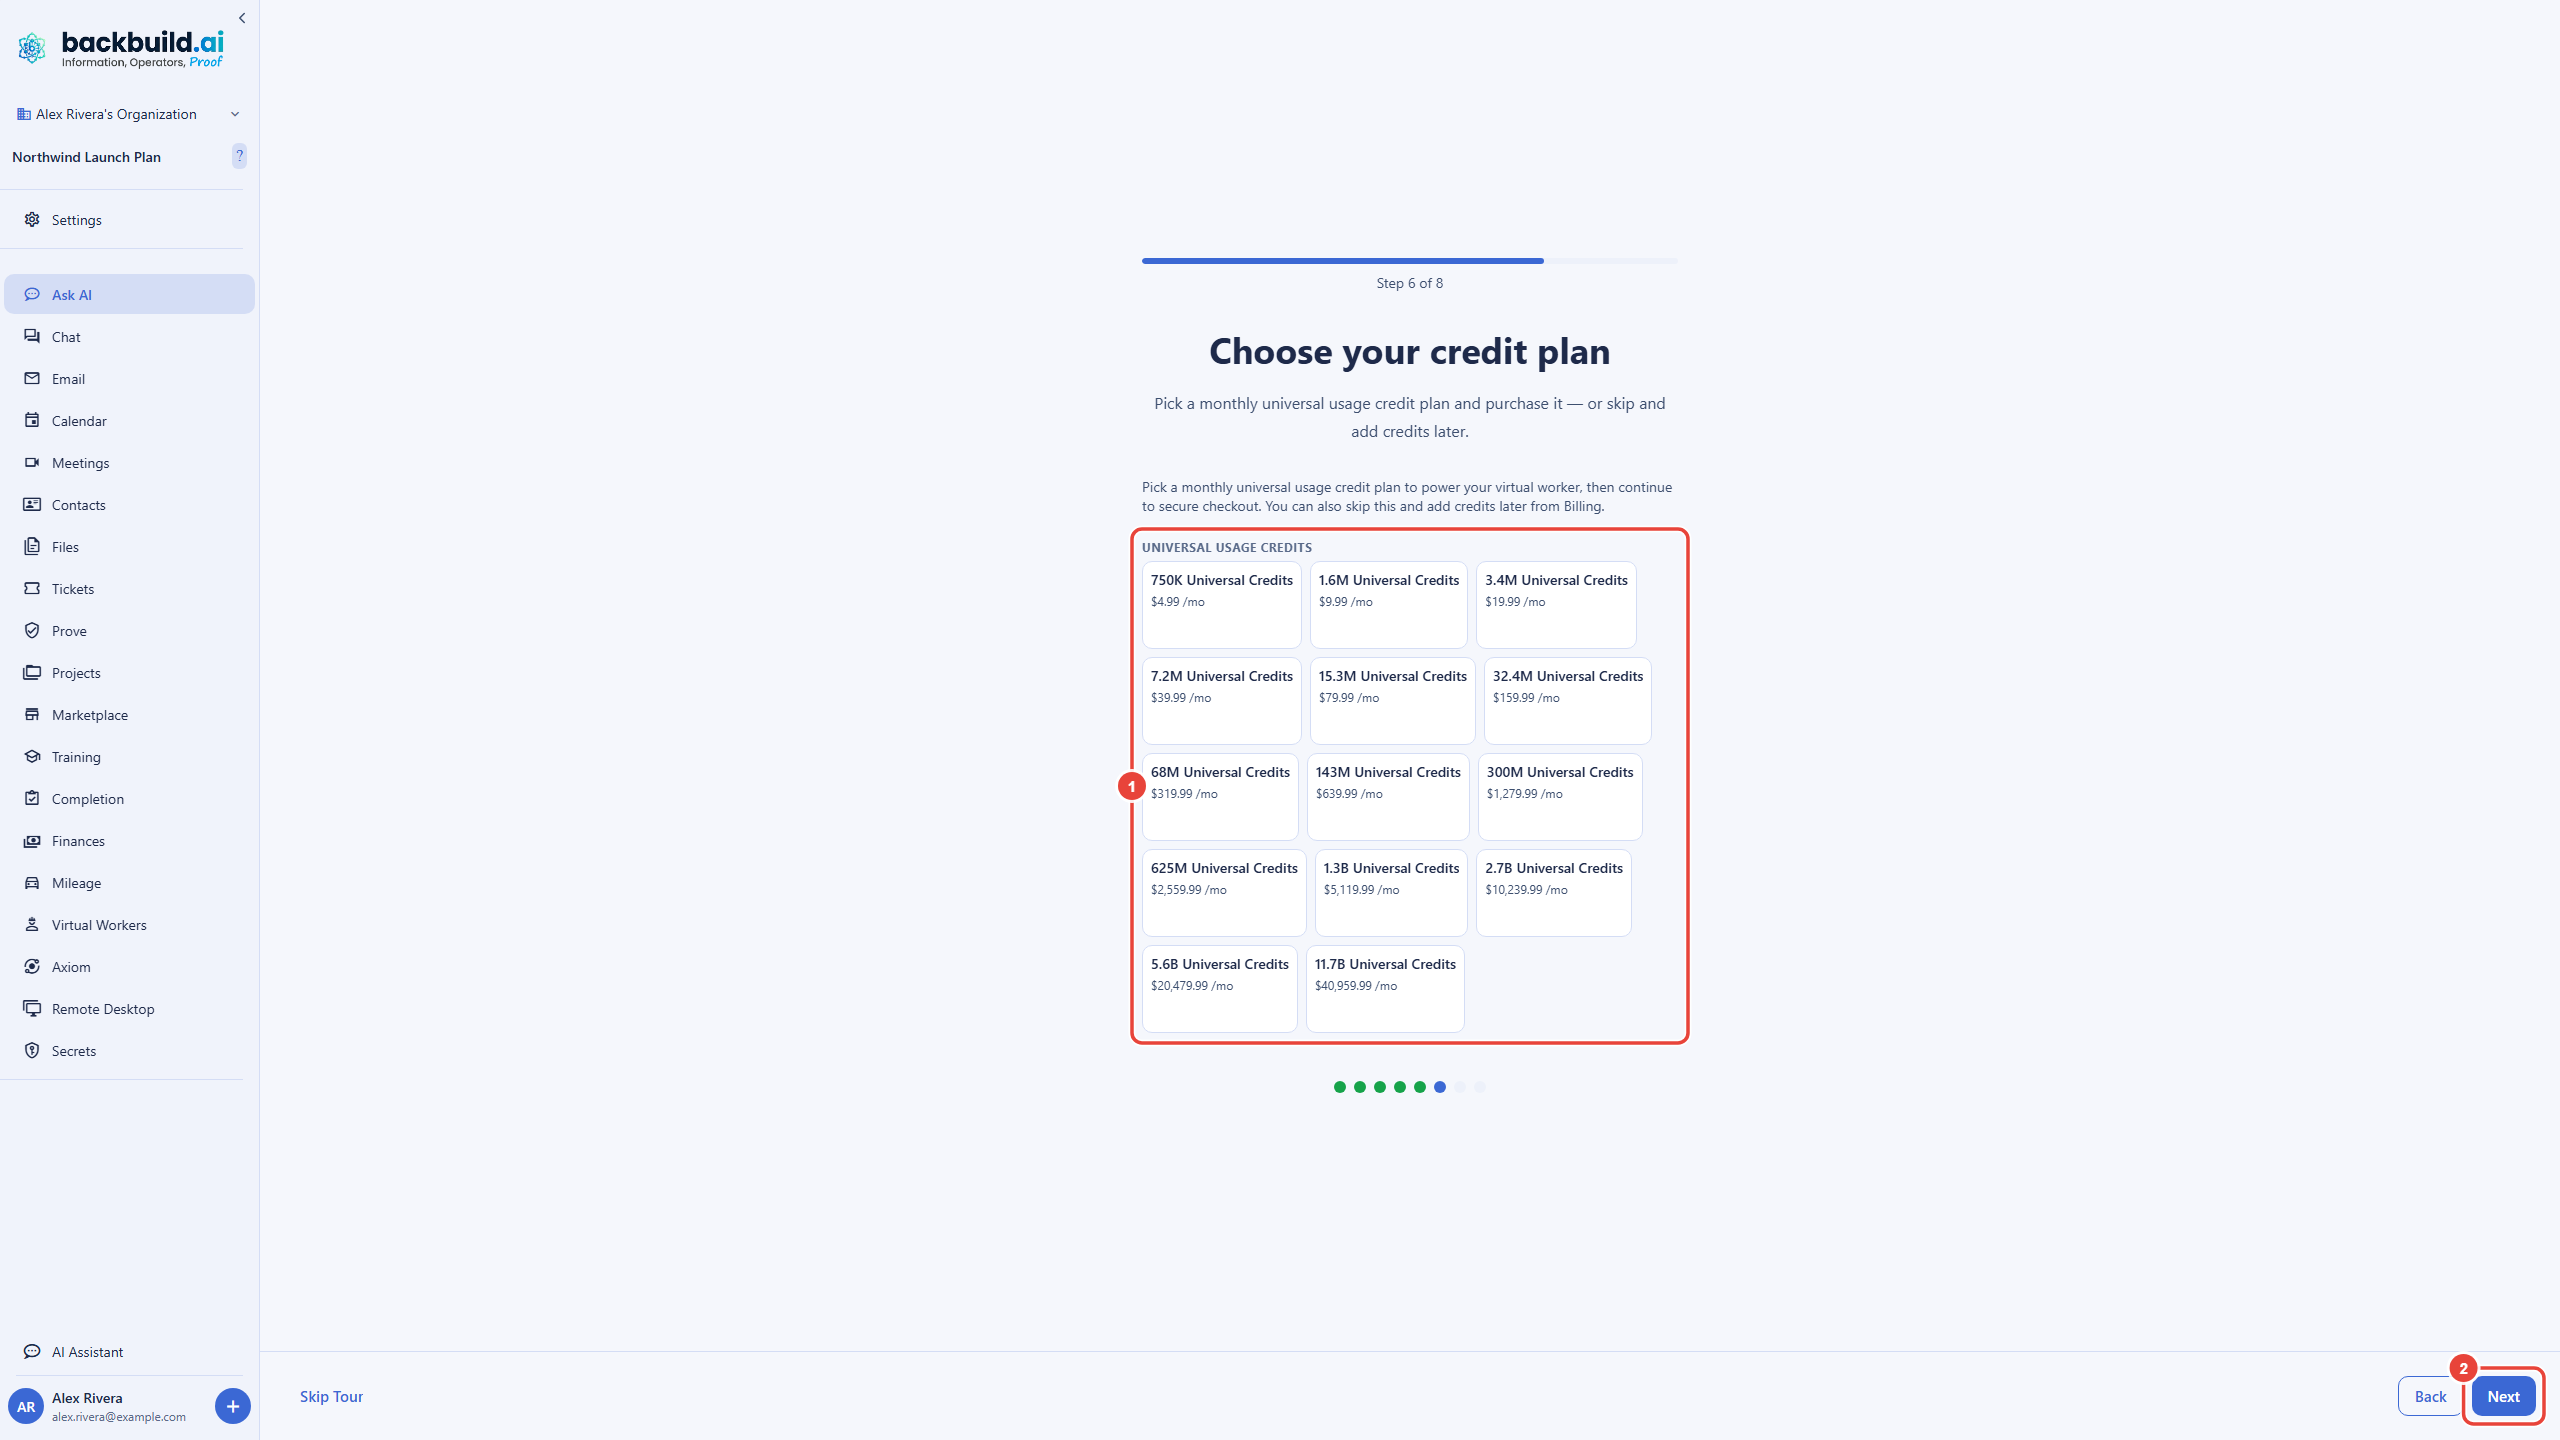
- Choose your credit plan. Shown when your worker draws on Universal Usage Credits or runs on a Backbuild environment. This is the one place the guide offers a purchase, and it is optional (see below).
- Connect a custom domain. Optional; you can set one up later in Settings.
- Give your worker context. Optionally let your virtual worker learn your workspace before it starts. The last step's button finishes the guide.
The credit plan step
Your credit plan is chosen once, in this single step near the end of the guide. Pick a monthly Universal Usage Credits package from the grid and the guide takes you to secure checkout to buy it, the same checkout Settings → Personal Organizations uses. Choosing Next instead moves on without buying anything; you can add credits at any time later. The purchase always funds the organization you are setting up, never another one you belong to.
4. Your Workspace
When the guide finishes, or you skip it, you land in Ask AI, the workspace home. Backbuild has created a personal organization for you on the Free plan, with you as its owner. An organization is the container that holds your projects, documents, and (later) your teammates. There is nothing you must configure before you start working.
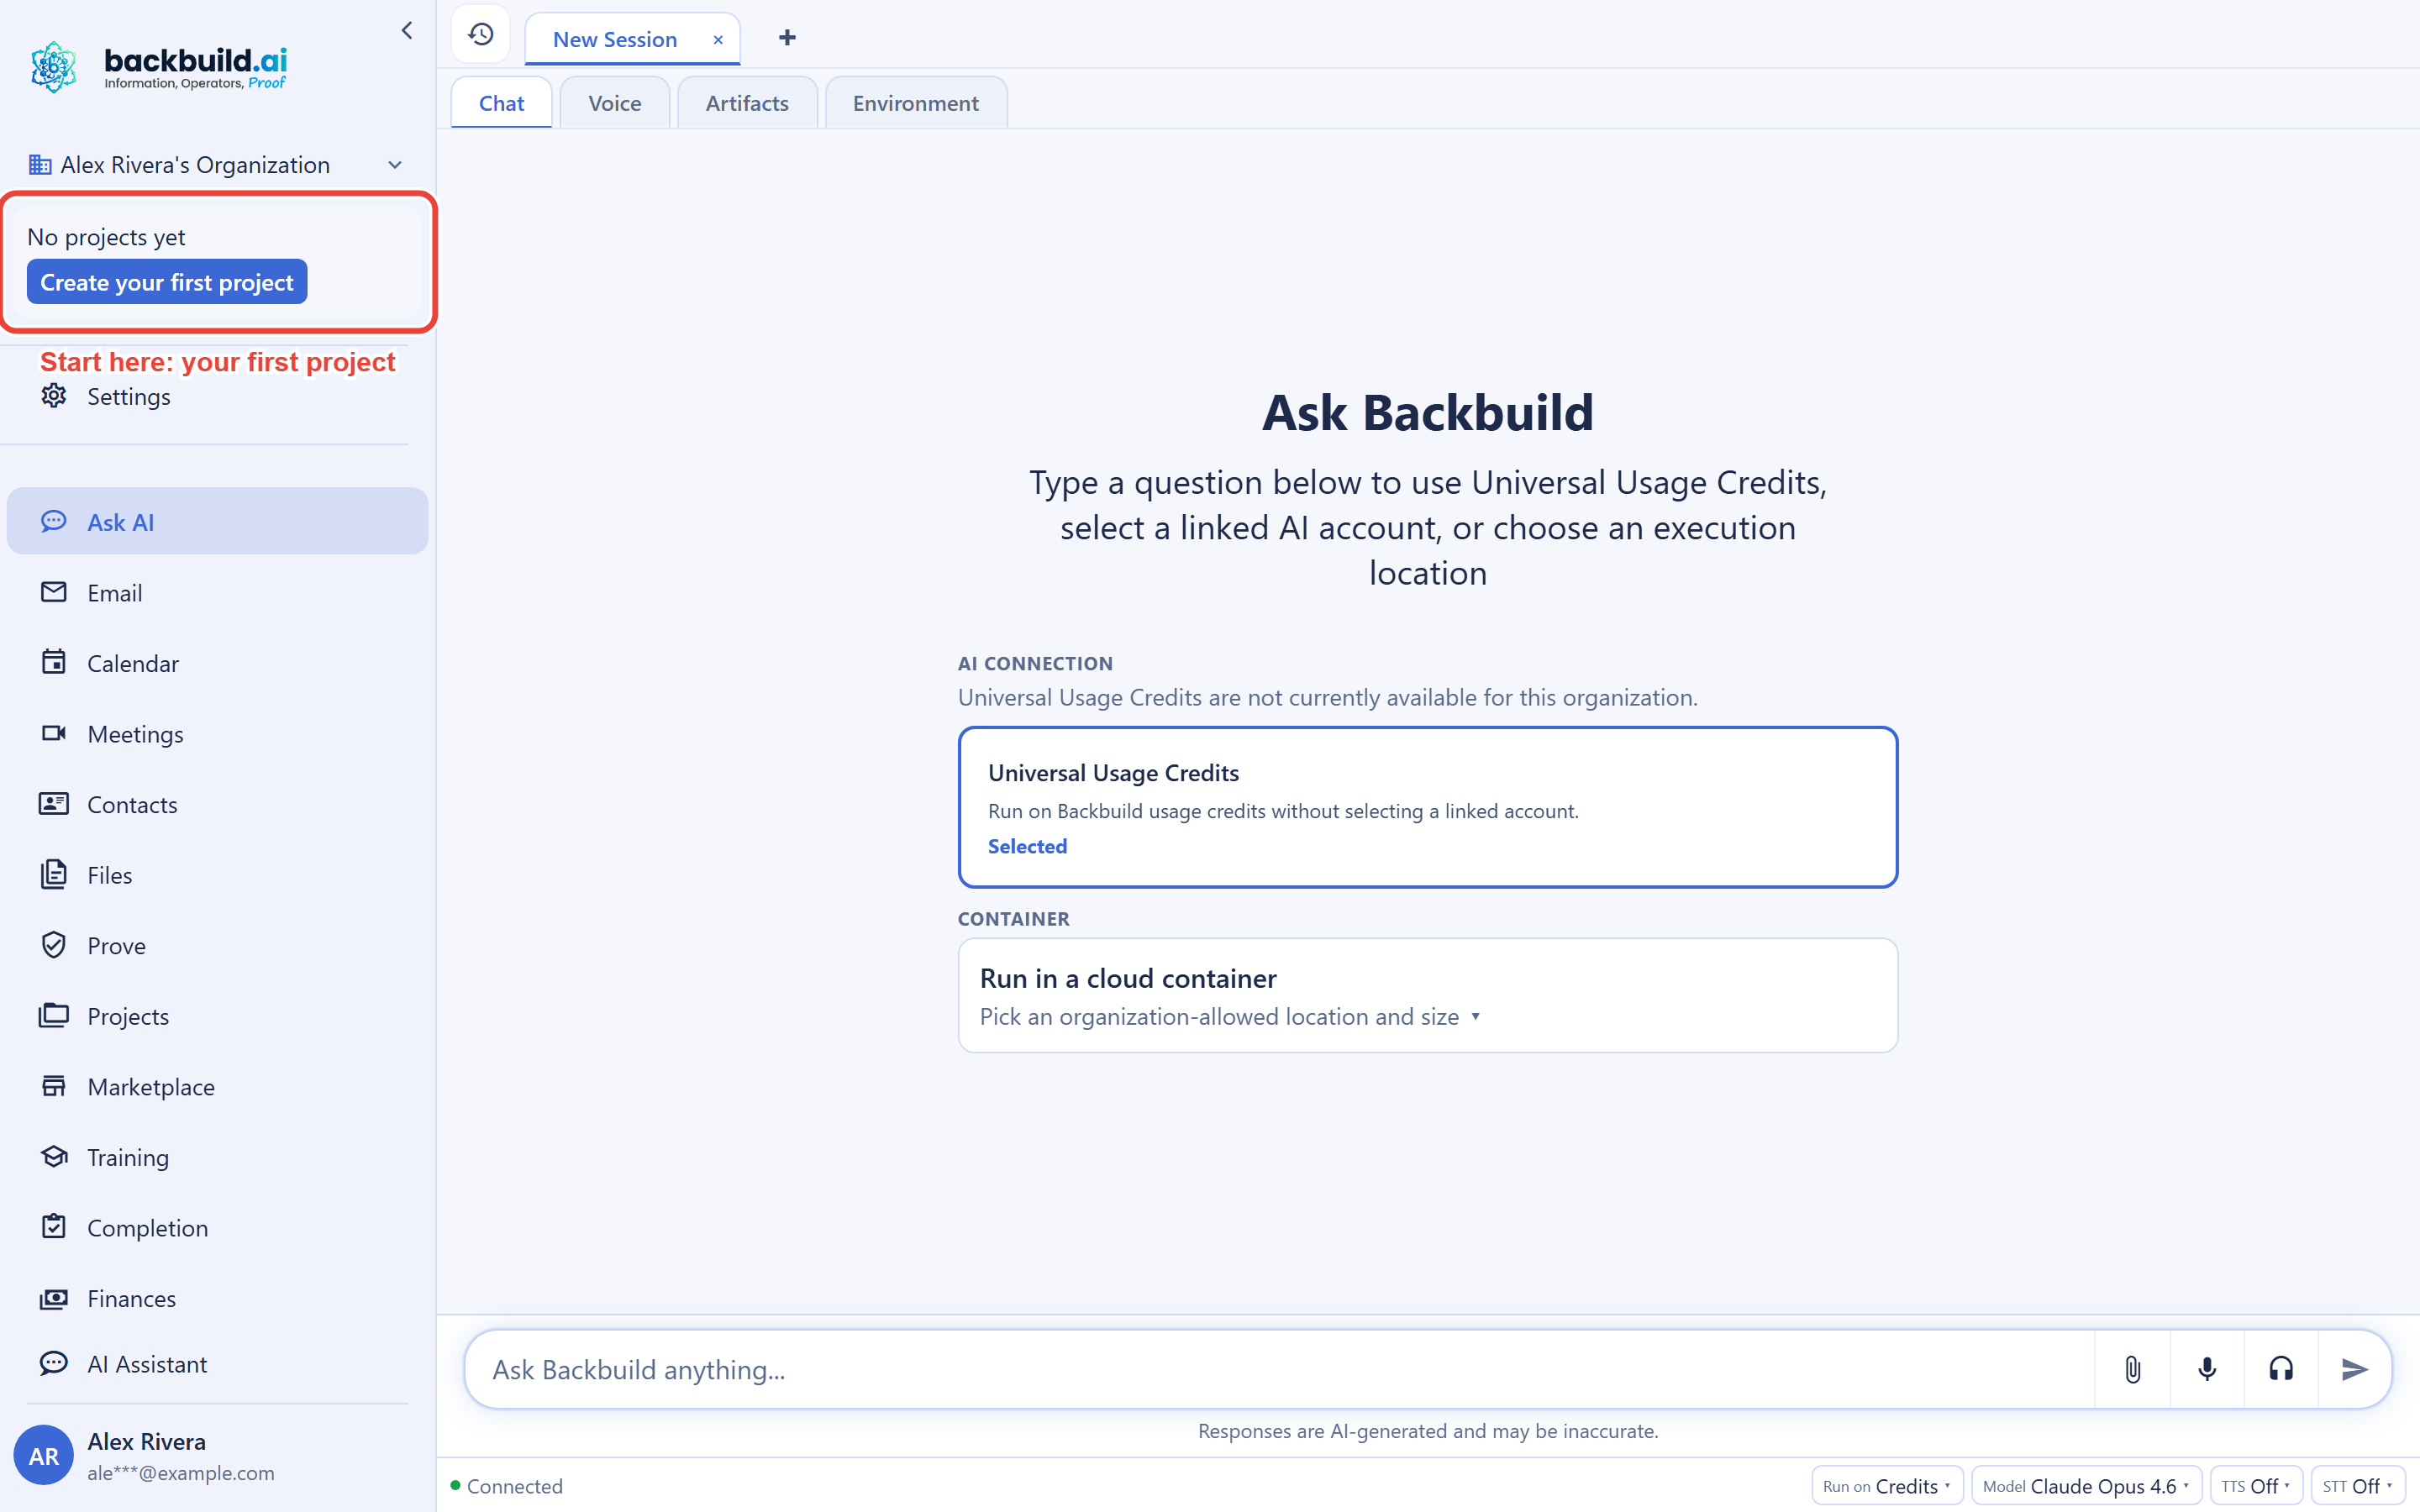
- The sidebar lists every app on your plan. The organization switcher sits at its top, with your current project beneath it.
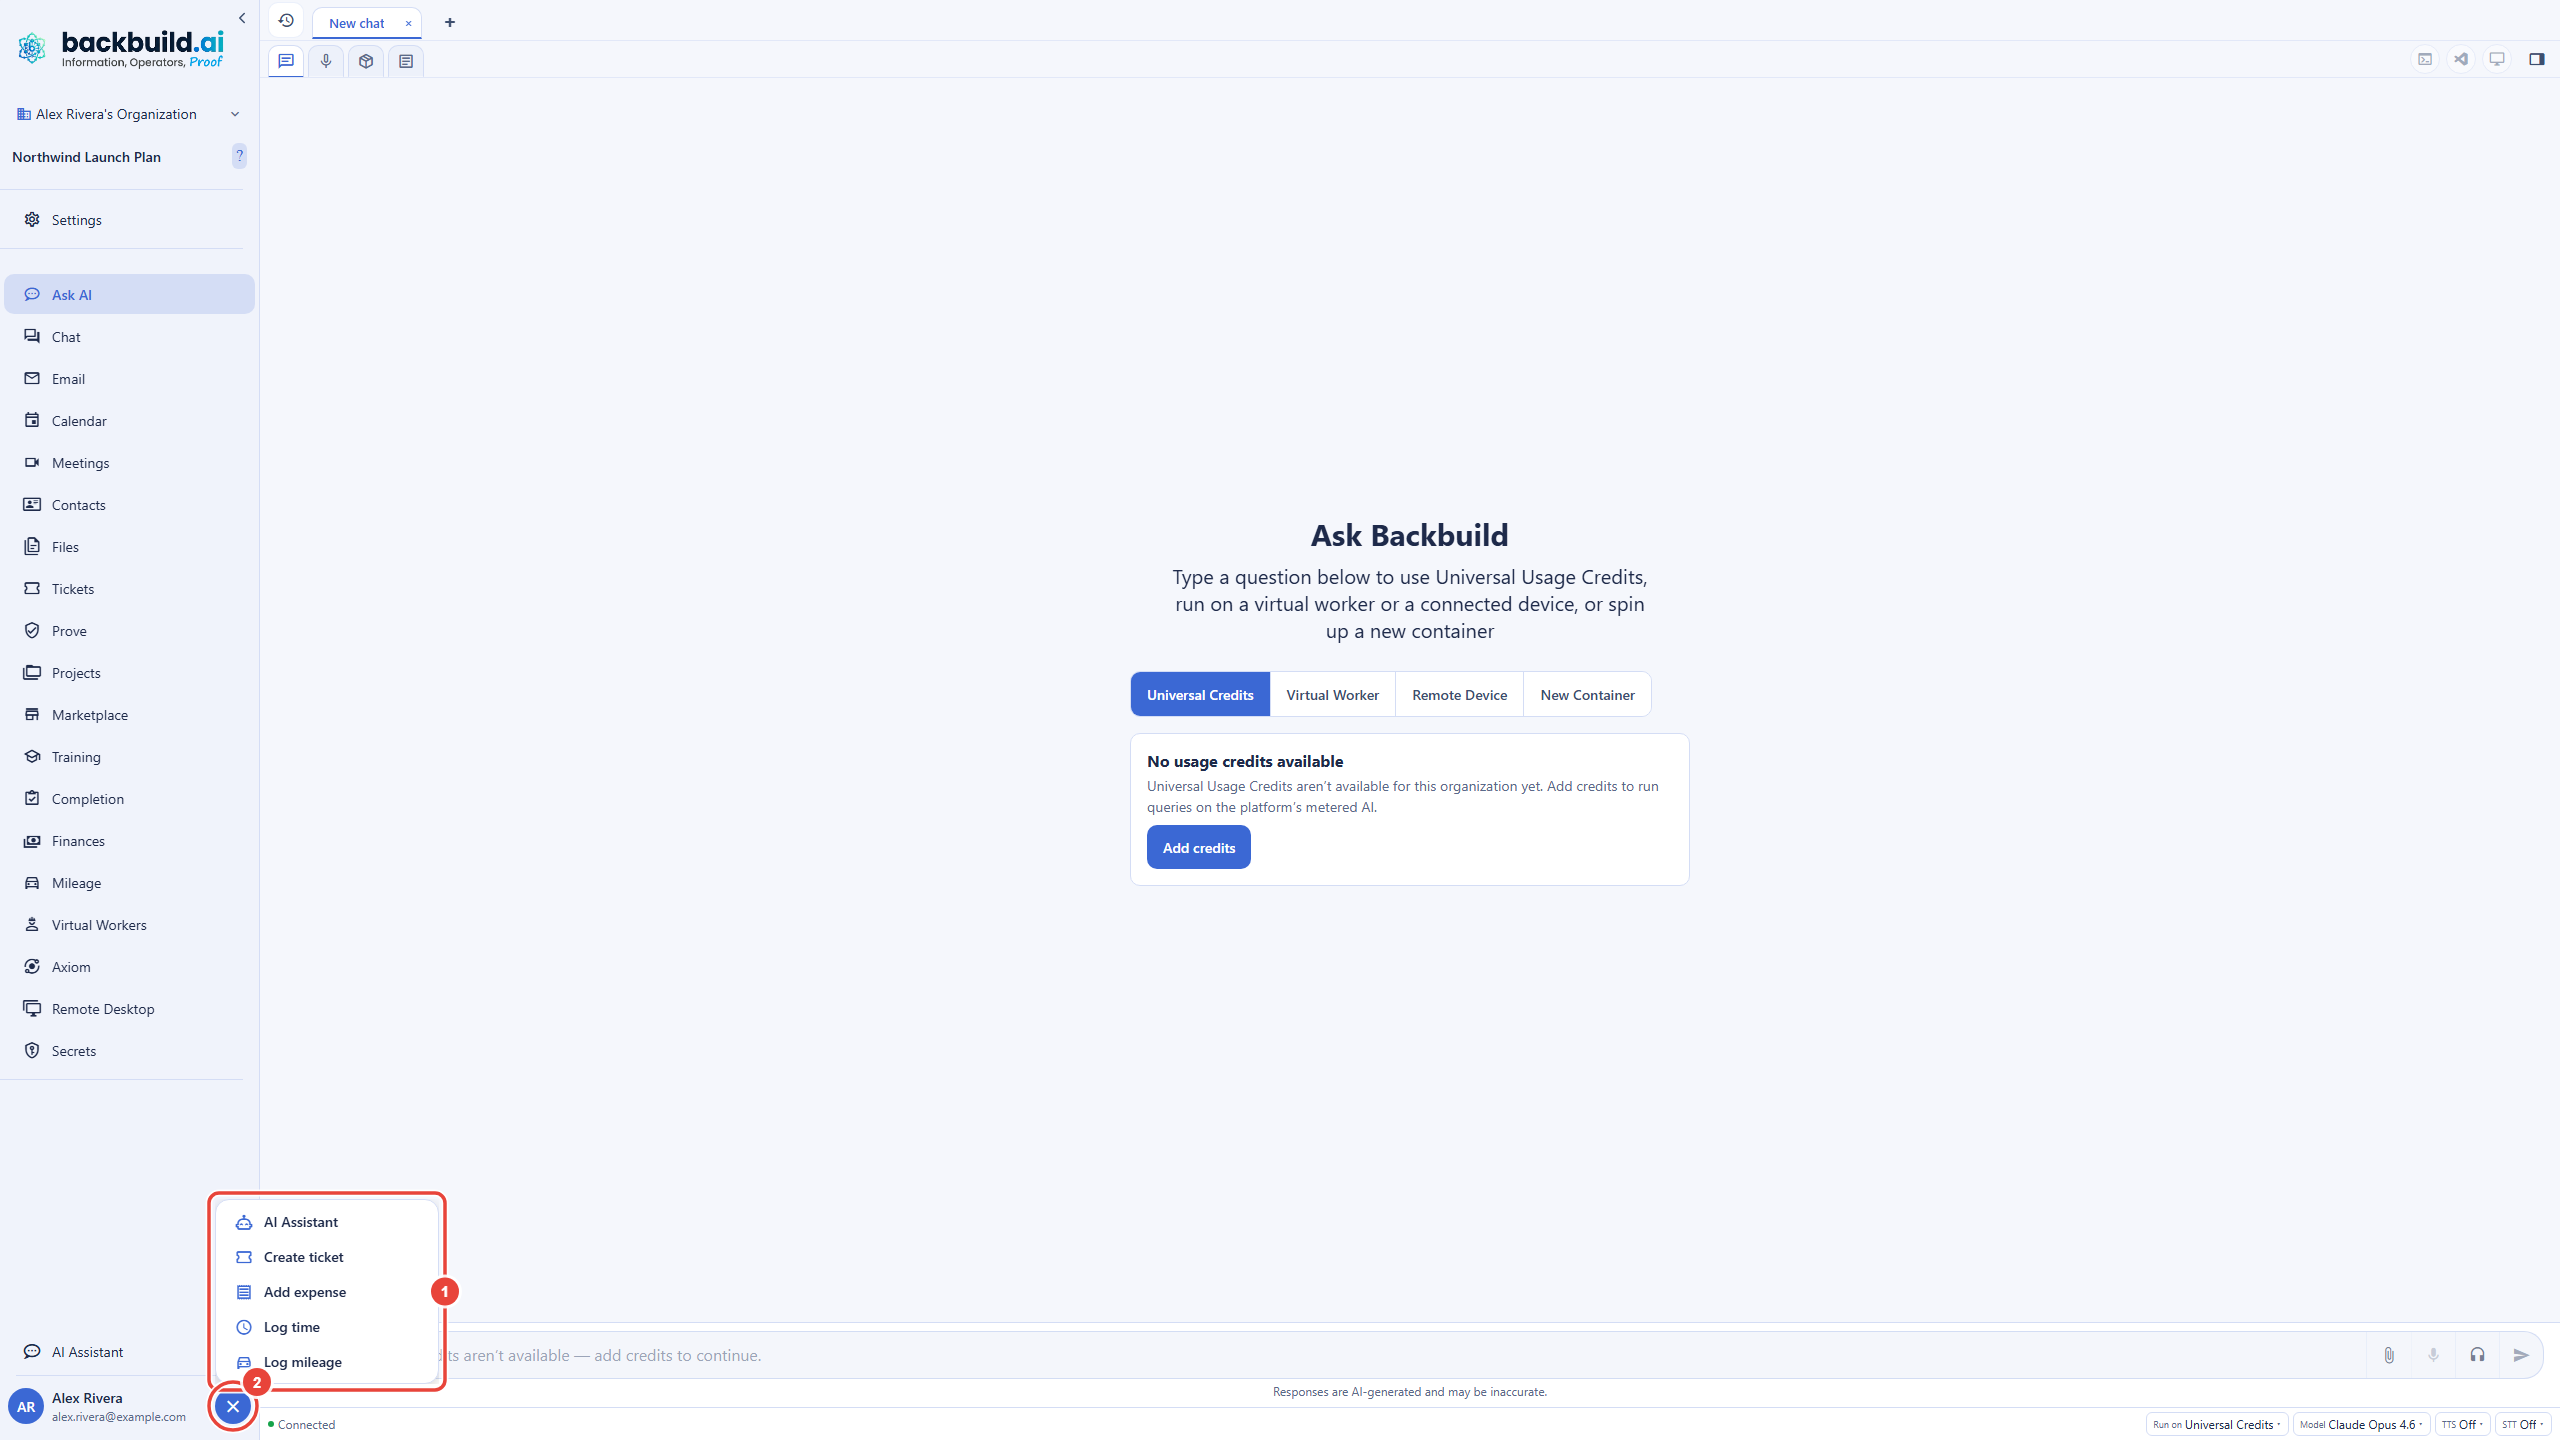
- Quick actions live in the sidebar, in the round plus button beside your name. It opens a short menu of shortcuts that work from any page: the AI Assistant, Create ticket, and the finance quick entries Add expense, Log time, and Log mileage. The menu shows only the actions your plan includes.
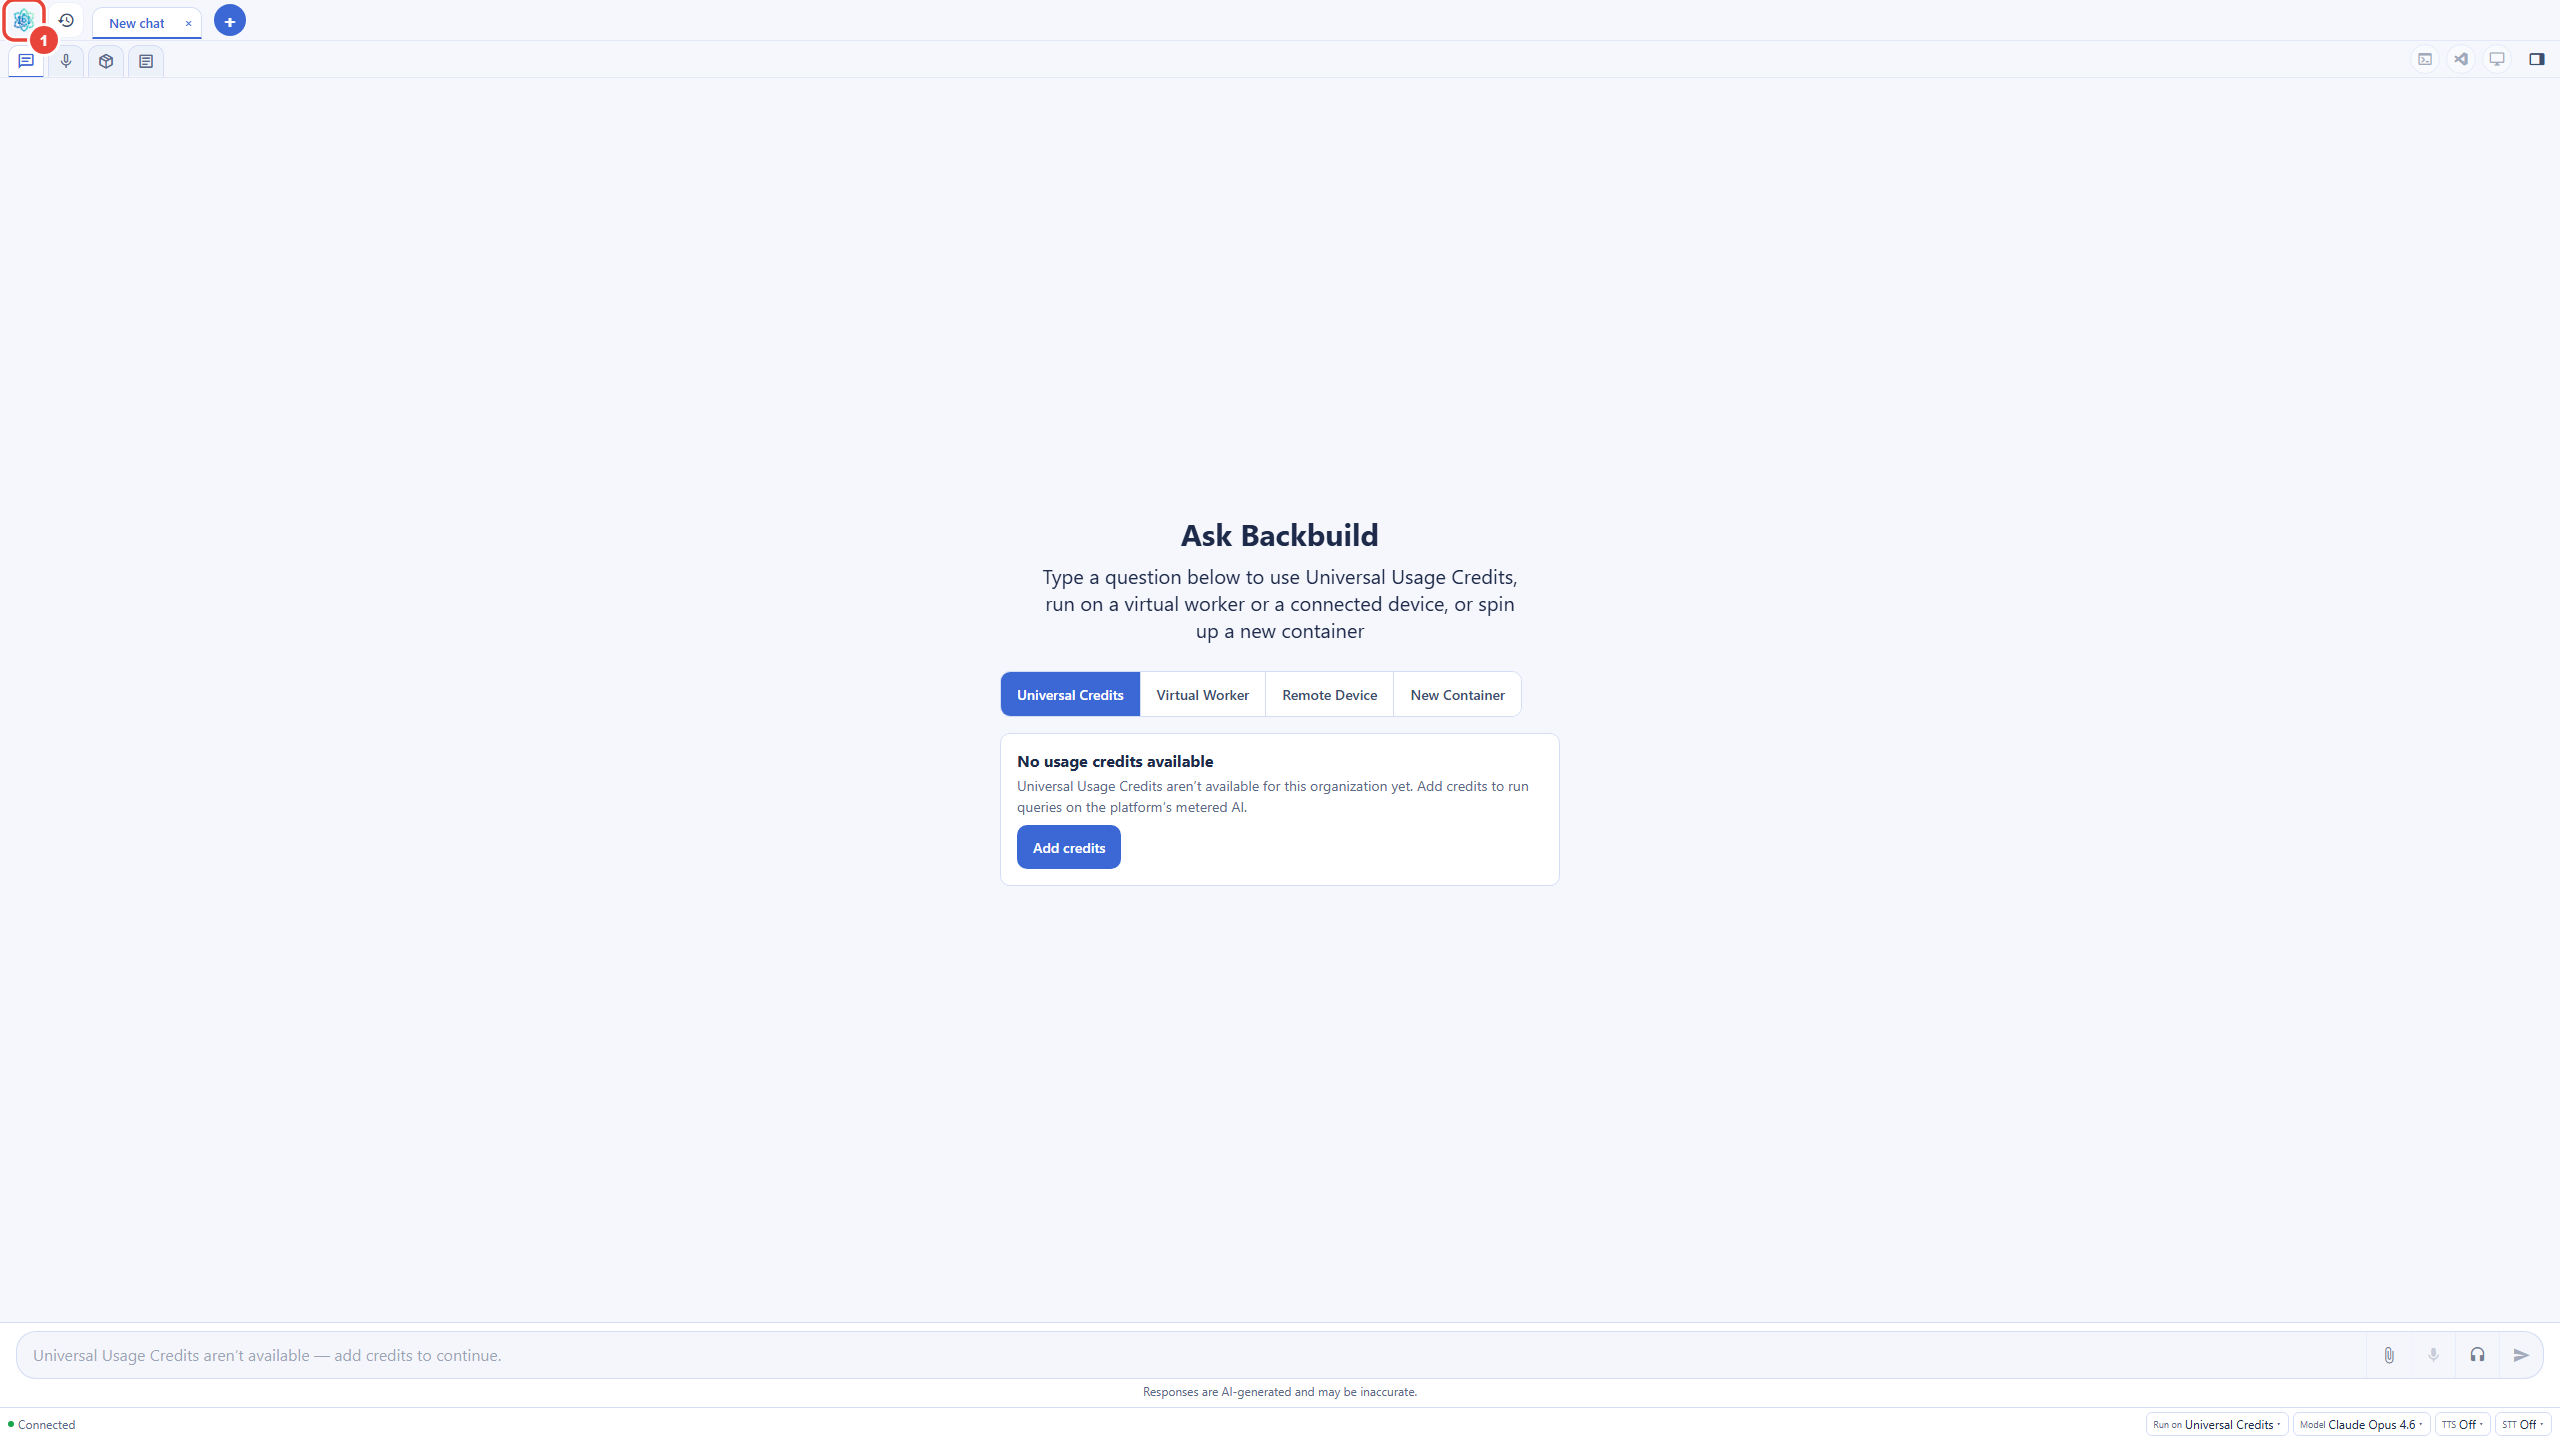
- Hiding the sidebar gives a page the whole window: choose the arrow beside the logo. While the sidebar is hidden, the Backbuild logo sits at the start of the page's own title bar; choose it to bring the sidebar back.
5. Your First Fifteen Minutes
The fastest way to make Backbuild yours is to do one real piece of work in it. Here is a first-success checklist:
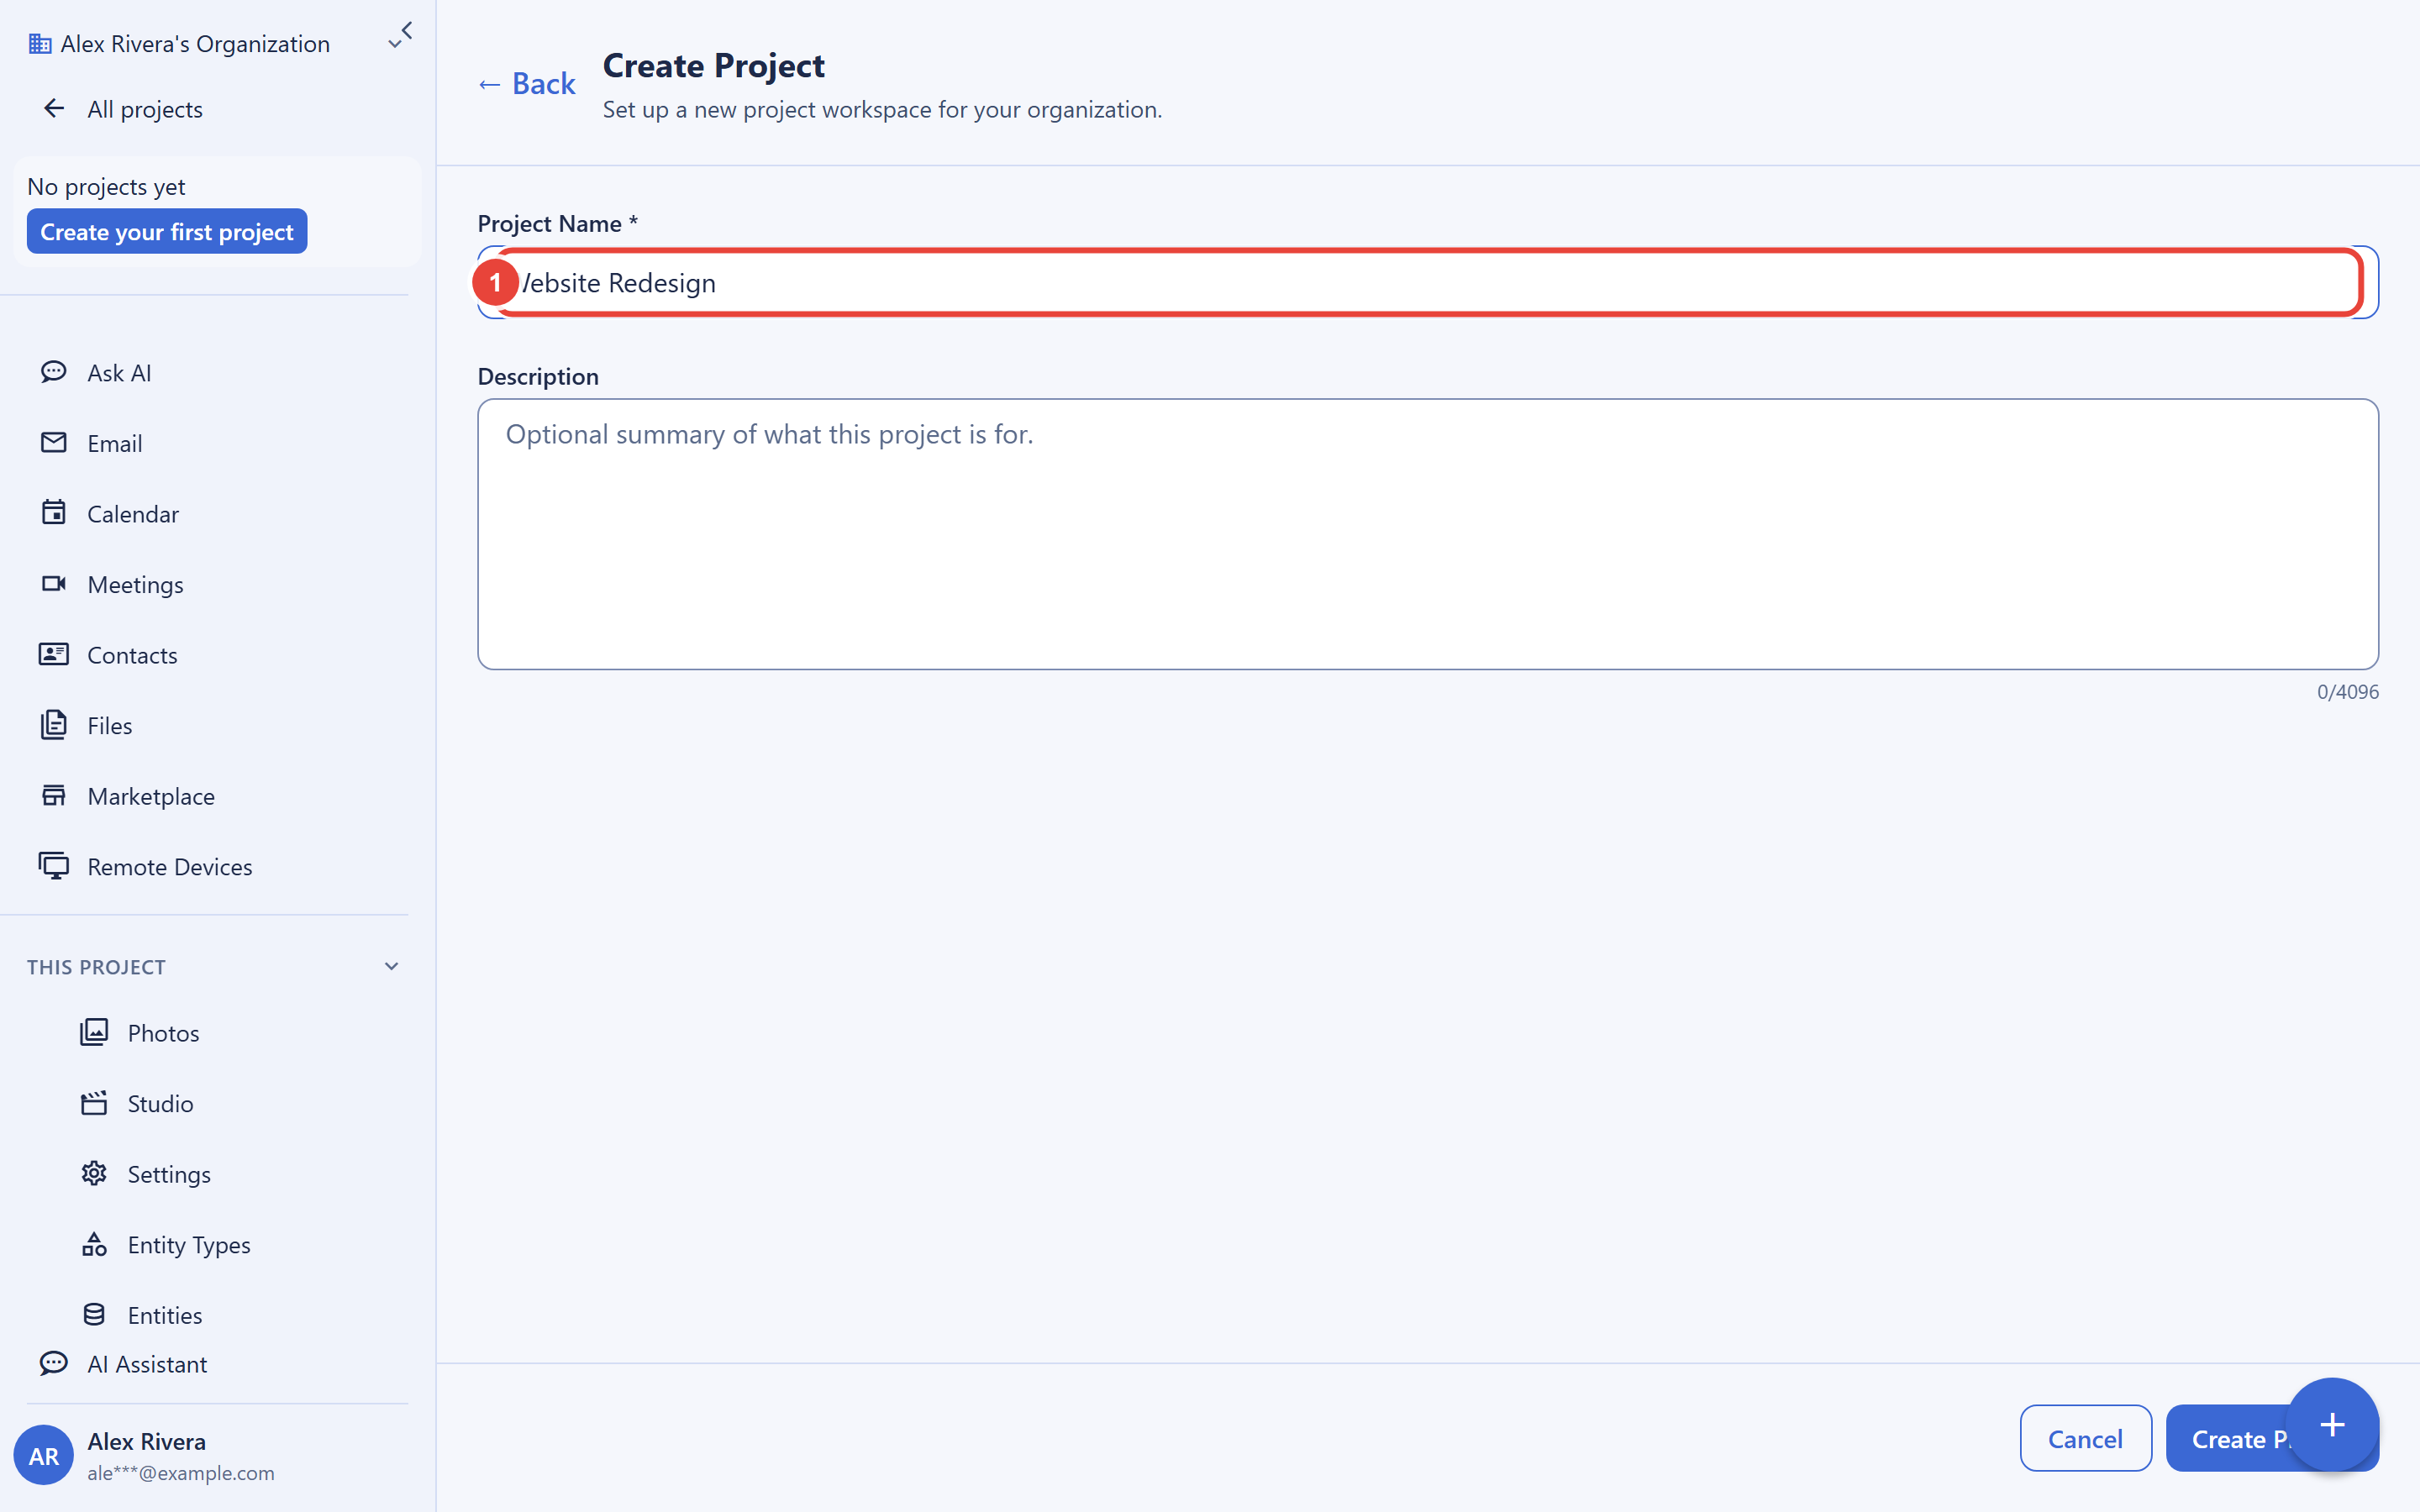
- Open your first project. If you named one in the setup guide, it is already in the sidebar. If you skipped that step, create one from the project panel at the top of the sidebar.
- Create a document inside it. Open the project and start a doc. Write anything: meeting notes, a plan, a draft.
- Open the other apps in the sidebar. Mail, calendar, files, sheets, and Secrets are all part of the same workspace. Knowing where they live now saves hunting later.
- Store one credential in Secrets. Unlock the vault with your master password and save one login you use often. This is the moment the vault master password from signup pays off.
That is a complete loop: an organization, a project, real content, and a protected credential, all inside the free plan, all in one sitting.
6. Invite Your Team
This section teaches you how invitations behave so you can send them confidently and answer your team's questions before they ask.
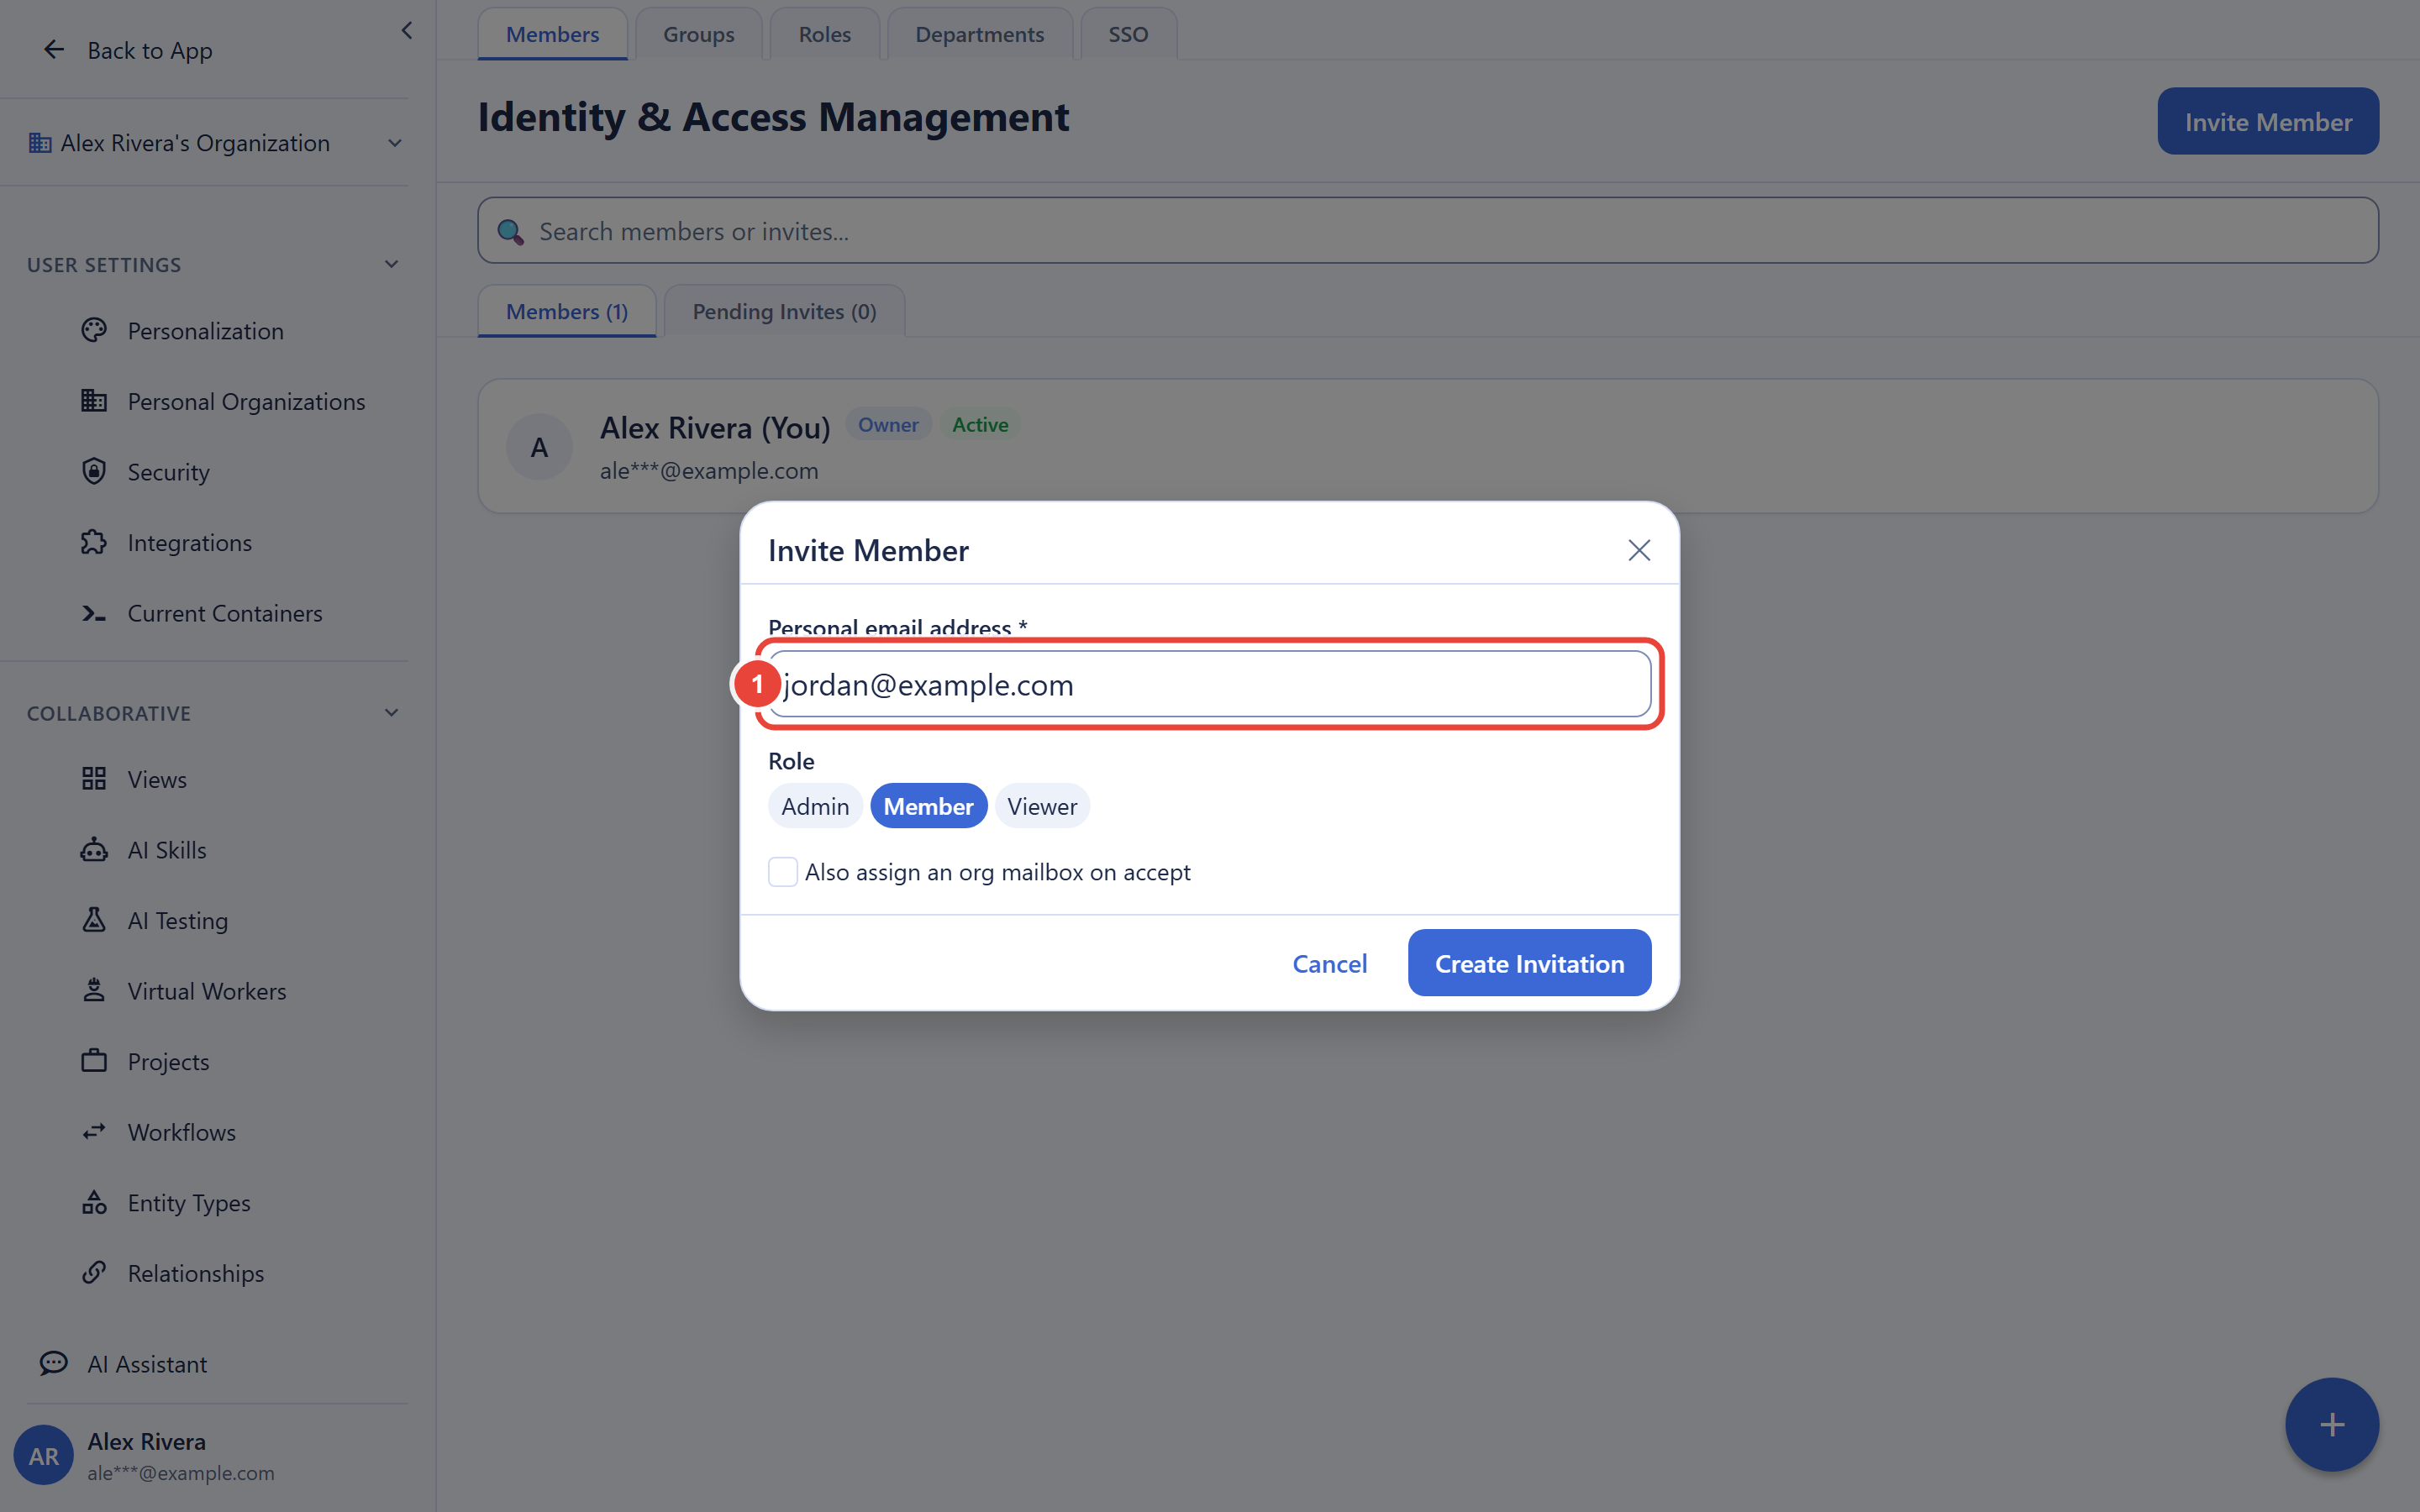
Invite teammates from the Identity & Access Management screen in your organization's settings. Each invitee receives an email with a personal invitation link. What happens next is designed to be self-service, so nobody comes back to you for setup help:
- The invitee sets everything up themselves: their login password and their own vault master password, and, like every account, a second factor. When they finish, they are in your organization and working.
- Invitations expire 24 hours after they are created. If a link expires unused, send a new one.
- The link locks to the first browser that uses it. Opening the link does not lock it; requesting the verification code (or accepting while signed in) does. This protects the invitation if it is forwarded or intercepted. If someone starts on the wrong device, send a fresh invitation and have them use it where they intend to finish.
- An invite to an address that already has a Backbuild account never creates a duplicate. That person is routed to sign in and joins your organization with their existing account, skipping any setup steps they have already done.
Joining from an Invitation
If you are the one who was invited: open the link from the invitation email in the browser you actually want to use, because the link binds to the first browser in which you request the verification code. Set your login password and your vault master password (read the master password section above before you pick one, and save the recovery kit it gives you), set up your second factor as described in the two-factor section, and you land in your team's organization ready to work. If you already have a Backbuild account under that email address, you will be sent to the normal sign-in page instead, and joining takes seconds. If your link has expired, ask the person who invited you to send another; they expire 24 hours after creation.
Upgrading, Downgrading, and Your Data
Plans are managed in-app after signup. When you outgrow the free allowances, upgrade from Settings → Personal Organizations; the change is self-serve and takes effect immediately. The same screen is where you create additional organizations of your own (see Organizations). Current plans, allowances, and prices live on the pricing page, which is always the authoritative source for numbers.
Two guarantees worth knowing before you invest real work:
- Hitting a free-plan boundary never charges you. Usage simply pauses at the free allowance until you upgrade or add credits. There is no surprise invoice.
- Downgrading never deletes your work. If a plan lapses, the organization returns to the Free tier and your data stays put. The only removal policy on the platform is for abandoned accounts: a Free account with no activity for six months receives a deactivation notice first and is removed only if it stays untouched for another 30 days, as described on the pricing page.
You are also not locked in. Your content remains accessible through the apps and through the REST API, and the research editors support standard export formats (see Research Editors & Export).
For Developers
Everything you just did in the UI is available programmatically. Mint an API key in the app, then drive the platform from scripts:
# Create a project via the API
# The project is created in the organization tied to your key
curl -X POST https://api.backbuild.ai/v1/projects \
  -H "Authorization: Bearer YOUR_API_KEY" \
  -H "Content-Type: application/json" \
  -d '{"name": "My First Project", "description": "Created from the command line"}'
See the API Reference for the endpoints; keys are minted and revoked from your API keys settings in the app. If you live in a terminal, the CLI Reference and the Secrets CLI guide are your next stops. The CLI is entirely optional: nothing in this guide required it, and non-developers never need it.
Frequently Asked Questions
Do I need a credit card to sign up?
No. Signup never asks for payment details, and the Free plan is not a
time-limited trial. You add payment information only if and when you
upgrade or buy credits.
Can I skip two-factor authentication?
No. Every account sets up a second factor during signup, or at its next
sign-in if signup was interrupted. If your phone is not handy, choose
this device's fingerprint, face, or PIN, or email codes, and add more
factors later from your security settings.
Do I have to buy credits during the setup guide?
No. The credit plan step is optional: choose Next to continue without
buying, and add credits whenever you need them.
Should I sign up with Google or with email and password?
Either is a good choice, and both are protected. Google sign-in means one
less password; a password account is screened against breached and common
passwords. Both kinds of account set up a second factor. Use whichever
fits how you already work.
What happens if I forget my vault master password?
Use the recovery kit you saved when you created it: choose "Forgot your
master password?" on the vault unlock screen, enter the kit, and choose a
new master password. Without the kit, nobody, including Backbuild and your
administrators, can open your personal vaults. Your account keeps working
either way.
I never received my verification code.
Check spam, then request a new code; only the newest one is valid. If a
corporate filter is blocking the mail, use another address or contact us
via the contact page.
What happens when I hit a free-plan limit?
Usage pauses at the allowance. Nothing is charged and nothing is deleted.
Upgrade or add credits in-app to continue; details are on the
pricing page.
Can I get my data out?
Yes. Your content is accessible through the apps and the
REST API, and the research editors export to
standard formats. Leaving is possible, which is exactly why staying is a
choice.
Do I need to install anything?
No. Backbuild runs in your browser. A desktop app
is available for Windows and macOS if you prefer one, and developers can
use the optional CLI.
Next Steps
- Learn every sign-in option, MFA, and multi-account handling in Signing In and Account Security
- Explore the platform overview to see what your workspace can do
- Set up scripting access with the CLI Reference
- Replace your .env files with the Secrets CLI guide
- Review plans when you are ready to grow