

Backbuild Containers
A Backbuild container is a real cloud computer you launch on demand, straight from a project, without provisioning a machine or configuring a toolchain. It gives you a terminal, a full Visual Studio Code editor in your browser, and an optional graphical desktop, all in one isolated workspace. Your files are saved to a private home folder that survives shutdown, and you pay usage credits only while it is running. After this page you will know what a container is, how to launch your first one and connect to it, what it costs, and where to go for each task you need to accomplish.
Containers are available on every plan, including Free, and run on universal usage credits while they are running. Only running time is metered; a stopped or torn-down container draws nothing. See the pricing page for the credit model.
What You Get
After this section you will understand the shape of the product and which guide answers your question. A container is not a stripped-down shell. It is a complete, disposable environment that bundles the three things most cloud workflows otherwise stitch together from separate services.
- A reconnectable terminal. A real shell that keeps running while you work. If your connection drops, you reattach to the same session, not a fresh one, and full-screen terminal programs render faithfully.
- Visual Studio Code in your browser. The full editor, open on your container's files, with nothing to install locally. Work from a laptop, a Chromebook, or a tablet.
- An optional graphical desktop. Launch with the desktop turned on and you also get a live Linux desktop you can see and control in the browser, for the moments a terminal and an editor are not enough.
- A private home folder that persists. Your work is saved to your organization's own private storage and survives shutdown, so relaunching picks up where you left off.
- Credit metering you can predict. A per-hour rate is shown on every size card and in the running status bar. Credits are drawn only while the container runs; idle teardown protects you from a container you forgot was on.
- Drivable by API and AI agents. The whole container lifecycle is available over the public REST API and to AI agents through native tools, so scripts and agents can launch, drive, and tear down containers without a person at the keyboard.
Launch Your First Container
After this section you will have a running container and know how to connect to it. The fastest path is to launch a small size from a project and open the terminal; you can add the graphical desktop later by launching a new one with it turned on.
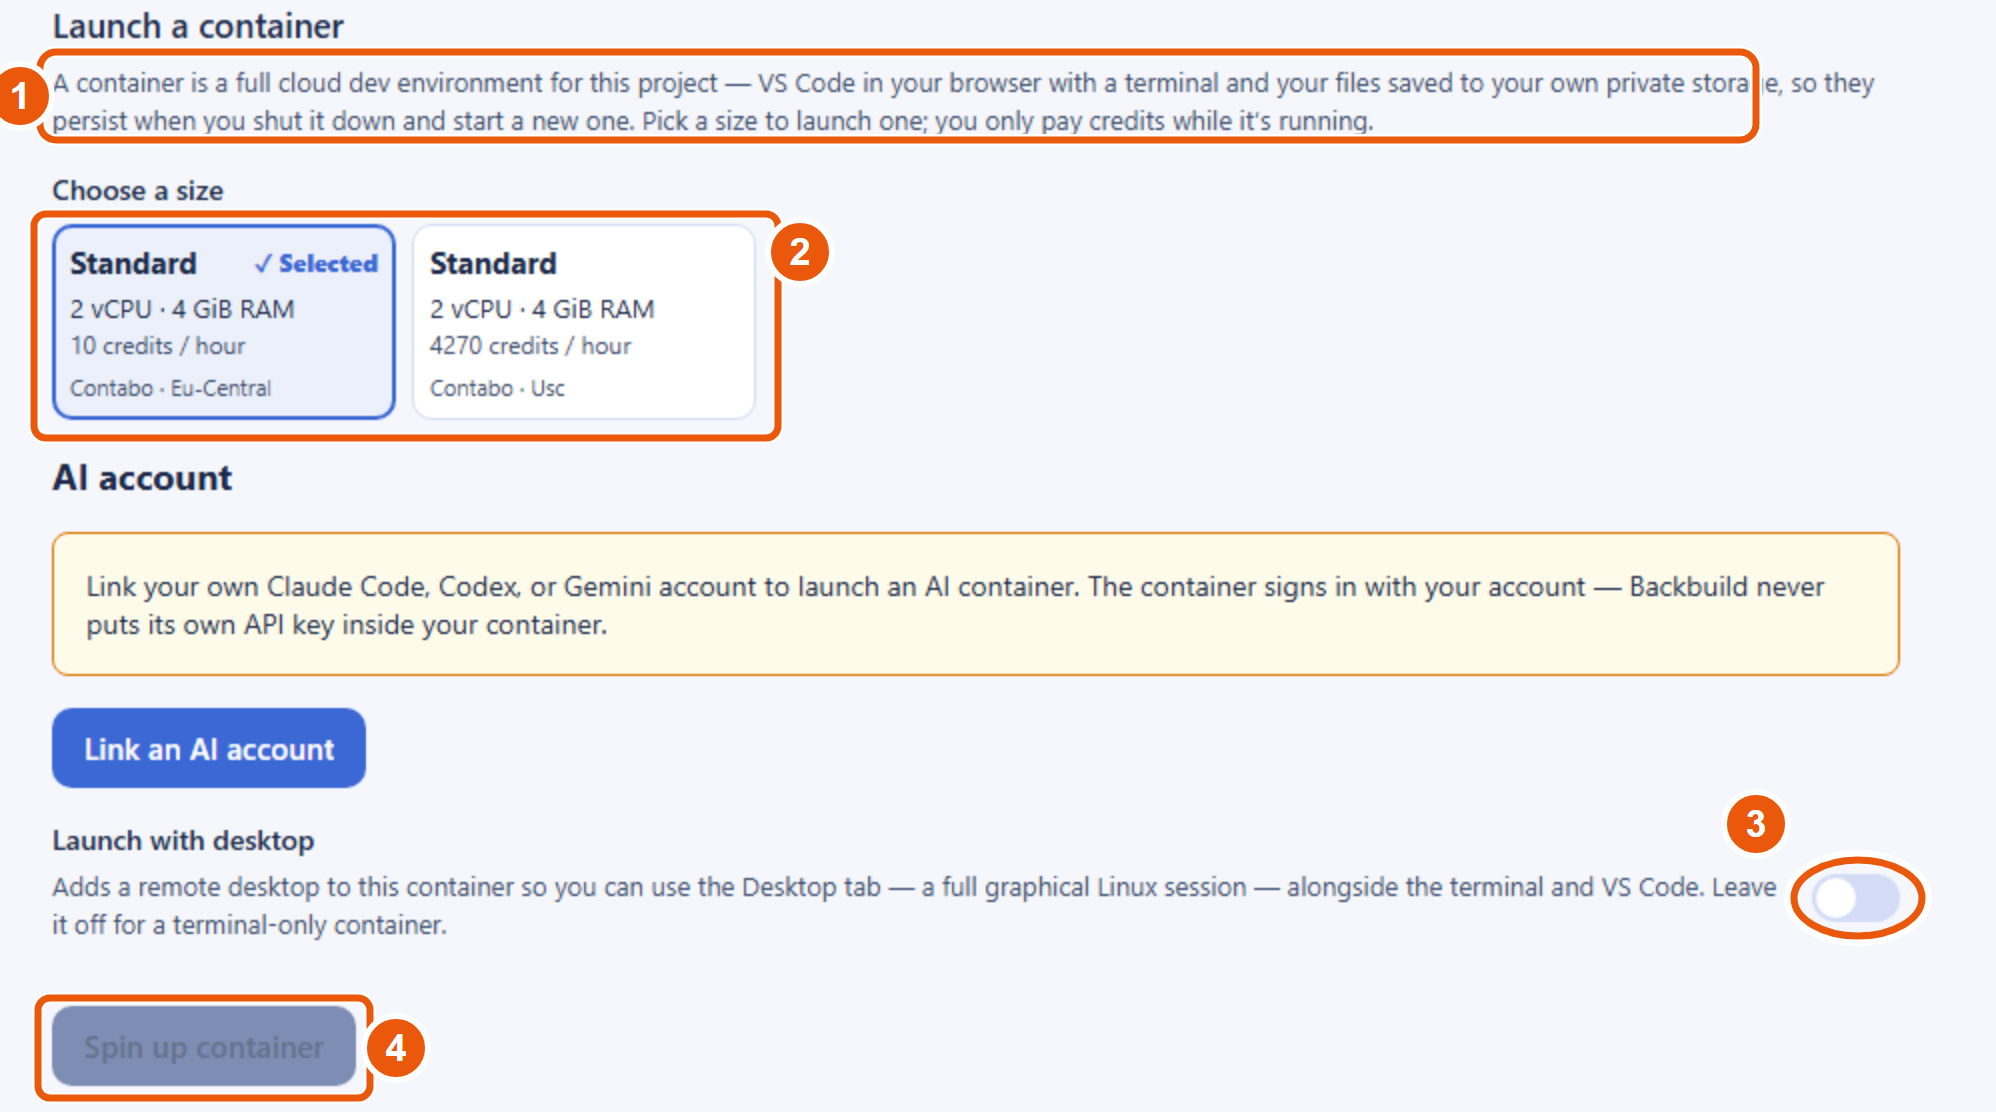
- Open a project and choose Launch a container. Read the short explainer so you know what you are about to get.
- Pick a size. Each card shows the tier name, its vCPU and memory, its credits-per-hour rate, and the backend and region it runs in. Start small; you can launch a larger one whenever a task needs it.
- Decide on the desktop. Leave Launch with desktop off for a terminal-and-editor container. Turn it on if you need the graphical desktop surface. See Terminal, VS Code, and Desktop.
- Spin it up. Click Spin up container. The status badge moves through queued, starting, and running, usually in well under a minute, and the terminal attaches and waits while it provisions. See Launching a Container.
- Work, then close. Use the terminal, editor, and desktop tabs. When you are done, terminate the session from your containers list; your home folder is kept for next time. See Managing Sessions, Persistence, and Credits.
How fast does it spin up? A container is typically ready to use in well under a minute. The terminal attaches immediately and shows the status as it provisions, so you watch it come up rather than guessing.
Can I work from a Chromebook or a tablet? Yes. The compute runs in the cloud and everything renders in the browser, so any device that runs a modern browser can drive a container. Only a network connection matters.
Available on Every Plan
After this section you will know what is included and what draws credits. Containers are part of the platform on every plan, including Free. There is no separate container subscription. What you pay is usage credits for the time a container actually runs.
- Running time draws credits. Each size has a credits-per-hour rate shown on its card. Larger sizes draw more. A container that is stopped or torn down draws nothing.
- Real-time syncing to a running container is measured in Real-Time Session Minutes. Every organization includes 10,800 of them free each month, and only active time counts; idle time never does.
- Your home folder counts toward your file storage allowance, the same pool your other files use, not a separate meter.
The pricing page is the authoritative source for current rates and included allowances.
Choose Your Guide
Each guide teaches one job end to end. Start with the one that matches what you need to do.
- Launching a Container: the launch screen, picking a size, the backend and region, the desktop toggle, running the in-container AI on your own account, and the status lifecycle from queued to running.
- Terminal, VS Code, and Desktop: the three surfaces in depth, how the terminal reconnects to the same shell, VS Code parity, and the graphical desktop with input and audio.
- Managing Sessions, Persistence, and Credits: your containers list, switching and terminating, graceful close, exactly what persists, and how credits and idle teardown keep costs predictable.
- Container Policies and Administration: for admins, restricting which sizes, backends, and regions your team may use, per-project overrides, scoping a contractor, the audit trail, data residency, and reselling containers in your own product.
- Agents, Automation, and the API: driving a container from an AI agent, the browser and desktop control tools, the isolation posture for running untrusted code, and the public REST API.
- GitHub for Your Team: connect GitHub at the organization level so containers get authenticated git and gh, and the AI can ground answers in your repositories, using read-only access with every credential sealed in your organization's zero-knowledge vault.
Related Surfaces
Containers share their engine with three neighboring capabilities. Choose by what you are trying to do.
- Virtual Workers: when you want an autonomous AI worker to operate a container for you, under your organization's roles, vault, and audit trail, rather than driving it yourself.
- Remote Desktop: the browser-based screen, control, and audio engine that a container's graphical desktop streams over, and the way to reach your own enrolled machines.
- Sandbox Execution: the API-first, disposable code-execution model for agents and test runs, with session persistence, a git clone on provision, and artifact download.
What a Container Is Not
Choosing well means matching the tool to the requirement. A Backbuild container is a disposable cloud computer for interactive development, agent work, and graphical tasks. It is not a permanently-on server for hosting a production service, and it is not a replacement for your organization's managed deployments. Its home folder persists, but the running machine is meant to be started for work and stopped when the work is done, which is exactly what keeps it inexpensive. If you need an always-on workload, host it on a deployment rather than leaving a container running.