

Vaults, Items and the Password Generator
This guide teaches you the day-to-day of keeping secrets in Backbuild Secrets: how vaults organize and gate access, how to create every kind of entry with the right fields, how to reveal and copy a value without leaking it, how to generate a strong password, and how to bring back a value you changed by mistake. By the end you will be able to structure a workspace that is easy to find things in and safe to share.
Vaults Are the Unit of Organization and Sharing
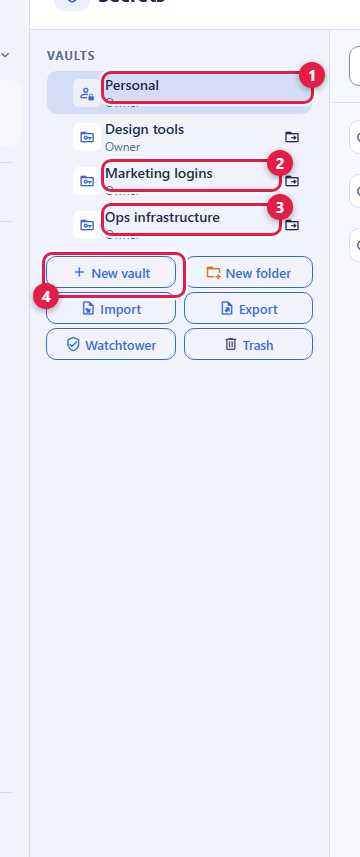
After this section you will know how to structure your vaults so sharing later is simple. A vault is a container of items, and it is also the thing you share. Everyone starts with a Personal vault that cannot be deleted or transferred away. You create additional named vaults for a team, a project, or a client, each with its own icon and color so it is easy to recognize.
The single most useful habit is to organize secrets into vaults that match how you want to share them. Sharing happens at the vault level: granting someone access to a vault lets them open every entry in it. So a vault called Marketing logins that you share with the marketing team, and a separate Ops infrastructure vault you share only with engineers, is far easier to run than one big vault you keep re-checking. Sharing is covered in full in Sharing Vaults with Your Team; the point here is to shape your vaults with sharing in mind.
You can arrange vaults in a tree. Projects and folders intermix at the top level, and a vault can sit at the root, inside a folder, or directly under a project. Folders are purely organizational: they tidy the rail, but they do not grant access. Access always comes from vault membership, never from where a vault sits in the tree. Folder and vault names are encrypted like everything else, so the structure itself is private.
Create an Entry
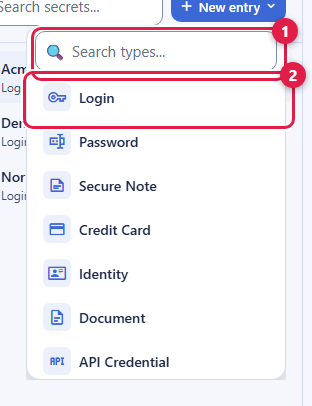
After this section you will be able to create the right kind of entry for anything you need to store. Click New Entry and a searchable flyout offers the item types. Picking a type pre-seeds the fields that type usually needs, so a Login opens with a username, a password, and a website, and a Credit Card opens with a number, an expiry, and a security code. You can always add or remove fields afterward.
The type set matches what a mature password manager offers, so an import from another tool lands in the right shape: Login, Password, Secure Note, Credit Card, Identity, API Credential, Database, SSH Key, Server, Software License, Wireless Router, Bank Account, Document, and more. If nothing fits, a Custom type lets you build the record from empty.
Sections, fields, and field types
Every entry can carry custom sections, which render as labelled dividers, and custom fields, each an editable label above a typed value. The field type controls how the value is entered, displayed, and protected. The available types are text, password, email, url, phone, date, month and year, one-time passcode, number, address, a reference to another item, a menu of choices, a file, and a masked multi-line field. The main Notes area is a rich-text editor for longer context.
The masked multi-line field is built for the things developers actually store that do not fit on one line: a kubeconfig, a PEM certificate or private key, a service-account JSON file, a block of environment variables. It grows as you paste, up to a tall default height, can be dragged to resize, and stays masked with reveal and copy controls like any other secret. It means you do not have to flatten a multi-line secret into a note to store it safely.
Every masked field, whatever its type, has inline controls to reveal or hide the value and to copy it to the clipboard, and it stays masked until you deliberately reveal it. The clipboard is a shared surface that other applications on your device can read, so paste a copied secret where you need it and then overwrite your clipboard, and prefer autofill or a direct reveal over a copy whenever you can.
Keep a one-time passcode beside its login
A one-time-passcode field stores the authenticator secret for an account that uses app-based two-step verification, and renders the live rotating code, six digits refreshing every thirty seconds for a typical account, right next to the login it belongs to. When you add a new account's two-step protection, choose to store the secret here and your codes live with the credential instead of on a separate device you have to reach for.
Should I store my two-step codes and passkeys in the same vault
as the password?
Storing the one-time-passcode secret in the vault is supported and
convenient: the current code appears beside the login, ready to use. Whether
to keep a second factor in the same place as the first is your call; some
prefer the convenience of one place, others keep the factors apart on
principle. Passkeys are different today: the vault can file a passkey as a
record for your reference, but it does not yet act as a passkey authenticator
that answers sign-in challenges.
Generate a Strong Password
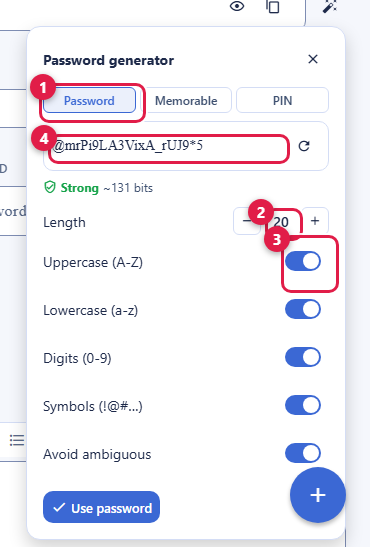
After this section you will never have to invent a password again. The built-in generator produces a value from a cryptographically secure random source, in three shapes:
- A random password with a length stepper and toggles for upper case, lower case, digits, and symbols, plus an option to avoid ambiguous characters (like the letter O and the digit 0) for values you may have to read aloud or type.
- A memorable passphrase of real words, with controls for the word count, the separator between words, whether to capitalize, and whether to include a number.
- A numeric PIN of the length you choose.
A live preview updates as you adjust the controls, a strength meter shows how strong the current value is, and a regenerate control rolls a fresh one. When you like it, drop it straight into the password field of the entry you are editing.
History, Attachments, and Trash
After this section you will be able to recover from a mistaken edit and manage an entry's whole lifecycle.
- Value history. Every entry keeps the last fifty prior values of a field. Open history to see them; revealing an old value asks for a fresh confirmation, the same care as revealing the current one. Restoring an old value creates a new current version from it rather than a raw overwrite, so nothing in the chain is lost.
- Attachments. An entry can carry file attachments, encrypted like the rest of the entry and shared with whoever the vault is shared with.
- Trash. Deleting an entry moves it to the vault's Trash rather than destroying it. From Trash you can restore it or purge it permanently. A soft delete is reversible; a purge is not.
Find Anything Fast
The workspace is a three-pane layout: the vault and folder rail on the left, search and the item list in the middle, and the entry detail on the right. Search is instant, because after your first unlock the app paints from a local encrypted cache rather than waiting on the network, so opening the app and finding a credential feels immediate even before a sync completes.
Import From Your Old Password Manager
After this section you will have your existing logins in Backbuild. You do not have to start from scratch. Backbuild Secrets imports exports from 1Password, LastPass, Bitwarden, Dashlane, and KeePass, as well as the CSV that browsers produce. It detects the format and maps fields into the matching item types, so your logins, secure notes, and one-time-passcode secrets carry over.
Because the vault is zero-knowledge, the import and the encryption that follows happen on your device. Two habits make an import clean: check the item count in Backbuild against your old manager so you know everything came across, then securely delete the export file, because a plaintext export is itself one of the most sensitive documents you will ever handle.
How do I move over from LastPass, Chrome, or a spreadsheet?
Export from your current tool (or your browser's saved passwords) to its
standard file, then import that file in Backbuild Secrets. The format is
detected and fields are mapped for you. After it lands, compare the item
count, then delete the export file securely.
Where do I put a kubeconfig, a certificate, or a private key?
Use the masked multi-line field on any entry (for example an SSH Key, a
Server, or a Secure Note). It grows as you paste, stays masked, and gives you
reveal and copy controls, so you never have to flatten a multi-line secret to
store it.
I changed a password and need the old one back.
Open the entry's history. It keeps the last fifty values; reveal the one you
need (with a fresh confirmation) and restore it, which creates a new current
version from that value.
Next Steps
- Sharing Vaults with Your Team: now that your vaults are shaped around how you share, grant access safely.
- Autofill with the Browser Extension: fill the logins you just stored on the sites you authorize.
- Unlocking, Device Factor and Recovery: unlock faster and set up your way back in.