

Set Up an Email Auto-Responder
You want inbound inquiries handled for you: a customer question comes in, and something reads it and answers, day or night, without a person glued to the queue. Backbuild does this with a Virtual Worker, a named AI employee you hire onto the job. You bring your inquiries into the built-in Help Desk as tickets, and the worker picks up each new one, reads the real message, and drafts an on-brand reply. One thing is deliberately not automatic: sending a message to an outside recipient always requires a person, on every plan, so a human gives the drafted reply a glance and sends it. That is the difference between a canned bounce that says nothing and a real answer that is fast and correct. After this guide you will have hired a Support Agent worker, given it operating instructions and a mailbox, routed inquiries to it through the help desk, and seen it draft a reply for review.
Virtual Workers are available on every plan and run on universal usage credits. Sending email to an outside recipient is a safety floor that always requires a person and cannot be switched off by any setting; see Autonomy and Approvals.
What You Will Accomplish
By the end you will have a working AI responder for your inquiries: a hired support worker with a clear brief, put on your help desk queue, that reads each incoming ticket and drafts replies your team approves and sends. You will also understand the one rule that shapes the whole design, that a worker drafts and a person sends, and why that makes it safe to leave running.
- A hired Support Agent Virtual Worker with a name, a manager, and operating instructions.
- An inquiry Backbuild Mail mailbox assigned to the worker.
- Inbound inquiries routed to the worker through the help desk so it reads the real conversation and drafts a reply as an internal note.
- A supervision routine: transcripts, the approval queue, a budget, and an instant pause.
Before You Start
You will need a few things in place first.
- Permission to hire workers. Hiring is a permissioned action; an owner or administrator has it, or someone they have granted it to. See Roles and Permissions.
- An inquiry mailbox. A Backbuild Mail mailbox for the address you want covered, such as an info or support address (for example
info@example.com). You can create it first or assign it later. - Usage credits. A worker runs on universal usage credits, so keep a credit balance available.
- The help desk. The built-in Help Desk is included on every plan and is where the content-aware answering happens (Step 7).
Step 1: Open Virtual Workers and Hire a Worker
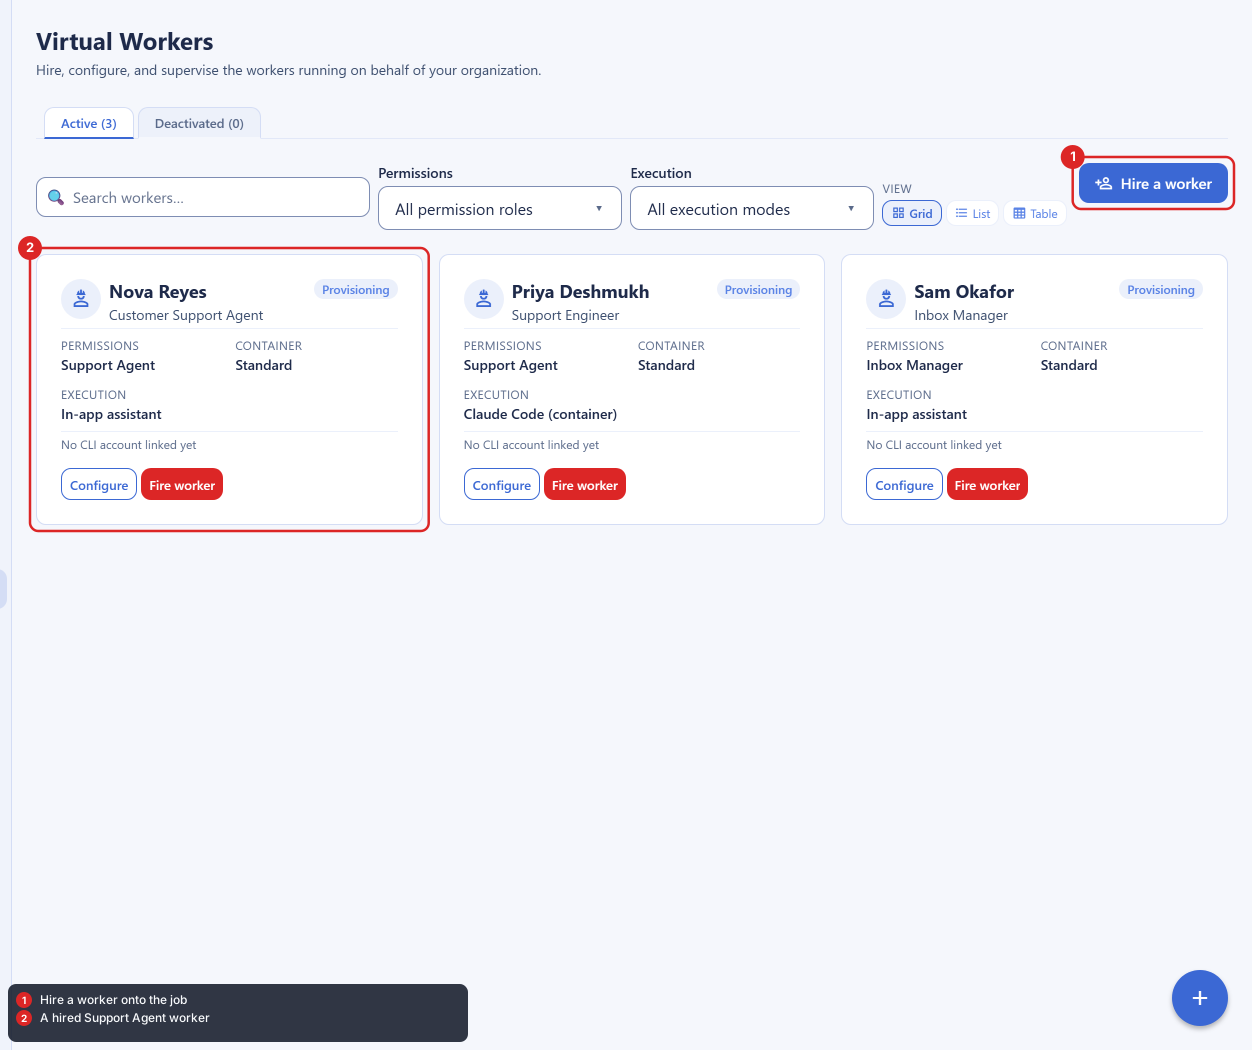
After this step you will have a new worker to configure. Go to Settings, then Administration, then Virtual Workers. This is the roster of your organization's workers. Choose Hire a worker to open the hire wizard. The wizard and the per-worker editor share one layout, with sections for Persona, Runtime, AI settings, Scheduling, and Access controls, so anything you set now you can revise later in the same place.
Step 2: Set the Persona and Choose the Support Agent Role
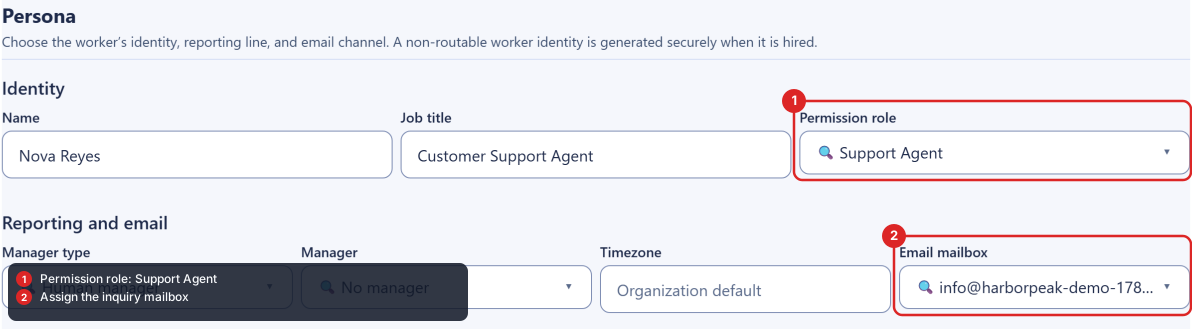
After this step the worker has an identity and a reach. In the Persona section:
- Give the worker a real, person-like Name (required). This is how it appears on the roster, in transcripts, and in your audit trail.
- Set a Job title, for example Customer Support Agent.
- Set the Permission role to Support Agent. There are exactly three roles, Support Agent, Developer, and Inbox Manager; Support Agent is the one for reading inquiries and drafting replies. The role is the ceiling on what the worker can touch, so pick the smallest one that covers the job.
- Choose a Manager, the person (or another worker) who reviews this worker's approvals and is accountable for its output.
- Set the Timezone the worker's hours are read in.
- Optionally assign the Email mailbox now, or leave it for Step 6.
The worker's underlying identity is created the moment you hire it. It cannot sign in and holds no password, and the three roles never include organization administration, billing, or identity-and-access management, so the worker is a first-class member of your team without being a door an attacker can walk through.
Step 3: Choose the Runtime
After this step the worker knows how it runs. In the Runtime section, set the Container size to Small (inquiry work is light; raise it only if a task needs more) and the Execution mode to In-app assistant. In-app assistant runs on your usage credits with nothing to link and is the right default for reading tickets and drafting replies; the container modes are for workers that edit code or drive a desktop. See Hiring and Configuring a Worker for the other modes.
Step 4: Connect the AI and Write the Operating Instructions
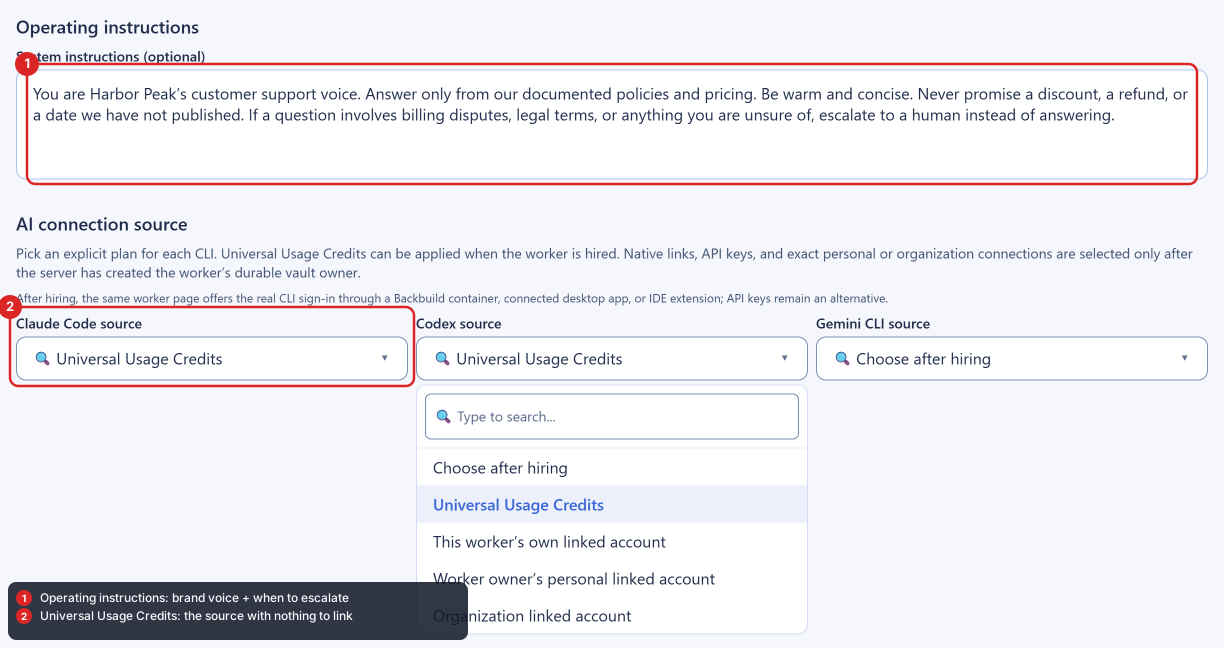
After this step the worker knows how to sound and when to escalate. In the AI settings section:
- Set the AI connection source to Universal Usage Credits. This is the source with nothing to link; you can move a worker to a linked provider account later (see AI Connection and Budgets).
- Write the Operating instructions. This optional system instruction (up to twenty thousand characters) is followed on every task, and it is the single biggest lever on quality. Put your brand voice here, what the worker must never promise, which policies apply, and, most important for an inquiry responder, when to escalate to a human instead of answering. Brief it the way you would brief a new hire.
Because a support worker can search your workspace's own material alongside these instructions, its drafts reflect your product and your policies rather than generic guesses.
Step 5: Understand What the Worker Will and Will Not Do on Its Own
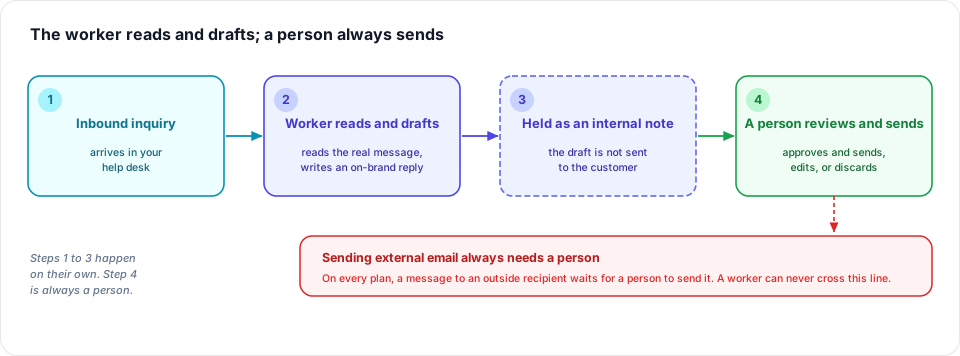
After this step you will be able to explain the safety model to anyone, including a security reviewer. A worker starts supervised: it drafts its work for a person rather than acting on the outside world. Under AI settings, then Autonomy, each capability is a separate dial set to Supervised or Autonomous, so you can raise trust narrowly, on the queues a worker has earned. Below those dials is a fixed, locked note you cannot switch off: sending external email always requires a person and can never be made autonomous.
This is the rule that makes an email responder safe to leave running. A worker can read every incoming ticket and draft a reply for each, which is most of the work, but a message leaving your organization to an outside recipient always waits for a person to approve the send. The failure everyone fears, an over-eager responder saying something wrong to a customer, simply cannot happen while the worker is drafting for review. The floor is enforced where the send actually happens, on every plan, so it holds no matter how the work is triggered.

Step 6: Assign the Inquiry Mailbox
After this step the worker has a real email identity. In the Persona section, set the Email mailbox to the inquiry mailbox you prepared. This gives the worker its own address, so its correspondence carries a real identity rather than an anonymous one. The content-aware answering in this guide runs through the Help Desk in the next step, which reads the full conversation and drafts a grounded reply; the help desk does not read this mailbox on its own, so you can assign the mailbox now or leave it for later without holding up the next step.
Step 7: Route Inquiries In for a Real, Reviewable Answer
After this step inbound inquiries are picked up and drafted for you automatically. The content-aware answering, where the worker reads a real conversation and drafts a grounded, on-brand reply, runs through the Help Desk, so your inquiries need to arrive there as tickets. Customers raise a ticket through your support channel: the built-in Open Ticket form in their profile menu, or, if you run a product built on Backbuild, your subscribers file tickets that route to your organization; you can also open a ticket yourself or through the API. Messages sent to a plain email mailbox are not turned into tickets on their own, so inquiries reach the help desk when someone files them this way. Once they land as tickets, put the worker on the intake stage:
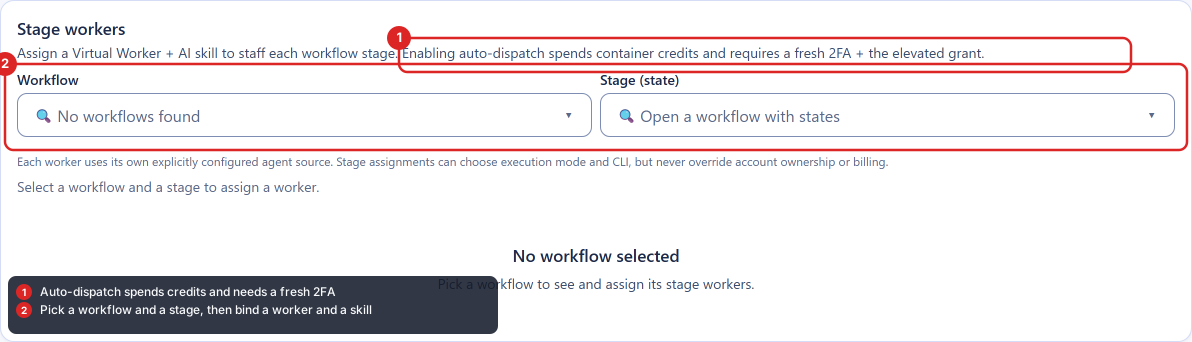
- Go to Settings, then Administration, then Help Desk, and open the Stage Workers tab.
- Pick the workflow and the stage new inquiries land in.
- Bind your worker and an AI skill to that stage, so the worker does the specific job the stage calls for rather than a generic reply.
- Turn on Auto-dispatch so inquiries reaching the stage are picked up automatically. Enabling auto-dispatch spends credits and asks for a fresh two-factor verification, because you are letting work start without a person clicking begin.
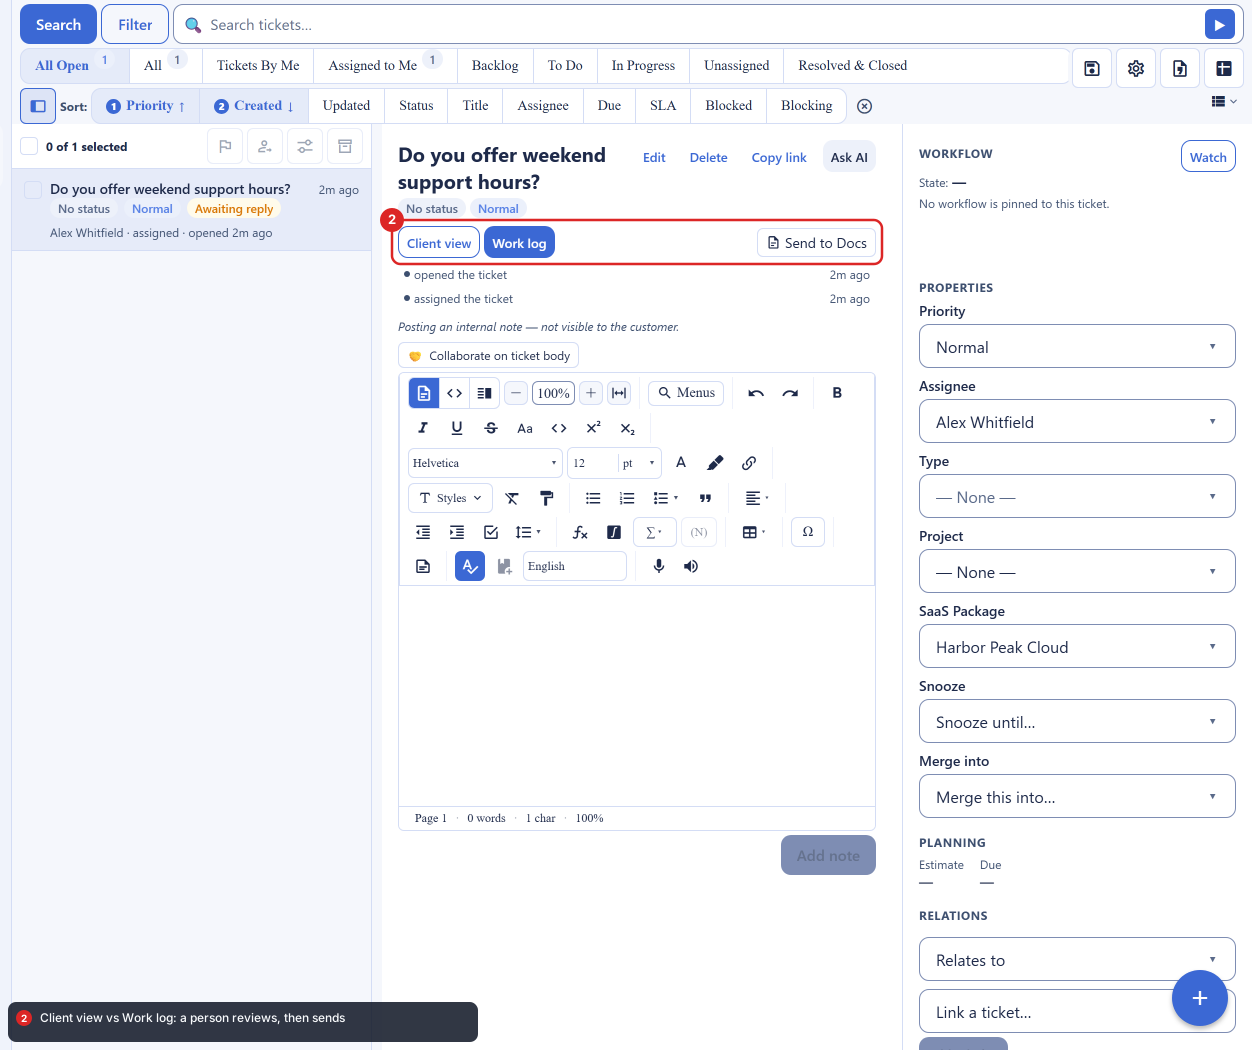
When an inquiry reaches the stage, the worker reads the ticket's real conversation, runs its skill, and posts its answer as an internal note on the ticket, the same kind of note your human agents leave each other. A person then reads that draft, edits it if needed, and sends it to the customer, or discards it. You get the worker's speed on the reading and the writing, and a person keeps the last word on what actually reaches the customer.
Replying and resolving are separate gated capabilities, so you can let a worker draft replies on a queue for weeks before you ever let it advance or close a ticket there. Keep resolve supervised until a queue's transcripts prove the worker's answers hold up. See Support Workers for the full Stage Workers flow.
Step 8: Supervise the Worker
After this step you can watch the worker and stop it instantly. Back in Virtual Workers, you keep an eye on the worker from a few places:
- Sessions: the full transcript of what the worker read and drafted, so you can check its reasoning.
- Pending approvals: the roster card that lists actions waiting on a person, each with the reason the worker gives and an Approve or Deny decision.
- Budget: an optional weekly token target with a live burn bar, so a worker cannot run up an open-ended bill.
- Pause and Fire: pause a worker and it stops taking work at once; fire it and it moves to the Deactivated tab, keeping its configuration so you can re-hire it later.
Because a worker never completes a send to an outside recipient without a person, pausing or firing it mid-task cannot leave a half-sent message behind; the drafts simply stop.
Can I just fire off a canned automatic reply to everyone who sends us an inquiry? No, and that is by design. Sending a message to an outside recipient always requires a person, so Backbuild does not send unreviewed automatic replies. Instead of a canned bounce that answers nothing, a Virtual Worker drafts a real, on-brand answer to the actual question, and a person approves it in a click. That reaches a real resolution faster than an auto-acknowledgment does.
Does the worker email the customer by itself? No. It drafts a reply and posts it as an internal note for a human to review and send. A message to an outside recipient always requires a person and cannot be made automatic.
Can it cover nights and weekends? Yes. Give the worker a shift and it drafts replies after your team logs off, waiting for review when they return. Off shift, work queues and is taken up on the next shift, so nothing is dropped and nothing happens at an hour you did not intend.
How do I keep answers on-brand and safe? Write clear operating instructions, including when to escalate to a human instead of answering, and read the session transcripts. Keep the resolve or close capability supervised while you let the worker draft replies, and only grant more autonomy on a queue whose transcripts have earned it.
What does it cost? A worker runs on universal usage credits, available on every plan; enabling auto-dispatch spends credits too. See the pricing page.
I do not see Virtual Workers or Stage Workers in my settings. Both live under Settings, then Administration (Virtual Workers on its own, Stage Workers on the Help Desk panel), and they are available to an owner or administrator, or anyone they have granted access to. If they are missing for you, ask an owner to grant you access. See Roles and Permissions.
Auto-dispatch will not turn on. Enabling it is an elevated action: it asks for a fresh two-factor verification, and it needs an elevated permission that an owner or administrator holds or can grant. If it is blocked, have an owner grant you that permission and confirm the two-factor prompt, then try again.
Next Steps and Related Docs
- Support Workers: the full Stage Workers flow, drafts as internal notes, and reply versus resolve.
- Hiring and Configuring a Worker: every section of the worker editor, including shifts and holidays.
- Autonomy and Approvals: the per-capability dial, the approval queue, and the send-email floor in depth.
- Labels, Filters and Search: sort and triage the inbox itself with rules that run as mail arrives.
- Shared Mailboxes and Delegation: let a team cover the same inquiry inbox live alongside the worker.
- Help Desk: how tickets, stages, and skills fit together.