

Editing Photos: The Non-Destructive Editor
This guide teaches the Backbuild Photos editor: a professional, layer-based image editor that opens right in your workspace and never overwrites your uploaded original. After it you will understand the four-region layout, the layer and masking model, the selection and retouching tools, the adjustments and filters, the vector and type tools, the transform and develop panels, and how version history keeps every look recoverable. It is written for someone who knows a real editor and will test whether this one is real, so it is also direct about what is not here.
Non-destructive means your original is never touched. Your uploaded file is content-addressed and kept immutable. Every change lives in an edit document, a stack of layers and operations, and saving writes a new rendered image alongside the original while recording the lineage from the source. That lineage is a version history you can branch from, so a figure or a hero image can always be reproduced or re-exported from the source bytes.
The Four-Region Layout
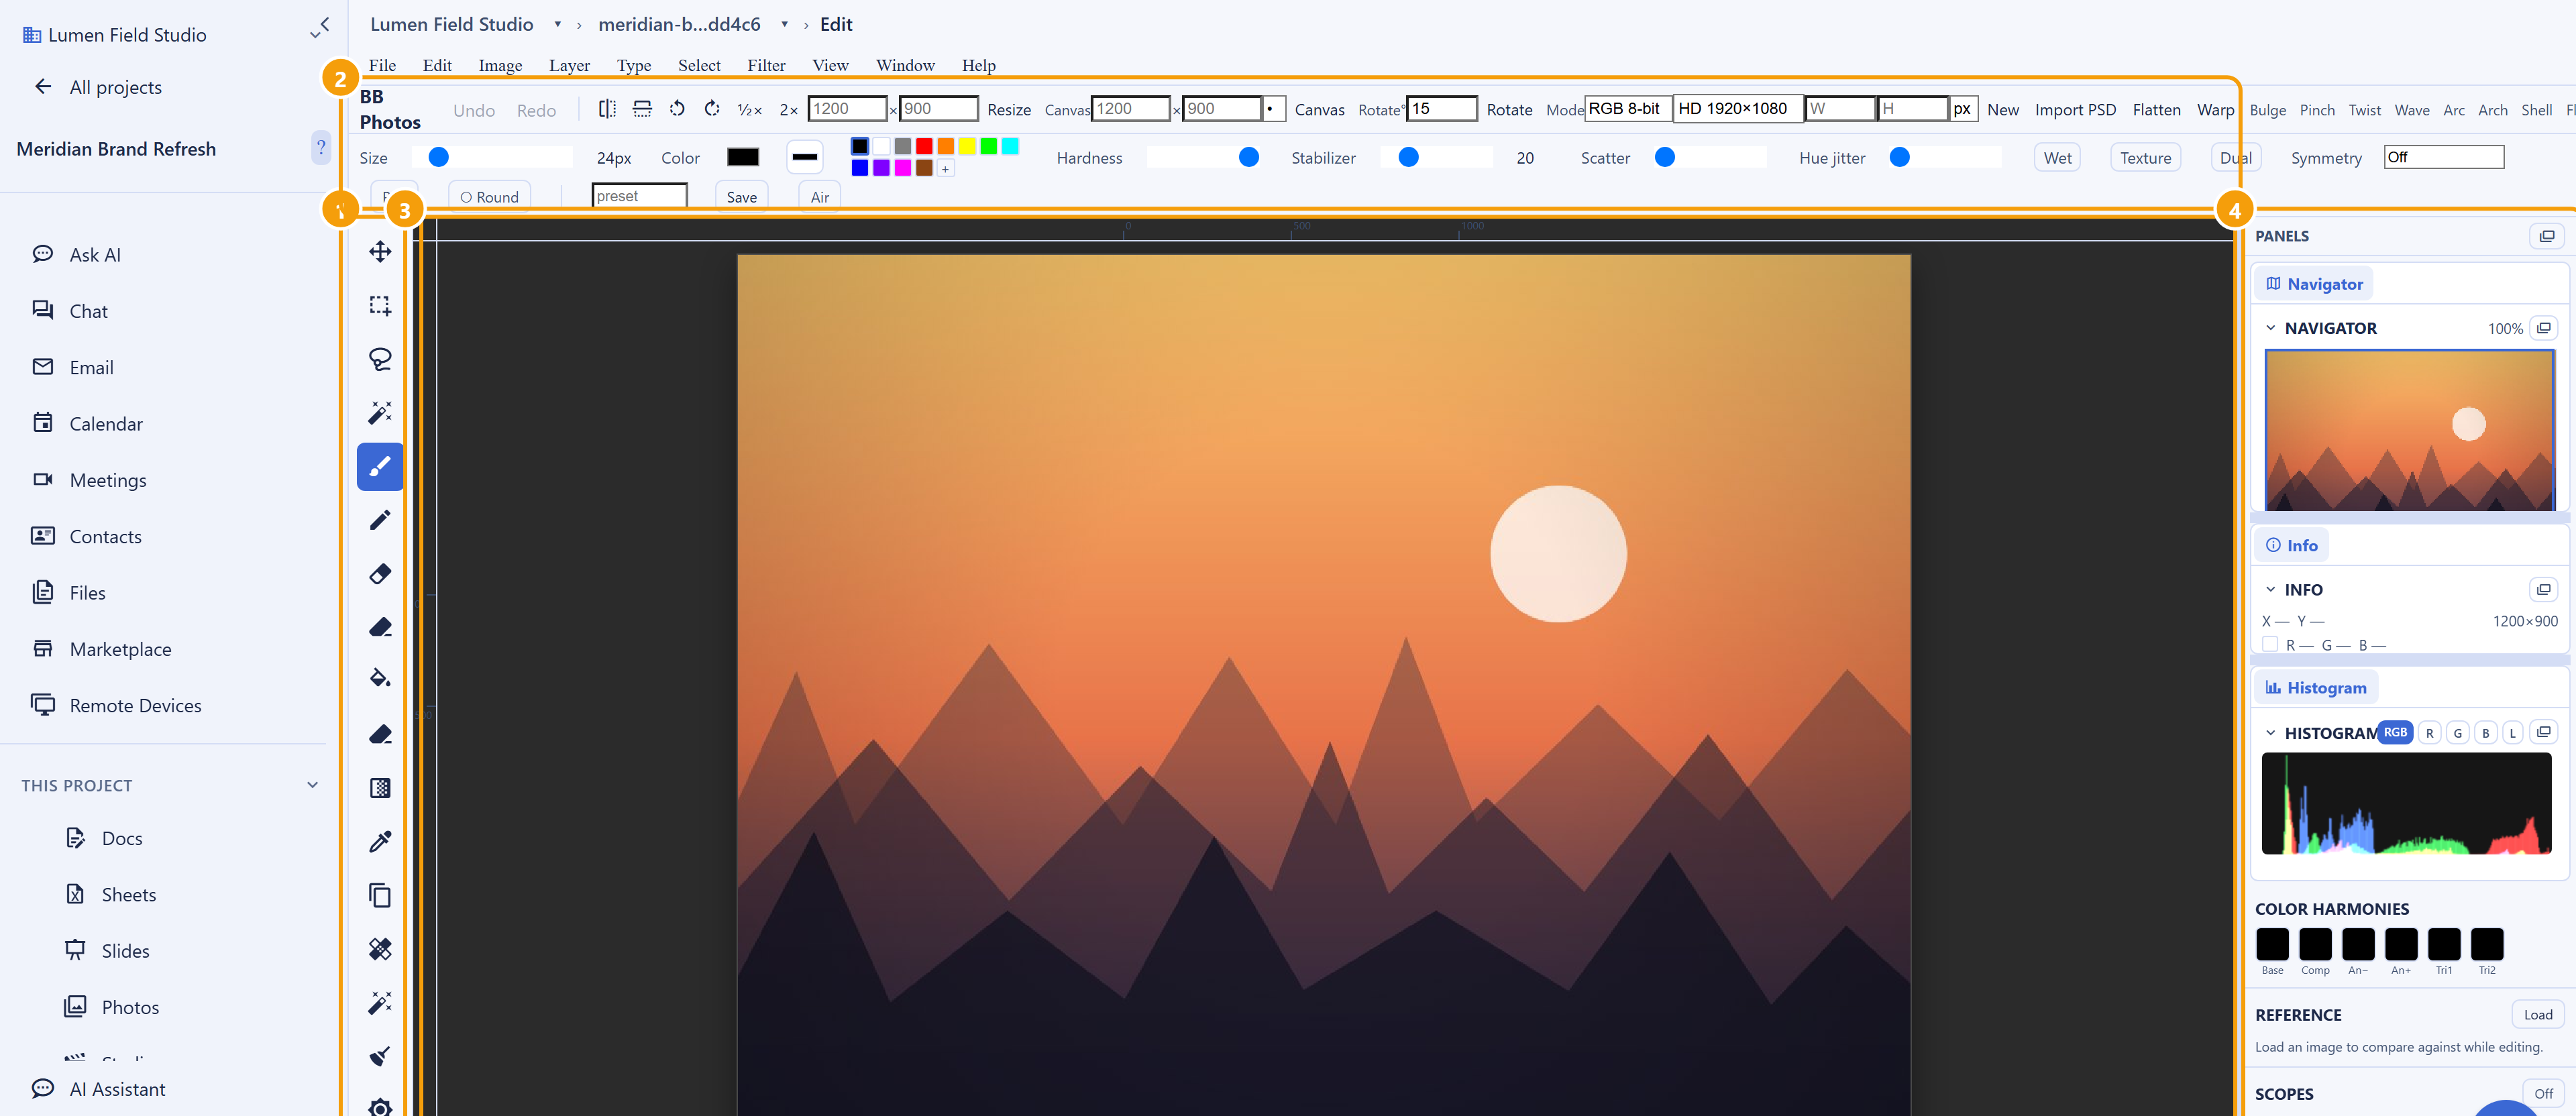
After this section you will find your way around. Open an image with Edit, or double-click it, and it opens in a familiar four-region workspace.
- The tool palette down the left edge holds the move, selection, brush, retouch, gradient, shape, pen, type, and crop tools.
- The menu bar and options bar across the top hold the menus and the settings for whatever tool is active.
- The canvas in the center, with zoom and pan, rulers and guides, a grid, smart guides and snapping, a Navigator, and a pixel grid at high zoom for precise work.
- The panel stack down the right edge holds the layers, adjustments, history, and property panels. Any panel tears off into a floating, draggable window, and its position is remembered.
The editor composites on the GPU for speed, with a reliable path for export, so large documents stay responsive while you work.
Layers, Masks, and Blend Modes
After this section you will build up an edit the way a professional does. The editor is fully layer-based:
- Layer types: raster, vector, text, adjustment, fill, and smart-object layers.
- Organize: group layers into folders, reorder them, set per-layer opacity, and lock a layer's pixels, position, or all of it. Hide and show any layer.
- Blend modes: a full set of around twenty-seven blend modes for compositing.
- Masks and styles: add a layer mask to hide part of a layer without deleting it, clip one layer to another, and apply layer styles.
- Align and distribute layers precisely, and use a frequency-separation workflow for high-end retouching.
Selections and Masking
After this section you will isolate exactly the region you want. The selection toolset is complete: rectangular and elliptical marquee, lasso and polygonal lasso, magic wand, a quick-select brush, and select-by-color. Refine any selection with Grow, Shrink, Smooth, Border, Feather, and Invert. Turn a selection into a mask and a mask back into a selection, and use a Select and Mask refine workspace with edge-aware matting for hair and fine edges, outputting the result to a clean mask. A quick-mask mode and marching-ants preview round it out.
Painting and Retouching
After this section you will paint and repair. The brush engine supports spacing, hardness, flow, a stabilizer, and pen-pressure dynamics. On top of it you get an eraser; a clone tool; spot healing that fills from surrounding content; content-aware fill for a selection; dodge, burn, and sponge; a gradient tool with linear, radial, angle, reflected, and diamond styles and a multi-stop editor; a paint bucket; and smudge, blur, and sharpen.
Adjustments and Color
After this section you will grade an image with control. The adjustments cover Levels, Curves with editable points, Exposure, Hue and Saturation, Color Balance, Selective Color, a full Channel Mixer, Black and White, Vibrance, Threshold, Posterize, Gradient Map, a Photo Filter for warm and cool casts, Auto Tone, Auto Contrast, Auto Color, and White Balance. A live histogram and per-channel and luma scopes show you what the numbers are doing.
Most tonal and color adjustments are available two ways: as a one-shot operation that bakes into the active layer, and as a re-editable adjustment layer you can turn off or retune later. A few adjustments, including Color Balance and Black and White, are applied from the adjustments panel as a direct operation rather than as a re-editable layer with sliders; reach for the panel when you want those.
Filters and the Smart-Filter Graph
After this section you will apply effects you can still change your mind about. The filter set includes Gaussian, box, motion, and radial blur; unsharp and smart sharpen; noise reduction; high-pass; find-edges; emboss; pixelate; solarize; dehaze; defringe for chromatic aberration; lens profile correction; and a custom convolution kernel.
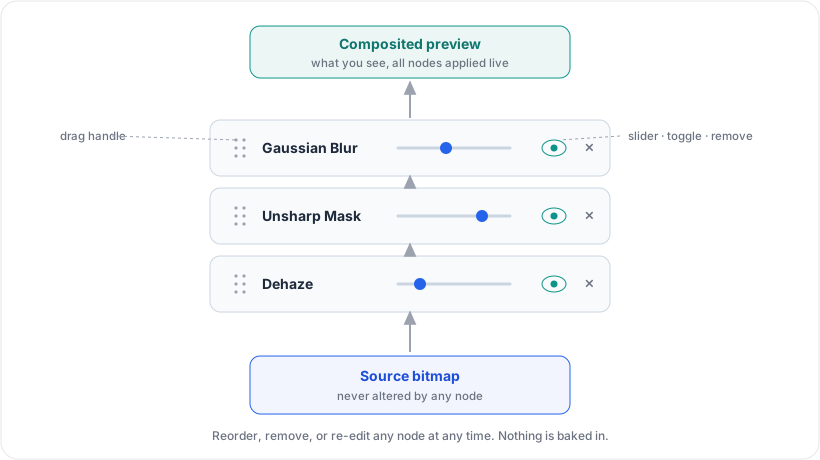
The standout is the smart-filter graph: a stack of live, non-destructive filter nodes you can reorder, remove, and re-edit, each with its own parameter sliders, all sitting above a source bitmap that is never altered. You can dial a blur back a week later, or drop a sharpen out of the stack, without starting over.
Vector and Type
After this section you will add crisp shapes and text. A full pen toolset (standard, curvature, and freeform) with node editing and boolean path operations (union, subtract, intersect) lets you draw and convert paths, and turn a path into a selection. A shape library covers rectangles, rounded rectangles, ellipses, lines, arrows, triangles, polygons, stars, and custom shapes, each with a stroke and fill and optional dashes. For text you get point text, paragraph and frame text, text inside a shape, type on a path, warped text, and vertical type, with Character and Paragraph panels for font, size, color, leading, tracking, and alignment, plus a live font-search preview. Rasterize type when you need it baked into pixels.
Transform, Geometry, and Develop
After this section you will reshape and develop. Free transform, mesh warp, liquify (push, bloat, pucker, and twirl), perspective crop, lens correction, crop and straighten, canvas extension, content-aware resize that protects the subject, and an edge-directed upscale are all here. A Develop panel gives a photographer the familiar controls for camera RAW and high-bit-depth images: exposure, temperature and tint, contrast, highlights, shadows, whites, blacks, vibrance and saturation, a parametric tone curve, white-balance presets, and capture sharpening. On sixteen-bit images, a deep-buffer path preserves highlight latitude while you work.
Formats You Can Open and Export
After this section you will move files in and out. The editor reads PNG, JPEG, WebP, GIF, BMP, TIFF, HEIC, and AVIF, plus camera RAW and DNG through their embedded preview, and it reads and writes Photoshop PSD with layers preserved, so a file can round-trip with a collaborator who is still on a desktop tool. Flatten and export produce a new asset in the format you choose; the source stays intact underneath.
Version History
After this section you will never lose a look. Because the original is immutable and each save is a new rendition, the images you save form a branchable version history. Open the version history from the lightbox to see the lineage from the source, and branch a new edit from any earlier point. Flattening and exporting is the one action that produces a permanent, separate file; it never changes what came before.
Honest Limits of the Editor
This editor is genuinely layer-based and non-destructive, and it goes well beyond a consumer photo app. It is not a full replica of every corner of a decades-old desktop suite, and if one of these is a hard requirement, weigh it before you switch:
- Feathering is not applied by every tool. A feathered edge is honored by the mask, clear, and gradient paths; a paint-bucket fill, a crop, and a move produce a hard edge rather than a soft one. When you need a soft transition, work through a mask.
- A few adjustments are panel-only. As noted above, Color Balance and Black and White apply from the adjustments panel rather than as a re-editable adjustment layer with its own sliders.
- RAW uses the embedded preview. Camera RAW files are developed from their embedded full-size preview rather than a from-scratch sensor decode, so develop latitude is bounded by that preview rather than the full sensor headroom.
- Exported text depends on available fonts. When type is rasterized or flattened for export, it renders with the fonts available in your environment; for perfectly portable text, rasterize while you can still see the intended result, or keep the layered document.
- No machine-learning restoration set. Machine-learning denoise, sky replacement, colorize, style transfer, depth blur, and photo restoration are not here. Background removal, subject select, upscale, and denoise ship as fast classical engines, which are excellent on clean images and degrade on genuinely hard cases. The prompt-based AI tools are covered in AI Image Tools.
- No pro long-tail yet. Recorded actions and batch macros, channels-as-alpha automation, print and prepress and CMYK output, OpenType and variable-font features, a glyphs panel, and spellcheck are not available today.
Does PSD really round-trip with layers? The editor reads and writes PSD with the layer stack preserved, which covers a normal hand-off with a collaborator on a desktop tool. As with any cross-application PSD exchange, a very complex file can lose fidelity on constructs the other tool implements differently; for critical work, check the round-trip on your actual file.
Are adjustments non-destructive? Most are, as re-editable adjustment layers you can retune or switch off, and filters can live in the re-editable smart-filter graph. A one-shot operation bakes into its layer, and the handful of panel-only adjustments above apply directly. In all cases your uploaded original is untouched and every save is versioned.
Can a browser editor handle a big file without choking? It composites on the GPU and stays responsive on realistic documents. As with any editor, extremely large canvases and very deep layer stacks are heavier; work at a sensible resolution and the experience holds.
What bit depth and color does it keep? It works in high bit depth on RAW and sixteen-bit images with a deep-buffer path that preserves highlight latitude, and exports to the format you pick. Print-oriented CMYK output is not available today.
Where to Go Next
- AI Image Tools: generate a fill, expand the canvas, or remove an object from a prompt.
- Your Library, Albums, and Slideshows: organize and present the results.
- Sharing, Access, and Governance: send a finished image with the right access.